Search tips
- To search in a subset of topics, select
 in the search field and select a filter.
 - To search for a specific word or phrase, add quotation marks around it (example: "budget column") in the search field.
- To remove highlighting on the search terms in a topic, select
 .
. - To search within a topic, select
 , press Ctrl+F, and enter the search term.
In the settings, you can change the general settings for drawing sets, drawings, specifications, and record types. The settings are saved automatically.
- Open the record settings.
- Select the record type.
- On the settings menu, select General.
Applies to: Drawing sets drawings, specification sets, specifications, all record types except AFPs, CORs, contract invoices, contracts, general invoices, PCOs, PCCOs, POs, and SCOs
If you make an item type available, anyone with the related permissions can view, create, and edit the items.
To ensure that you can process specification documents in specification sets, turn on the setting for specifications.
In submittal records, the Submittal Package field displays the:
- Submittal package records if submittal packages are available.
- Submittal Package lookup list if submittal package records are unavailable.
Lookup items are removed from the field, but they are restored if you make submittal packages unavailable again.
Submittal package record links are removed from the field, but they are restored if you make submittal packages available again.
- In the General section, select the Enable ItemType checkbox.
Applies to: Budgets
You can select which column amounts appear in the banner at the top of the budget.
- In the Banner section, select an option for each field.
Applies to: AFPs
When you add a PCCO to an AFP, the setting for consolidating COs affects how the change orders are added to the Detailed Items grid:
- If the setting is off, each PCO that's linked to the PCCO is added as a separate line item.
- If the setting is on, the PCCO is added as a single line item.
- Select the Consolidate COs toggle.
Applies to: PCOs
When you add new items to potential change orders, the default budget and cost allocations are selected automatically.
- In the General section, from the Default Bdgt Allocation list, select an allocation.
- From the Default Cost Allocation list, select an allocation.
Applies to: Contract invoices, contracts, general invoices, PCOs, POs, and SCOs
You can set whether the Approved for Budget toggle is on or off when new records are created.
For contract invoices, you can also set the default budget approval for users without the Can Access Contract Invoices for All Companies permission.
- In the General section, turn the Default Approved For Budget toggle off or on.
- In the contract invoice record settings, turn the Default Approved For Budget for Users with Limited Access toggle off or on.
Applies to: Contracts
When you create a contract, the default contract rule is selected automatically.
- In the General section, from the Default Rules Code list, select a rule.
Applies to: Drawing sets
When you create a drawing set, the default drawing group is selected automatically. The drawing group is part of the unique key that identifies each drawing.
For drawings in the drawing set, the default drawing group or lookup list is used. If a source in the following list is unavailable, the next one is used:
- Default drawing group for drawing sets
- Default drawing group for drawings
- First option in the Drawing Group lookup list
You can change the default group for drawings in the field attribute settings.
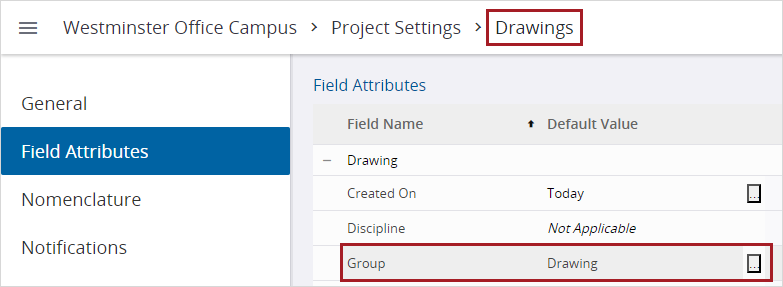
Default group for drawings in the field attribute settings
- In the General section, from the Default Group list, select an option.
Applies to: Drawing sets, specification sets, specifications, all record types except daily reports
You can select which users have access to an item type.
- Other factors also affect a user's access to specific records.
- Regardless of the sharing setting, all PCOs and PCO items are available for linking to CORs, PCCOs, and SCOs. Linked PCOs and items are visible to all users in those records.
- In the Default record sharing access section, select an option:
- Entire project: All project users, regardless of their involvement. In the Sharing panel of new records, the Entire project option is selected by default.
- Companies participating on the record: Only users from participating companies. In the Sharing panel of new records, the Participating companies option is selected by default.
- In the Update existing records dialog, select an option:
- Yes: The selected option is applied to all existing records, including locked records and draft records from other users, and is the default for new records.
- No: The selected option is not applied to existing records but is the default for new records.
- Cancel: No changes are applied, and the sharing setting reverts to the previous selection.
- If the Companies participating on the record option is selected, select the PrimaryCompany may always access all ItemType checkbox.
Users from the primary company, defined in the Project form, have access regardless of their involvement or the sharing setting in the record. However, they must have the View permission.
Users from the project's primary company, Company A, are allowed to access all RFIs. A user from Company B creates a non-draft RFI and limits access to participating companies. Company A users with the View permission for RFIs can view this RFI even though Company A is not a participating company.
Applies to: Contracts
When you create new contracts, the default retainage values are filled in automatically on the Detail tab.
- In the General section, in the Default Stored material retainage amount field, enter the default percentage.
- In the Default General work retainage amount field, enter the default percentage.
Applies to: Purchase orders
When you create a purchase order, the Ship To field is filled automatically with the job address, telephone number, and fax number from the Project form.
The default telephone and fax numbers are added to the Ship To field only when the default address is also used.
- In the General section, turn on the following toggles:
- Use Job Address as Default Ship To
- Use Job Tel/Fax in Default Ship To
Applies to: Specification sets
When you create a specification set, the default specification group is selected automatically. The specification group is part of the unique key that identifies each specification.
- In the General section, from the Default Group list, select an option.
Applies to: Budgets
You can control how certain budget columns are calculated. These settings affect the budget grid and reports.
- In the Field Calculations section, turn the Include Forecast Cost in Actual Cost To Complete and Actual Percent Complete toggle on or off.
- On: The Actual Cost To Complete and Actual Percent Complete columns are based on the Forecast Cost amount.
- Off: The Actual Cost To Complete and Actual Percent Complete columns are based on the Projected Costs amount.
- In the Field Calculations section, from the Over/Under Calculation list, select an option:
- Cost - Budget: The Current Over / Under, Projected Over / Under, and Forecast Over / Under columns are calculated using the cost minus the budget. A positive value represents a loss because the cost is greater than the budget.
- Budget - Cost: The Current Over / Under, Projected Over / Under, and Forecast Over / Under columns are calculated using the budget minus the cost. A positive value represents a savings because the budget is greater than the cost.
In the budget banner, the tooltip indicates how the over / under columns are calculated. After you change this setting, close and then reopen the budget to see the updated tooltip.
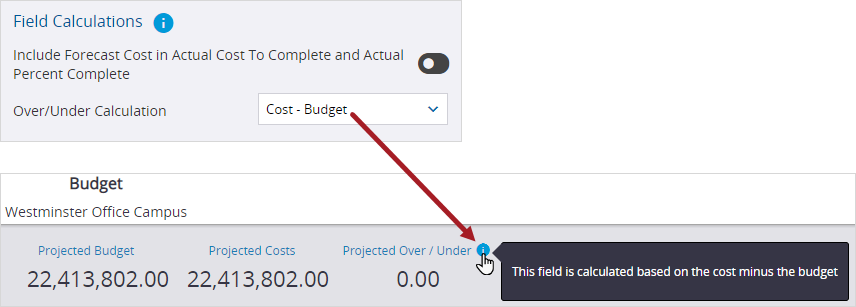
Budget tooltip for the over/under fields
Applies to: Daily reports
You can set how the crew information is displayed in new labor cards:
- Basic (hours/days): The labor card displays the total hours or days.
- Basic (workers & hours/days): The labor card displays the number of workers and the total hours or days.
- Detailed: The labor card displays the number of workers, the budget codes, the total hours or days, and a detailed grid of the company contacts that are assigned to the crew.
You can also add workers when you add a labor card to a daily report. However, those workers aren't added to the Contacts tab of the company.
- In the Labor section, from the Document As list, select an option.
Applies to: Daily reports
You can set the unit of measurement for the labor summary in daily reports. When labor details are added for a crew, the quantity is converted for the summary based on the hours per day from the Crews tab of the company record:
- If the labor is summarized in days, and the labor card uses hours, the logged hours are divided by the hours per day.
- If the labor is summarized in hours, and the labor card uses days, the logged days are multiplied by the hours per day.
- In the Labor section, from the Summarize As list, select an option.
Applies to: Drawings, all record types except financial records, specification sets, and specifications
If you make a record type available for linking to drawing annotations, anyone with the related permissions can select it from the list for linking records.
For information records, you can only link to existing records. You can't create or copy a record from the drawing annotation.
- In the General section, ensure that the Enable RecordType checkbox is selected.
- Select the Enable Linking to Drawing Annotations checkbox.
Applies to: Drawing sets, all record types except daily reports, general invoices, and meeting minutes
You can set up autonumbering, so the item number is incremented for each new item. The generated number is unique for that item type in the current project. The number is the next available one after the last generated number.
Autonumbering doesn't include letters or formatting.
- In the Numbering section, select the Auto Increment Numbers checkbox.
- In the Number of Characters field, enter the minimum number.
- The first item number is 01.
- The next item number after 99 is 100.
You set the minimum number of characters to 2.
The Number of Characters field always applies to child records such as PCO items, but those record numbers are still editable.
- In the Number of Characters field, enter the minimum number, and then press Enter.
- In the Update Number of Characters dialog, select Yes.
For existing non-draft records, zeroes are added to or removed from the beginning of the record number.
For records that were created when autonumbering was off, the record number isn't updated.
Applies to: Drawing sets, specification sets
When you publish drawings in a drawing set or specifications in a specification set, you can set the default group that will be notified:
- Project Participants: All the project contacts.
- Drawing or Specification Participants: The author, assignees, and courtesy copy recipients.
For drawing sets, notifications are also sent to users who add a comment on the Comments tab.
- In the General section, from the Publish Notification To list, select an option.
Applies to: All record types
You can set the quick upload folder path for files that are uploaded and linked to records. The folder path can contain:
- Subfolders with a backslash (\) between folder names.
- A record variable in the last folder of the path.
- [[Record_Nomenclature]]: Nomenclature for a single record.
- [[Record_Nomenclature_Plural]]: Nomenclature for multiple records.
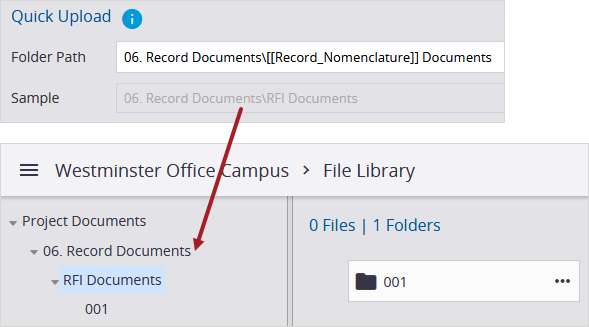
Folder path with subfolder and variable
The following variables are available:
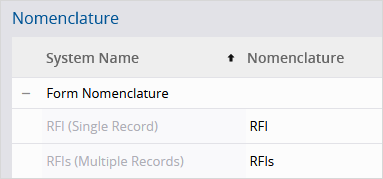
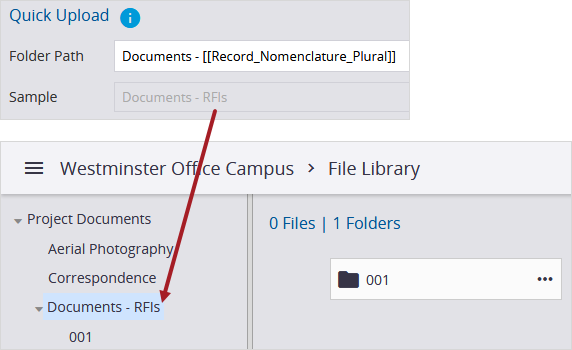
Folder path with variable
If you change the folder path:
- The quick upload folder is updated in the file management system after the next file upload
- A new quick upload folder may be created instead of updating the existing folder, but the files are moved to the new folder.
If you rename or move the quick upload folder in the file management system, it reverts to the folder path from the settings after the next file upload.
- In the Quick Upload section, enter the folder path in the Folder Path field.
A preview of the folder path is displayed below the field.
Applies to: Drawing sets, all record types except AFPs, checklists, contracts, daily reports, PCCOs, SCOs, specification sets, and specifications
When you create a record, the Due Date field is set automatically based on the number of review days after the Created On field. However, you can still edit the dates.
- If the record type uses ball-in-court workflows, the RecordType review time (days) field is unavailable on the general settings page.
- If the review time is set to 0, the Due Date field is empty when a record is created.
- In the General section, in the ItemType Review Time (days) field, enter the number of days.
Applies to: Drawings
You can select how revision numbers are set for uploaded drawings:
- Sequential: If the drawing is the first revision in the drawing series, the revision number is automatically set to the drawing revision default from the field attributes. If the drawing is a subsequent revision, the revision number is incremented automatically based on the drawing marked as Current.
- Extract revision number from title block: The revision number is extracted automatically from the title block of the drawing.
You can also manually edit the revision number for a drawing.
- In the Revision number section, select an option.
Applies to: Drawings
If snapping is on while you draw a measurement annotation, the lines are moved automatically to the nearest point or line in the drawing. If you move or resize that annotation, snapping is no longer applied.
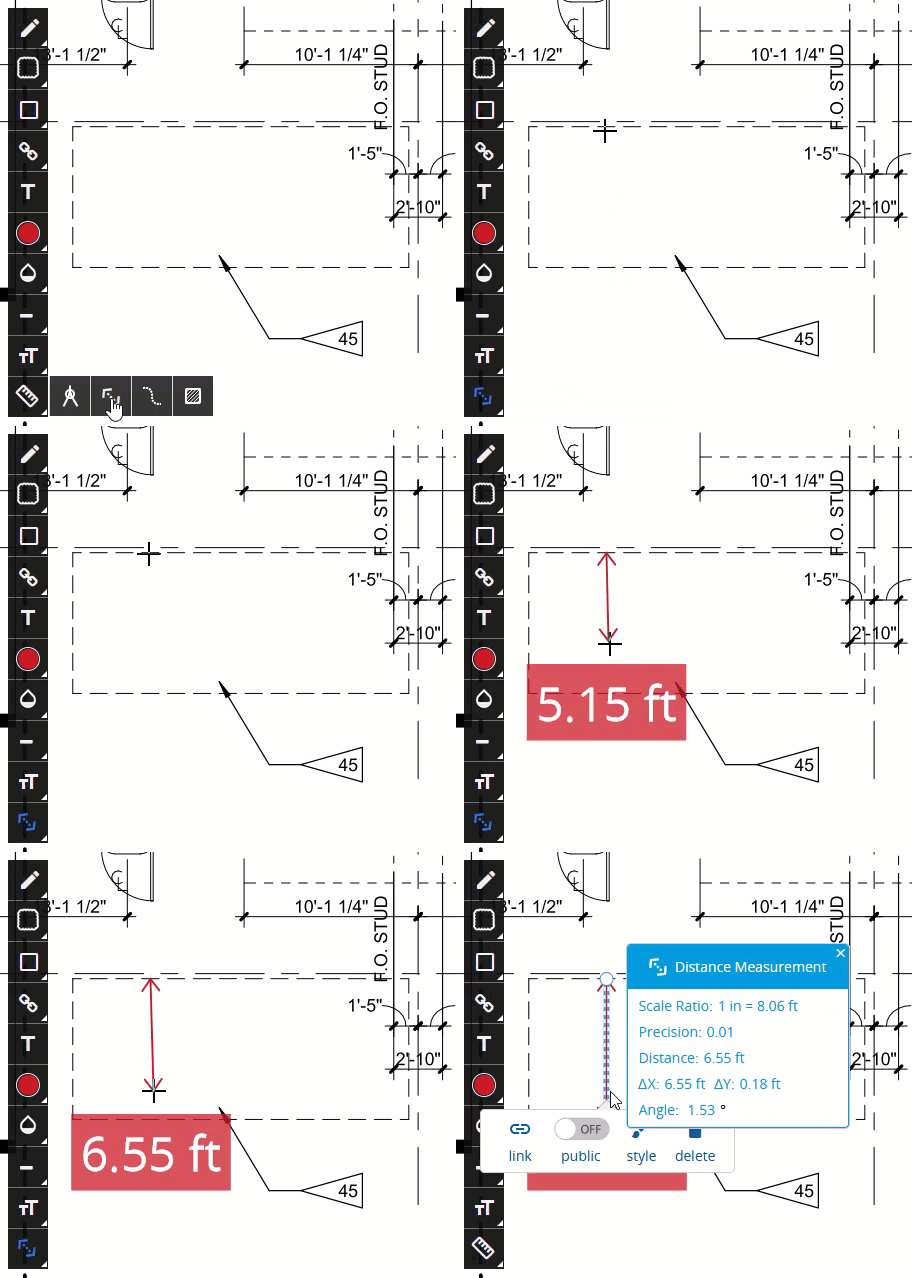
Drawing a measurement annotation when snapping is on
- You can temporarily turn off snapping if you press the Shift key while you draw a measurement annotation.
- Snapping isn't supported in raster drawings.
- In the General section, select the Enable Snapping for Measurement Annotations check box.
Applies to: Drawings
If you turn the superseded stamp on, published drawings with the Not Current status are overlaid with the stamp in the drawing viewer. The stamp is also included when the drawings are downloaded or included in a report.
- If a drawing is included in an emailed report, then marked as obsolete, and then opened from the report, the drawing is overlaid with the stamp.
- This feature is only supported in the ProjectSight web app.
You can use the default image or upload a custom image. The supported file types are .bmp, .gif, .jpg, and .png.
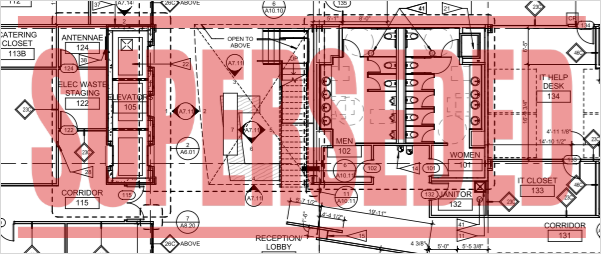
Default superseded stamp on an old revision
- In the Superseded Stamp section, select the Show Superseded Stamp check box.
- Ensure that the Use Default Image toggle is on.
- From the Stamp Position list, select where the stamp will appear on the drawings.
- In the Superseded Stamp section, select the Show Superseded Stamp check box.
- Select Upload.
- Drag the image file from your computer to the Upload Image dialog.
- In the Crop the image dialog, do any of the following:
- To move the image, select and drag the middle of it.
- To resize the image, select and drag a sizing handle.
- Select
(Crop).
- From the Stamp Position list, select where the stamp will appear on the drawings.
—Or—
Select Browse, and then select the image file.

The Use Default Image toggle is turned off automatically.
If you switch back to the default image, the custom image remains in the system so that you can use it again.
Applies to: Transmittals
If this setting is turned on, the telephone and fax numbers are included in the company address when you create a transmittal.
Changes to this setting only affect new records.
- In the General section, turn the Include Tel/Fax in Company Addresses toggle on or off.
Applies to: Budgets
The units and hours setting affects the visibility of the related fields and columns in the following records:
- Budget items
- Contract invoices
- PCOs
- Purchase orders
When the units and hours setting is on, the related columns are available in the budget.
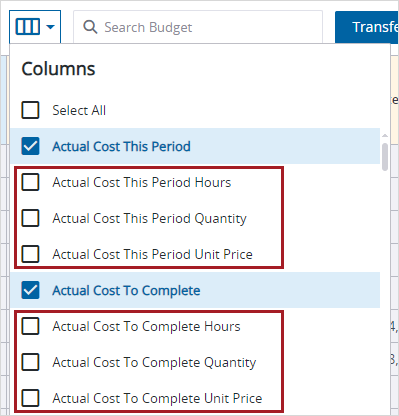
Columns related to units and hours
- If you unlock the budget settings at the project level and then add budget items in the project, the settings can't be locked again.
- You can't turn off the units and hours setting after budget items are added in a project.
- In the General section, turn on the Enable Units and Hours toggle.

Applies to: Daily reports
You can select the unit of measurement for weather details in daily reports. Changes to the default values are only applied to new weather cards.
- In the Weather section, from the UOM list, select an option.

