![]() Search tips
Search tips
- To search in a subset of topics, select
 in the search field and select a filter.
 - To search for a specific word or phrase, add quotation marks around it (example: "budget column") in the search field.
- To remove highlighting on the search terms in a topic, select
 .
. - To search within a topic, select
 , press Ctrl+F, and enter the search term.
ProjectSight Mobile
Take ProjectSight's cloud-based construction project management software with you in the field on your phone or tablet.


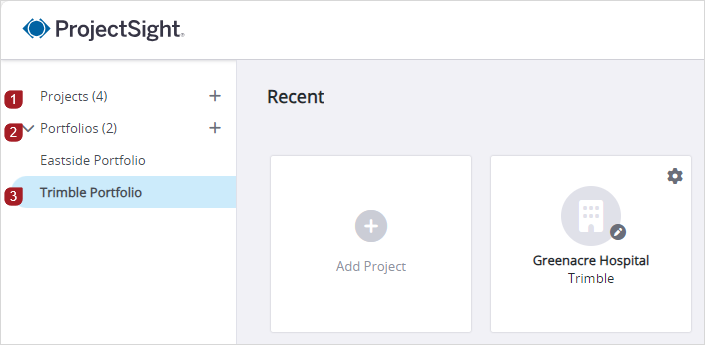
The project selection page displays the portfolios and projects that you have access to:
- Global projects: All the projects, including free projects, that you have access to.
- Portfolios: All the portfolios that you have access to.
- Portfolio-specific projects: The projects that you have access to in each portfolio.
Areas of the project selection page
After you open a project, the following elements are displayed:
- Project overview: The details in the overview come from the Project form. The project overview is available only on screens that are at least 960 pixels wide.
- Project dashboard: The dashboard contains widgets with project information.
- Filter the list of projects.
- From the filter list at the top, select a filter.
- Owned by anyone: All projects that you have access to.
- Owned by me: Projects that you created.
- Not owned by me: Projects that are created by companies other than your own.
- In the search field at the top right, enter the search terms.
- In the View options panel, modify the options.
- If the panel is closed, select
 (View options) on the top-right of the project selection page.
 - In the panel, modify the options.
- To reset the panel options to their defaults for the selected view, select Reset.
- To switch to the tile view, select
 (Tile).
 - To add or remove columns in the list view:
- Select
 (Columns).
 - Select the checkboxes of the columns that you want to add to the list view.
- Select Apply.
- To sort the projects in the list view by a column, select the column.
The panel icon displays a dot if you apply any options in the panel.

—Or—
To switch to the list view, select ![]() (List).
(List).
- Select a portfolio name in the menu to see its projects.
- Filter the list of projects.
- From the filter list at the top, select a filter.
- Owned by anyone: All projects that you have access to.
- Owned by me: Projects that you created.
- Not owned by me: Projects that are created by companies other than your own.
- In the search field at the top right, enter the search terms.
- In the View options panel, modify the options.
- If the panel is closed, select (View options) on the top-right of the project selection page.
- In the panel, modify the options.
- To reset the panel options to their defaults for the selected view, select Reset.
- Select the project tile.
The panel icon displays a dot if you apply any options in the panel.
- On the project selection page, select
 (Settings) on the project tile or row.
—Or—
In the project, select ![]() (Settings) on the banner.
(Settings) on the banner.
- On the dashboard, select
 (Edit) on the navigation toolbar.
—Or—
In the overview on the project dashboard, select ![]() (Edit).
(Edit).
- In the Project form, on the navigation toolbar, select
 (Sharing).
 - In the Link section, select Copy.
- If ProjectSight doesn't have access to your clipboard, the entire hyperlink text is selected automatically. Then you can use keyboard shortcuts to copy and paste it.
- The recipient must have the related permissions to view or edit the item.
The link is copied to your clipboard and is ready to be shared. For example, you can paste the link in an email.
- In the banner, select the project switcher, and then select a project from the list.
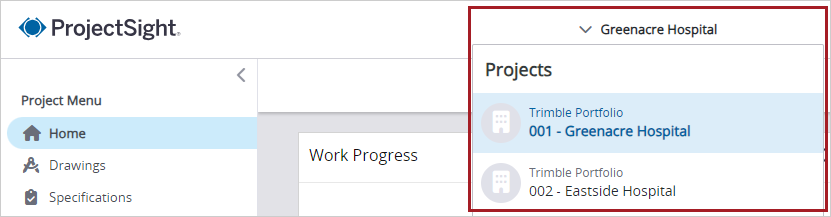
The list only shows projects that you have access to in the same portfolio. To switch to a project in a different portfolio, select My Projects at the bottom of the project menu, and then open the project.
When you create a project, you can use an existing project as a template to copy the project-specific settings, folder structure, and project access.
You can link a Trimble Connect project to your ProjectSight project so that it's selected automatically when you choose a model view for linking. A Trimble Connect project can be linked to only one project at a time. If you create a new project, it has the same name as the ProjectSight project, but you can also change the name later in Trimble Connect.
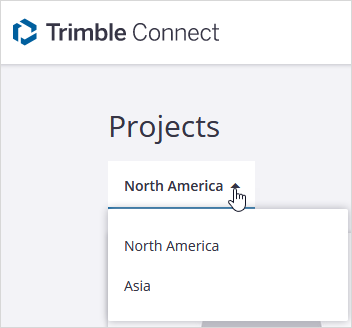
New projects are created automatically in the North America region of Trimble Connect. To link to a project in a different region, create the project in Trimble Connect first and then link it in ProjectSight.
To create a free project, first select Create free account on the project selection page, and set up your account. Then you can create a new project and select the My portfolio (Free Version) option.
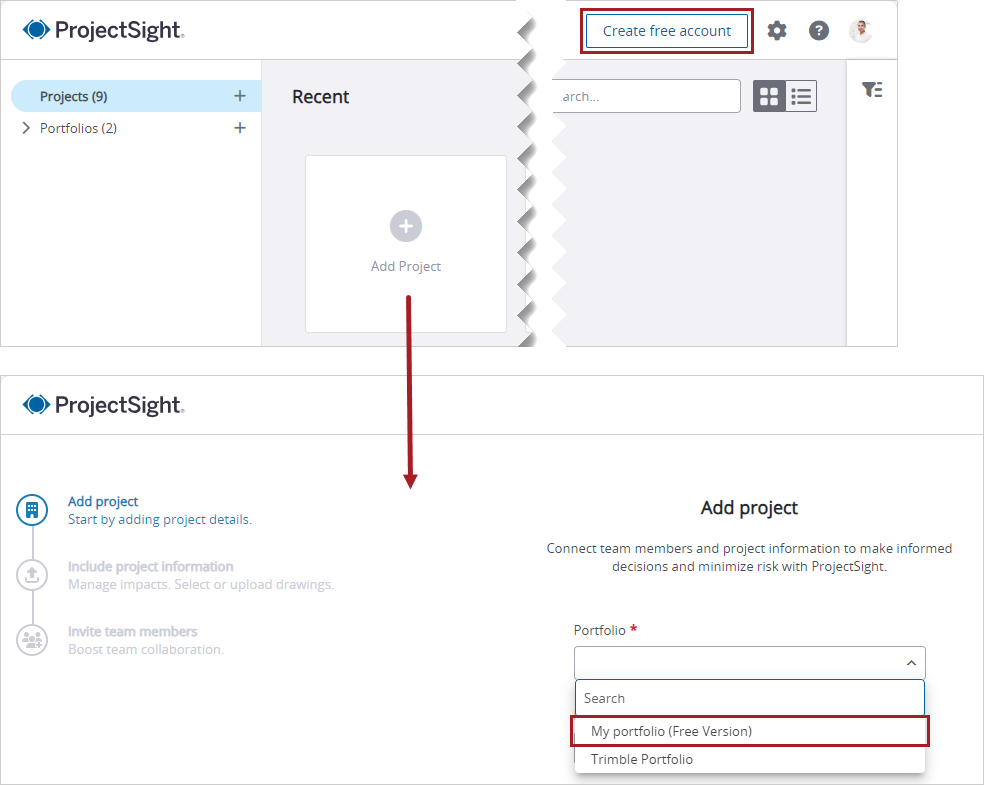
- In the left panel, select
 by Projects.
 - From the Portfolio list, select the portfolio that will contain the new project.
- Enter your project information.
- In the Project Name field, enter the project name.
- To set the project number in the Number field, enter a unique combination of the prefix, sequence, and suffix.
- From the Company list, select the primary company for the project.
- To upload a project photos, select Upload and select a photo.
- Use an existing project as a template.
- This option is displayed if the selected portfolio contains projects.
- You must be an Admin in the Trimble Connect project.
- From the Project template list, select the project that you want to copy.
- To copy the project-specific settings, turn on the Project settings toggle.
- To add all the team members to your new project, turn on the Team members toggle.
- To copy the folder structure and permissions in the File Library, turn on the File Library Folders toggle.
- Link the project to a Trimble Connect project.
- Turn on the Link to Trimble Connect project toggle.
- Select the Trimble Connect project.
- Select Next.
- Upload your project information.
- To include sample data in your project, select the Include sample data checkbox.
- Select Browse, and select one or more drawings (.pdf or .zip files).
- To upload more drawings, select Browse, or drag the drawings to the upload area.
- Select Next.
- Invite team members to collaborate in your project.
- Enter the email address.
- Select the role.
- Select Invite.
- Select Let's go.
—Or—
Select Add Project in the tile view, or select Add in the list view.
The prefix and suffix are optional.
This selection may affect record access for its contacts.
The list displays the projects that you have access to in the portfolio.
PCO markups that are associated with a budget code aren't copied.
The copied folder structure includes folders that are created automatically when you upload and link files.
The list only contains unlinked projects.
—Or—
To create a new project, select Create a Trimble Connect Project, and then select a license.
The sample data includes 2 drawings and an RFI.
—Or—
Drag the drawings to the upload area.
To remove a drawing from the upload list, select ![]() next to the drawing.
next to the drawing.
This step is unavailable if you use a project template and turn on the Team members toggle.
After the project is created, you can enter additional details such as the location and key contacts in the Project form.
You can edit the project details, including information that's displayed on the project home page. Changes are logged on the History tab.
- Open the Project form.
- Edit the basic project information.
- Edit the project name, which is displayed throughout the project.
- Edit the start date and time, which are used for the Work Progress widget on the project home page.
- Edit the address, building type, construction type, and owner, which are displayed in the summary on the project home page.
- In the Contract section, edit the information.
- In the Additional project locations section, edit the information in the grid.
- In the Info for Legal Documents section, edit the information.
- In the Key Contacts section, edit the information.
- In the Notary Public Information section, edit the information.
- Select
 (Save).
You can upload an image that represents the project. The supported file types are .bmp, .gif, .jpg, and .png.
The project image can't be deleted, but you can upload a different image to replace it.
- Select Projects in the left panel.
- On the project selection page, select (Tile).
- On the portfolio tile, select
 (Upload photo).
 - Drag the image file from your computer to the Upload Image dialog.
- In the Crop the image dialog, do any of the following:
- To move the image, select and drag the middle of it.
- To resize the image, select and drag a sizing handle.
- Select
 (Crop).
—Or—
Select Browse, and then select the image file.

You can create a report that only includes the records in the current project or a report that also includes records from other projects in the portfolio.
Linked files aren't included in project reports.
- On the navigation toolbar, select
 (Print report).
 - Select the report template.
- Select the report type.
- Edit the file name.
- If available, select the report format.
- To include records from projects that you have access to, select
 (Open) in the Projects list, and then select the projects.
 - On the button, select
 , and then select an option:
 - View
- File Library
- Download
 Email
Email

 to find or create a contact.
The available options depend on the type of report.
You can export the current project with all of its records and attachments. When the export is completed, each user in the notification list receives an email link to download it.
If you select the As Builts option for drawings or specifications, you can include items that are linked to the visible annotations. When you select an annotation in the downloaded drawing or specification, the linked item is opened. The following linked items are included in the export:
- Linked Records: The default report is generated for each record or specification set and included in the Records folder.
- Hyperlinked Designs & URLs: Linked drawings are included in the Drawings folder, and linked specifications are included in the Specifications folder. In the downloaded item, you can select the annotation to open the linked drawing, model, specification, or URL.
- Files (Linked Files & Photos): The linked files are included in the Files folder.
- The export only includes the records that you have access to.
- Draft records aren't included in the export.
- Each record type is exported as a PDF report, which you can select in the settings.
- If a report isn't selected for the module in the settings, or you don't have access to the selected report or the module, the module isn't displayed on the Project Export page.
- On the toolbar of the project dashboard, select
 (Export).
 - To include a module in the export, select its checkbox.
- To include attachments for a module, select the Include Attachments checkbox.
- To include only the current versions of drawings and specifications, select the Current Versions Only checkbox.
- To include items that are linked to the visible annotations in drawings or specifications, select the As Built checkbox.
- Select users and contacts that will be notified when the export is completed.
- In the Notify section of the panel, select Add.
- Open the list of users, contacts, or distribution lists.
- To open the list of ProjectSight users, select Users.
- To open the list of company and project contacts, select Contacts.
- To open the distribution lists of contacts, select Distribution list.
- Select the checkbox for one or more names or distribution lists.
- To invite a member, select Invite member.
- In the Email field, enter or select the email address.
- From the Security role list, select a security role to make the new team member a ProjectSight user.
- In the First name and Last name fields, enter the name.
- In the Company field, select the company.
- Select Save.
- Select Export.
- Review the export list, and then select Export.
If this checkbox is not selected, all versions are included in the export.
Linked records are included even if their checkbox isn't selected on the Project Export page.
To make sure you can open files that are linked to annotations, select the Include Attachments checkbox.
To view all the contacts in the portfolio, select the Include portfolio contacts checkbox.
The list displays only project contacts or displays all contacts and users, depending on the portfolio setting for company and contact selection.
If you select the checkboxes for some names or distribution lists, and then enter a search term, those checkboxes remain selected even if they're not visible in the filtered list.
This option is available if you have permission to invite members.
If you select an existing email address, the contact's name, company and default security role are entered automatically.
—Or—
Select None (contacts only) to make the new team member a project contact.
—Or—
Enter a new company name, and then select Add.
—Or—
Select Save & add another to invite another team member.
You can permanently delete a project from ProjectSight.
You cannot restore a deleted project.
- Open the Project form.
- Select
 (More) > Delete.
- In the confirmation dialog, type the word DELETE, and then select Delete.
The Delete button is available when you type the word correctly.