Search tips
- To search in a subset of topics, select
 in the search field and select a filter.
 - To search for a specific word or phrase, add quotation marks around it (example: "budget column") in the search field.
- To remove highlighting on the search terms in a topic, select
 .
. - To search within a topic, select
 , press Ctrl+F, and enter the search term.
Specification sets
The Specification sets module is only available in North America.
- The viewer displays the uploaded document.
- The Specification sections panel displays the specifications that were detected automatically when the document was processed.
Specification sets automatically move through the following statuses:
- Processing: The specification set is being processed for specifications.
- Review: The specification set has been processed and is ready for review.
To ensure that you can process specification documents in specification sets, turn on the specifications setting in the record settings.

Specifications settings in the record settings
- In the project menu, select Records > Specification sets.
- In the Specification sets module, select the specification set.
- To change the page transition or page layout, select
 (View Controls), and then select an option.
 - To use the pan mode, select
 (Pan).
 - To open the previous or next specification set based on the list when the current specification set was opened, select
(Previous) or
(Next) on the navigation toolbar.
—Or—
On the specification set tile, select (More) > Open Full Form.
Specification sets can only be opened after they have been processed.
—Or—
To use the select mode, select  (Select).
(Previous) and
(Next) are not available when you open the specification set in a new tab.
- Select
 (Search) on the toolbar, and then enter the search terms in the field.
 - To apply a filter, select the checkbox:
- Case sensitive: Find matches with the same capitalization.
- Whole word: Find exact matches of the search term.
- Open the specification set.
- In the Specification sections panel, do any of the following:
- In the search box, enter the keywords.
- Select
 Filter and then select one or more options.
 - To see the full list of specifications again, clear the keywords and the filters.
The panel displays the specifications with section codes and names that match the keywords and filters.
- Open the specification set.
- In the Specification sections panel, select the specification.
- To view the specification in the full screen, select
 (View Controls) > Enter Full Screen.
You can upload one or more specification documents into a specification set. For the best results for the files that you're going to upload, ensure that:
- The files contain unique specifications without overlapping pages.
- The specifications use this format in the bookmarks or header: SECTION [Spec section code] [Spec section description].
- The word SECTION must be all capital letters.
- If a bookmark starts with SECTION [Spec section code with a non-standard format], the code is used for the Section Code and Specification Section Name fields of the detected specification.
- The spec section code can be detected in the header and the footer if the code uses the standard format of 6 digits or 6 digits plus 2 (example: 11 14 13.16) . The description can be detected if it's on the same line as the code or up to two lines after the code.
- Any spaces and special characters in the code are retained in the specification that is created in the specification set.
- Separators are ignored so that specifications with the same alphanumeric characters (example: 11 14 13.16 and 11 14 13-16) are treated as duplicates.
Example: SECTION 213400 Pressure-Maintenance Pumps
After you upload .pdf files into a new specification set:
- The files are combined into one document and sorted by page number.
- The specifications are detected automatically from the bookmarks, or if no specifications are found, they are identified from the text in the files.
- The division for each specification is taken from the first two numbers of the code. If the division doesn't exist in the settings, this required field is empty.
- Annotations in the .pdf files are flattened so that you can no longer edit or interact with them.
You can edit the specifications and add section breaks for new specifications before you publish them.
The group, spec section code, and revision number combination must be unique across all specification sets in the project.
- On the navigation toolbar, select Add.
- Drag one or more .pdf files to the dialog.
- To remove a file, select
(Remove).
- To upload more .pdf files, drag them to the bottom area of the dialog, or select Browse or File Library.
- Enter a unique name for the specification set.
- From the Group list, select the group, which is part of the unique key of the specification.
- If autonumbering is off, enter a number in the Number field.
- In the Issue date field, enter or select a date.
- In the Received date field, enter or select a date.
- After the files are uploaded, select Done.
- After the files are processed, open the specification set.
- Edit each specification as needed.
- In the Specification sections panel, select a specification.
- In the Current section area of the Information panel, edit the information for the specification.
—Or—
Select Browse, and then select one or more .pdf files.
—Or—
Select File Library, and then select one or more .pdf files.
If you select a file from the file management system, it retains its annotations when it's added to the specification set. Then separate copies of the file are maintained in the file management system and in the specification set. New annotations that are added to the file in one place aren't added to the copy in the other place.
—Or—
Select Create new and then enter a new group.
New groups are added to the lookup list settings at the portfolio and project levels. If this setting is unlocked at the project level, the new group is only added at the project level.
The Specification sections panel flags any specifications that are duplicates or that are missing required information.
The group, spec section code, and revision number combination must be unique across all specification sets in the project.
Changes are saved automatically if you navigate to another specification from the panel.
You can also add assignments and courtesy copies or set access to the specification set.
In the specification set, you can add a section break to create a specification, or you can remove a specification to merge its content with another specification.
When you add a specification:
- If the spec section code and group match a published specification, the specification is a new revision. Annotations that were added to the original specification prior to adding the page break are removed. The annotations from the current version are carried over to the corresponding pages and are marked for review.
- If the spec section code and group don't match a published specification, the specification is a new section. Annotations that were added prior to adding the section break are removed from the pages that are included in the new section.
When you remove a specification:
- If you select the first specification in the Specification sections panel, its content is merged with the next specification.
- If you select a specification that's not the first one, its content is merged with the previous specification.
- If you select all the specifications, their content is merged into one specification.
Specifications that follow a specification in the Publishing, Published, or Obsolete state can't be removed.
- In the viewer, navigate to the page that will be the first page in the new specification.
- On the toolbar, select Add break.
- In the Information panel, in the New section break section, enter the details for the new specification.
- To save the new specification, save the specification set.
Section breaks can't be added to the first page of an existing specification or to specifications in the Publishing, Published, or Obsolete state.
—Or—
If your screen is smaller, select  .
.
The new specification starts from the current page to the last page before the next specification.
The group, spec section code, and revision number combination must be unique across all specification sets in the project.
—Or—
Navigate to a different specification.
- In the Specification sections panel, filter the specifications.
- At the top of the panel, select
(Batch Edit).
- Select the checkbox for the specification.
- Select
(Remove).
- In the confirmation dialog, select Remove.
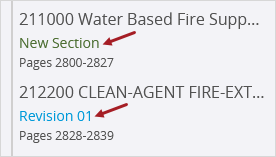
After you upload revisions into a specification set, the Specification sections panel indicates if each specification is one of the following:
- New section: The spec section code doesn't exist in a published specification yet.
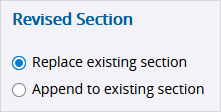
- Revision: The spec section code does exist in a published specification, and the revision number is incremented automatically. The following options are available in the Information panel:
- Replace existing section: Replace the current version with the new revision. Annotations from the current version are copied to the specification and marked for review.
- Append to existing section: Add the new revision to end of the current version. Annotations from the current version are not copied to the specification.
- When a specification is checked to see if it's a revision, special characters and spaces are ignored in the spec section code.
- A specification set can contain only one revision for each specification.
- Create a specification set, and upload the .pdf files with the revisions.
- After the files are processed, open the specification set.
- In the Specification sections panel, select a revision.
- In the Information panel, select what will happen to the revision when it's published:
- If the new revision replaces an existing section and contains annotations for review, keep, edit, or remove the annotations.
Changes are saved automatically if you navigate to another specification from the panel.
If a new revision replaces an existing specification, any annotations, including linked items and comments, from the published current version are carried over to the new revision. The annotations are copied to the same page of the revision at the same location and are marked for review.
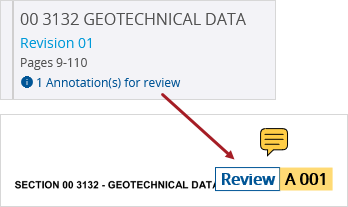
The number of annotations for review may change as another user adds, edits, or removes them in the current version. The annotations are refreshed when you open the specification set, navigate to an unpublished specification, or change the spec section code.
- If an annotation is on a page that doesn't exist in the new revision, the annotation isn't copied.
- The annotations for review include your private annotations and any public annotations.
- If two users edit the same annotation that's marked for review, the latest saved changes overwrite any previous changes.
- Annotation changes that are made in the current version overwrite changes made to the same annotation in the new revision.
- In the Specification sections panel, select the specification with annotations for review.
- On each page of the specification, keep, edit, or remove each annotation that's marked for review.
- To save the changes to the current specification and remove the review indicators, do one of the following:
- Save the specification set.
- Navigate to a different specification.
- Publish the specification.
After you review the unpublished specifications, you can publish all or a selection of them so that they're available in the specification viewer.
Specifications aren't published until the following errors are fixed:
- Duplicate specifications: The spec section code or revision number is changed so that the combination is unique across specification sets in the project.
- Missing required fields: The missing information is added to the required fields.
- Publishing notifications are sent to either all project contacts or only the author, assignees, and courtesy copy recipients of the specification set. Each user can turn off notifications for published specifications.
- Annotations can't be added, edited, or removed in published specifications in the Specification Sets module. However, you can add, edit, and remove the annotations in the specification viewer.
- In the Specification sections panel, filter the specifications.
- At the top of the panel, select
(Batch Edit).
- Select the checkbox for the specifications.
- At the bottom of the panel, select Publish Selected.
- In the confirmation dialog, select who will be notified and then select Publish.
—Or—
To choose all the visible specifications in the panel, select Select All at the top.
These specifications will be compared to the current versions, and the revisions with the most recent Issue Date will be Current. Other revisions will be Not Current.
- At the bottom of the Specification sections panel, select Publish All Sections.
- In the confirmation dialog, select who will be notified and then select Publish.
All the specifications, even any that are filtered out, will be published. Alternatively, you can also publish selected specifications.
These specifications will be compared to the current versions, and the revisions with the most recent Issue Date will be Current. Other revisions will be Not Current.
After a specification is published, you can change its status.
If you change the status of the current version to Obsolete or Not Current, the published revision with the most recent Issue Date changes automatically to Current.
- In the Specification sections panel, select the specification.
- In the Information panel, select Current from the status list.
- Save the specification set.
The status for the previous current version is changed automatically to Not Current.
- In the Specification sections panel, select the specification.
- In the Information panel, select Obsolete from the status list.
- Save the specification set.
- In the Information panel, select Not Current from the status list.
- Save the specification set.
- In the Specification sections panel, select the specification.
- In the Information panel, select Obsolete from the status list.
- In the confirmation dialog, select OK.
- Save the specification set.
The specification is no longer visible in the Specifications view or for linking.
You can download specification sets and their annotations with an optional cover sheet so that you can share them with your team members. If you select the As Builts option, you can include items that are linked to the visible annotations. When you select an annotation in the downloaded specification sets, the linked item is opened.
If the item is linked to a note annotation, select outside of the annotation to open the item.
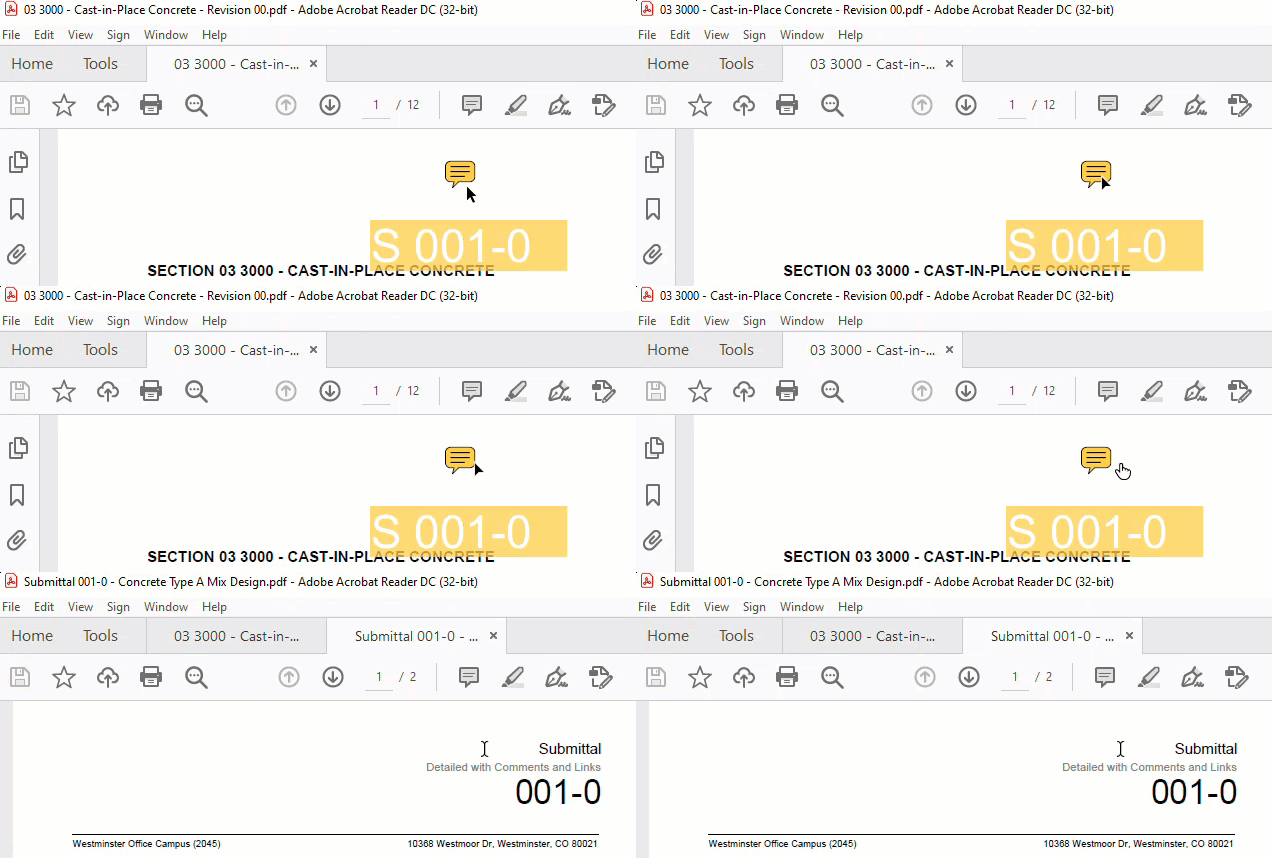
Opening a record that's linked to an annotation in the downloaded specification sets
The following linked items can be included in the ZIP folder if you select the As Builts options:
- Linked Records: The default report is generated for each record or specification set and included in the Records folder.
- Hyperlinked Designs & URLs: Linked drawings are included in the Drawings folder, and linked specifications are included in the Specifications folder. In the downloaded item, you can select the annotation to open the linked drawing, model, specification, or URL.
- Files (Linked Files & Photos): The linked files are included in the Files folder.
You must select the linked specification set as part of the download. Otherwise, the linked annotation isn't displayed in the downloaded specification set, and the linked specification set isn't included in the ZIP folder.
If you want to download a large number of as-built items, you can use the project export feature. When the export is completed, you receive an email link to download it.
- Open the specification set.
- To filter the annotations that appear in the downloaded specification set, set the filters in the Layers panel.
- On the navigation toolbar,
(Download).
- In the Download dialog, set the download options.
- Content: Select the cover page.
- Public Annotations: Include or exclude all public annotations.
- Private Annotations: Include or exclude your private annotations.
- As Builts: Include linked drawings, specifications, models, URLs, and files, as well as reports for linked records and specification sets.
- File Name: Edit the file name.
- Select Download.
- To ensure that the linked annotations work in the downloaded specification set, extract the files from the ZIP folder.
- Open a specification set in a PDF reader, and then select an annotation to open the linked item.
If you only download one specification set, its linked specification sets aren't included.
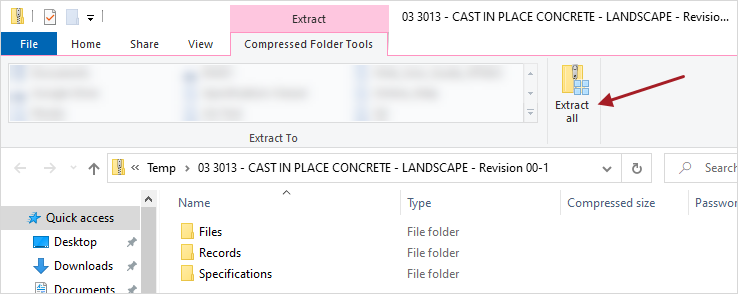
Extracting files in File Explorer
If a security warning is displayed in Adobe Acrobat Reader, select Allow.
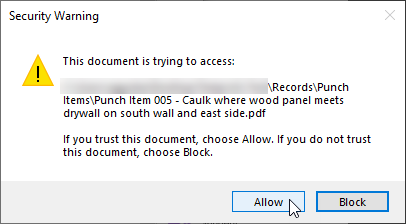
Security warning
If you open the downloaded specification set in a browser, the annotation links don't work.
- In the module, select the checkboxes for the specification set.
- On the navigation toolbar,
(Download).
- In the Download dialog, set the download options.
- Content: Select the cover page.
- Public Annotations: Include or exclude all public annotations.
- Private Annotations: Include or exclude your private annotations.
- As Builts: Include linked drawings, specifications, models, URLs, and files, as well as reports for linked records and specification sets.
- Download As: Download one .pdf file with all the specification sets, or download a .pdf file for each specification set. If the As Builts toggle is on, the files are downloaded in a ZIP folder.
- File Name: Edit the file name.
- Select Download.
- To ensure that the linked annotations work in the downloaded specification set, extract the files from the ZIP folder.
- Open a specification set in a PDF reader, and then select an annotation to open the linked item.

Extracting files in File Explorer
If a security warning is displayed in Adobe Acrobat Reader, select Allow.

Security warning
If you open the downloaded specification set in a browser, the annotation links don't work.
You can delete specification sets even if their specifications are being published or are already published.
- To switch to the Select mode, select the checkbox for a specification set.
- To choose more specification sets, select each one.
- Select
(More) > Delete Selected Records.
—Or—
To choose all the specification sets, select the checkbox on the toolbar.

To delete one item, you can also:
- Select
(More) > Remove on the item.
- Open the item, and then select
(More) > Delete on the navigation toolbar.

