Search tips
- To search in a subset of topics, select
 in the search field and select a filter.
 - To search for a specific word or phrase, add quotation marks around it (example: "budget column") in the search field.
- To remove highlighting on the search terms in a topic, select
 .
. - To search within a topic, select
 , press Ctrl+F, and enter the search term.
You can customize the header and footer for ad hoc reports that are created from custom data views. The header and footer settings are available at the portfolio, project, and data view levels. At the portfolio and project level, you can set the ad hoc header and footers for all record types. If you want to customize them for a specific data view, you can edit the header and footer in the data view settings.
If you customize the header and footer at the data view level, the changes are available automatically in all the projects that you have access to in the portfolio.
- Open the settings.
- In the Portfolio settings or Project settings section of the menu, select Reports.
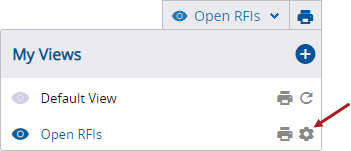
- In the View list, select
(Settings) by the custom data view.
- Select the Report Settings tab.

View list in the RFI data view
The following fields can be added to the header and footer:
- Date Printed: The date that the report is generated.
- Free Text: An editable text field that can be added multiple times. This field is up to 3 columns wide.
- Logo: The logo that's uploaded in the settings.
- Module Name: The plural version of the module's nomenclature (such as RFIs).
- Module & View Name: The plural version of the module's nomenclature (such as RFIs) on the first line and the data view that the ad hoc report is generated from on the second line.
- Page Number: The page number alone.
- Page X of X: The page number out of the total number of pages.
- Portfolio Name: The portfolio name.
- Project Address: The project address from the Project form.
- Project Name: The project name from the Project form.
- Project Name (Number): The project name and number (prefix, number, and suffix) from the Project form.
- Project Number: The project number from the Project form.
- ProjectSight: The name of the application (ProjectSight) that the report is generated from.
- View Filters: A comma-separated list of the filters that are applied to the data view. This field is 3 columns wide.
- View Name: The data view that the ad hoc report is generated from.
Fields that are not applicable to the data view are not displayed.
You can add and remove fields from the header and footer in the following section:
- Header: The report header at the top of the first page. For cross-project reports, only the data from the current project is included in the header.
- Page header: The page header at the top of each page.
- Footer: The footer at the bottom of each page.
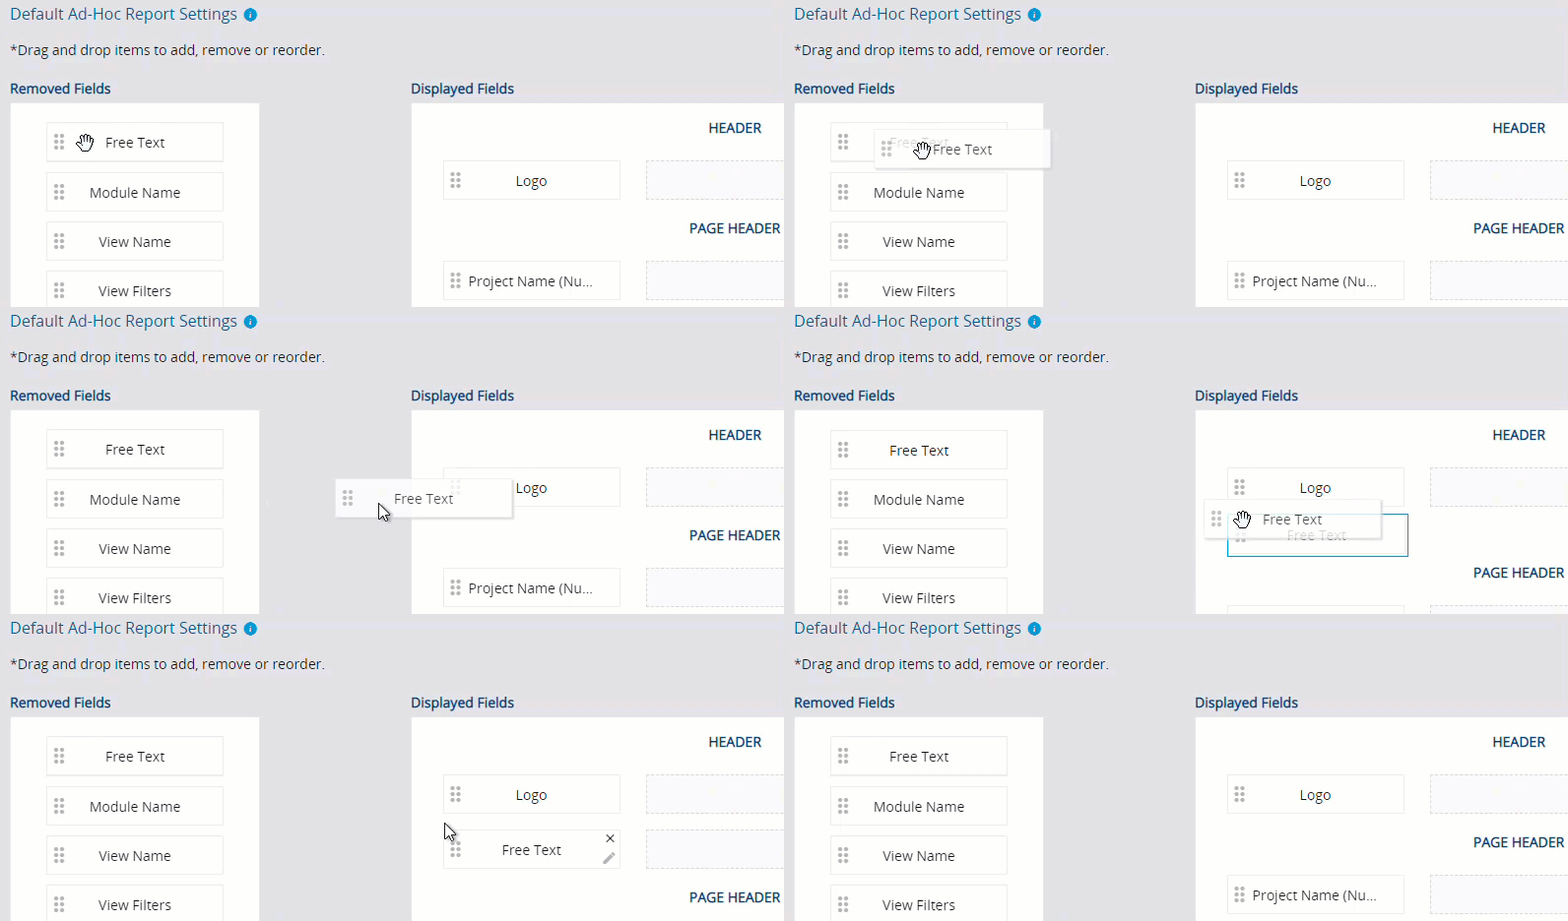
- In the Removed Fields area, select the field, and then drag it to a section in the Displayed Fields area.
Fields that span multiple columns can only be added to a row with enough empty columns.
- In the Removed Fields area, select the free text field, and then drag it to a section in the Displayed Fields area.
- On the free text field, select
(Edit).
- In the rich text editor, enter and format the text.
- Apply a character style.
- Select the text size.
- Select the font type.
- Remove all applied styles.
- Select the number of columns that the field will span. The maximum is the number of empty columns to the right of the field.
- Select outside of the field.

- In the Removed Fields area, select a field, and then drag it above or below a row in the Displayed Fields area.

Free text field in a new row
- In the Displayed Fields area, select the field, and then drag it to the Removed Fields area.
To remove a free text field, select (Remove) on the field.
- Select Preview in the ad hoc report settings.
This option is only available at the data view level.
The report is generated as a .pdf file and opens in a new browser tab. You can download or print the report from your browser.
You can reset the header and footer settings so that they are restored to the setting level above them:
- At the portfolio level, the settings are reset to the system defaults.
- At the project level, the settings are reset to the portfolio settings.
- At the data view level, the settings are reset to the project settings if those settings are unlocked. Otherwise, they're reset to the portfolio settings.
- Open the ad hoc header and footer settings.
- Select Reset.
- In the confirmation dialog, select Confirm.
The header and footer settings display the same header and footer as the setting level above.

