Search tips
- To search in a subset of topics, select
 in the search field and select a filter.
 - To search for a specific word or phrase, add quotation marks around it (example: "budget column") in the search field.
- To remove highlighting on the search terms in a topic, select
 .
. - To search within a topic, select
 , press Ctrl+F, and enter the search term.
User interface
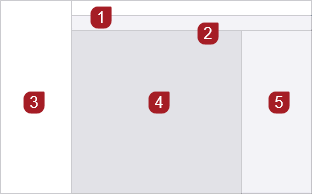
The ProjectSight user interface consists of the following areas:
- Banner: Displays the global navigation elements.
- Navigation toolbar: Displays the navigation elements, page titles, and buttons related to the selected module.
- Project menu: Displays the modules that you can open.
- Content area: Displays the content associated with the selected module. You can create custom views and update information in the grids.
- Right-side panel: Displays information or actions related to the content area. For more information, see Panels.
Your permissions affect what's available and what you can do in the different modules.
You can open various applications from ProjectSight. On the banner, the app switcher may contain the following links, which depend on your account type and permissions:
- External links
- MEP solution links
- Trimble Construction One links for Trimble Connect and Trimble Work Center
- Viewpoint Spectrum module links
- Viewpoint Vista module links
- The MEP solution links, Trimble Construction links, Viewpoint Spectrum, and Viewpoint Vista links are only available in North America.
- Viewpoint Spectrum or Viewpoint Vista module links are available if the portfolio is part of an account with the associated ERP link type, which is set by ProjectSight Support.
- Open a portfolio that is part of an account with the Viewpoint Spectrum or Viewpoint Vista ERP link type.
- Set up the security roles.
- In the portfolio settings, select Security Roles.
- In the security role that will set up the links, select the following feature permissions:
- Integrations > ERP > Link Companies
- Integrations > ERP > Link Projects
- In the security roles that will have access to the links, select the applicable feature permissions in the Integrations > ERP Links section.
- Select the ERP company.
- In the portfolio settings, select Companies.
- On the navigation toolbar, select
(Import/Export) > Link to ERP.
- In the ERP Company field, select a company.
- Select Link > Confirm.
- On the General tab of the project settings, select the Link this Project to ERP checkbox, and then select a project.
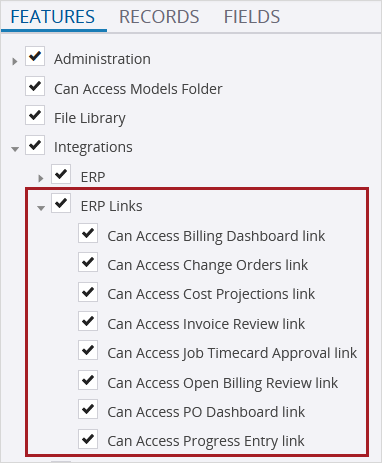
Feature permissions for Viewpoint Vista module links
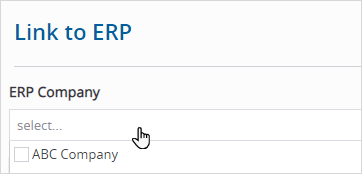
ERP Company field
- On the banner, select
 (App switcher), and then select a link.
Charlie is an AI chatbot where you can find information from the online help. By default, Charlie is available on the bottom left of the application, but you can reposition it if needed.
- Select and drag the chatbot icon or the top of the chat area to another position.
The chatbot remains in that position as you navigate around the application.
- At the top of the chatbot window, select
 (More) > Restart conversation.
 - In the chat area, select Yes.
Your conversation is restarted, and the welcome message is displayed again.
- On the banner, select
(Settings).
- In the settings menu, select My settings > AI Assistant.
- Select the Activate Charlie checkbox.
- At the top of the chatbot window, select
 (More) > Deactivate Charlie.
 - If the confirmation dialog is displayed, select Deactivate.
You can also deactivate the chatbot in the settings (). In the settings menu, select My settings > AI Assistant, and then clear the Activate Charlie checkbox.
In the Company Search dialog, which is available from company fields such as From Company, you can search for companies or create them.
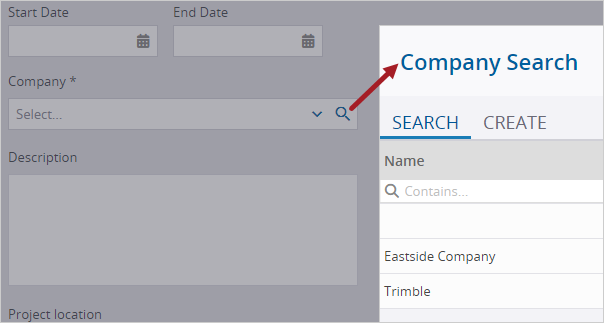
- In a company field, select
(Search).
- Open the Company Search dialog.
- On the Select tab, turn on the Project Companies toggle.
- To filter the list by a column, enter a value in the filter row.
- Select the company name, and then select Select.
A project company has at least one contact with access to the current project.
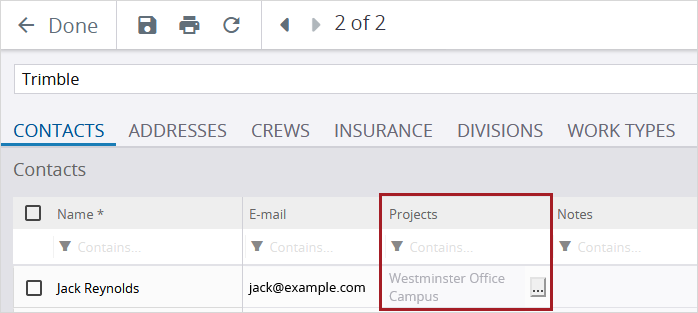
Company contact with access to the project
- In the Company Search dialog, select the Create tab.
- In the Name field, enter a unique company name.
- Enter the company details.
- Select Create.
A company record is created in the company settings.
Contact cards represent people who are associated with the project, record, or file. These cards are displayed in places such as the Information panel or Contact Info tab of records.

- On the contact card, hover over the profile picture or initials.
The contact information comes from the Contacts tab of the company record.
- On the contact card, hover over the profile picture or initials.
- In the contact popover, select the contact information that you want to copy.
The contact information is copied to your clipboard.
- On the contact card, select
(More).
The available actions depend on where the contact card appears.
You can move and resize various dialogs such as child record, search, and print dialogs.
- Select the top area of the dialog, and then drag it.

- Select the side or corner of the dialog, and then drag it.

—Or—
To change the dialog to the maximum size, select (Maximize).
—Or—
To change the dialog from the maximum size to the previous size, select (Restore).
Some areas contain grids where you can add and update information. You can also edit the grid columns.
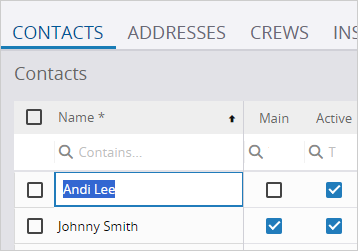
- In the top row of the grid, enter the value for a column.
- Select
 and select a filter.
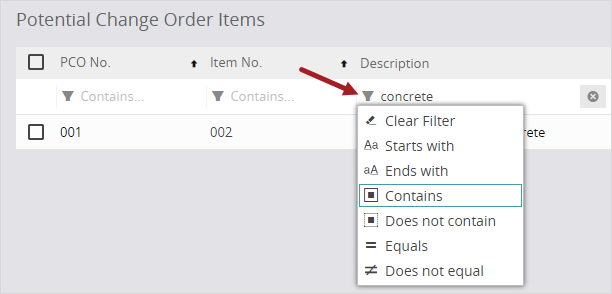
- If you unlock the lookup list in the project settings or delete items from it and then filter the grid items, the grid may still display items with the old lookup list values.
- If you filter the grid items, the Add, Up, Down, and Insert options aren't available.
- Select the cell, and then edit the information.
You can press Tab to move to the next cell in the row.
- Right-click the cell, and then select Copy Text.
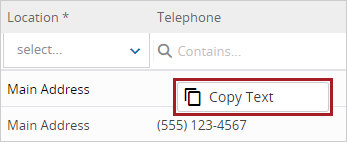
- Select an unlocked cell that contains the value to be copied.
- Press Ctrl+Down arrow.
The cell will either be selected or the dropdown list will be expanded.
The value is copied down to the unlocked cells in the column.
This keyboard shortcut works for columns where you directly edit or select a value. It doesn't work for columns, such as Location, where you select a value from a popup or in grids that are saved automatically.
- To choose a line item, select the row.
- At the top-right of the grid, select Up or Down.
- If you filter the grid items, the Add, Up, Down, and Insert options aren't available.
- If you select a column header to sort the items, the sorting order is temporary.
- Select the checkbox for one or more rows, and then select Remove.
The rows are deleted when you save the changes.
You can use keyboard shortcuts to navigate through ProjectSight.
| Location | Action | Keyboard shortcut |
|---|---|---|
| Settings | Open a top-level menu item (setting) in a new tab. | Ctrl+Click |
| Sitewide | Open a project menu item (module) in a new tab. | Ctrl+Click |
| Sitewide | Open an item in a new window. | Shift+Click |
| Sitewide | Open an item in a new tab. | Ctrl+Click |
| Sitewide | Add the current date in a date field. | Ctrl+D |
| Sitewide | Copy values down a column.
This keyboard shortcut works for columns where you directly edit or select a value. It doesn't work for columns, such as Location, where you select a value from a popup or in grids that are saved automatically. |
Ctrl+Down arrow |
| Sitewide | Close a dialog. | Esc |
| Sitewide | Move to the next cell or field. | Tab |
| Sitewide | Select or clear a checkbox. | Space bar |
| Budgets Meeting minutes grid |
Save changes to the current cell if applicable, and move down to the next cell.
This keyboard shortcut doesn't work for cells where you can enter multiple lines of text. |
Enter |
| Budgets Meeting minutes grid |
Save changes to the current cell if applicable, and move up to the previous cell.
This keyboard shortcut doesn't work for cells where you can enter multiple lines of text. |
Shift+Enter |
| Budget - Forecast To Complete editor | Navigate to the Forecast To Complete editor for the previous budget item. | Mac: Option+Left arrow Windows: Alt+Left arrow |
| Budget - Forecast To Complete editor | Navigate to the Forecast To Complete editor for the next budget item. | Mac: Option+Right arrow Windows: Alt+Right arrow |
| Drawings - Edit properties dialog | Undo a change while a grid row is selected. | Esc |
The notification center displays the items in which you're added to the assignments or the courtesy copies list in the current project. The cards are sorted by the most recently added or by the most recent reminder. The time or date indicates when you were added to the assignments or the courtesy copies list or when the assignment reminder was sent.
| Notification center indicator | Status |
|---|---|
| Blue background | You haven't opened the item yet. The total number of unopened items is displayed on the banner icon ( |
| Blue dot | Your assignment is still open, or you haven't opened the item with your courtesy copy yet. |
| Green check mark | Your assignment is completed. |
| Red badge | Your assignment is overdue. |
Cards are removed from the notification center when:
- 30 days have elapsed since the assignment or courtesy copy was marked as complete.
- The item is moved to a locked status.
- Your name is removed from the assignments or the courtesy copies list.
- The item is deleted from ProjectSight.
Your notifications appear in the center even if you turn off your email notifications for assignments.
- On the banner, select
(Notification center).
- To open an item and view more details, select the card in the notification center.
In the content area, you can set up the data view according to your preferences. If you save the changes as a custom view, you can look at the information again with the same settings.
- At the top-right of the view, select
(Tile) or
(List).
- At the top-right of the view, select
(Columns).
- Select or clear the checkboxes for the columns.
- Select Apply.
- To adjust the width of a column, place the pointer between two columns, and then select and drag the border.
- To reorder the columns, select and drag a column header to a new position in the grid.
—Or—
On the right-side of the grid header row, select  (Columns).
You may need to scroll to the right to see the button.
The selected columns are displayed in the grid.
To automatically resize the column for the content, double-click the border.


- In the list view, select a column header.
- To sort the items in descending order, select the same column header.
The items are sorted in ascending order.
When applicable, the items are sorted by the selected column, then by the Number column, and then by the Revision column.
- At the top-right of the view, select the Group list, and select an option.
Within each group, the items are sorted by the number in ascending order.
To quickly collapse or expand the groups, you can select (More) > Collapse All or Expand All on the navigation toolbar.
- At the top-right of the view, select the Sort list, and select an option.
Items are sorted alphanumerically in ascending order by the selected option and then by the number.
Drawings can be sorted alphabetically or ‘intelligently’.
- On the navigation toolbar, select
(View Options) > Refresh.
The view is updated, so you have the latest information from other users.
- To modify the current view:
- In the Search panel, change the search filters.
- From the Group list, select an option.
- From the Sort list, select an option.
- In the list view, sort the items by column.
- Edit the columns in the view.
- On the navigation toolbar, select
(View Options) > View in Excel.
The Excel file includes all the visible columns and rows.
This Excel file is for viewing purposes only and can't be imported back into ProjectSight.

