You can create different types of records to keep track of project information.
Locked records, which have a locked workflow status, can't be modified. In the record, save (Save) and arrow_back Done aren't available.
- On the navigation toolbar, click > ModuleName > RecordType.
—Or—
On the project home page, click ModuleName > RecordType.
Click Document Control > RFIs.
- If the Search panel is closed, click
 (Search) on the navigation toolbar.
 - Set the filters.
- In the record view, click the record.
- In the full record, click
 (Previous) or
  (Next) to open the previous or next record.
To open the full record from the Information panel, you can click aspect_ratio (Expand).
The previous and next records are based on the list when the current record was opened.
![]() (Previous) and
(Previous) and ![]() (Next) are not available when the record is opened in a new tab.
(Next) are not available when the record is opened in a new tab.
- On the navigation toolbar of the record, click refresh (Save and Reload). —Or—
In the Information panel of a collaborative record, click refresh (Save and Reload).
The record is saved and updated with the latest information from all users.
Collaborative and data-entry record types are available for tracking your project information. Only collaborative record types use the Create and Information panels in the record view, as well as different comment types.
| Record type | Module | Collaborative or data-entry |
|---|---|---|
| Action items | Document Control | Collaborative |
| Checklists | Field Management | Data-entry |
| Daily reports | Field Management | Data-entry |
| Field work directives | Field Management | Collaborative |
| Issues | Document Control | Collaborative |
| Notices to comply | Field Management | Collaborative |
| Punch items | Field Management | Collaborative |
| Requests for information (RFIs) | Document Control | Collaborative |
| Safety notices | Field Management | Collaborative |
| Submittals | Document Control | Collaborative |
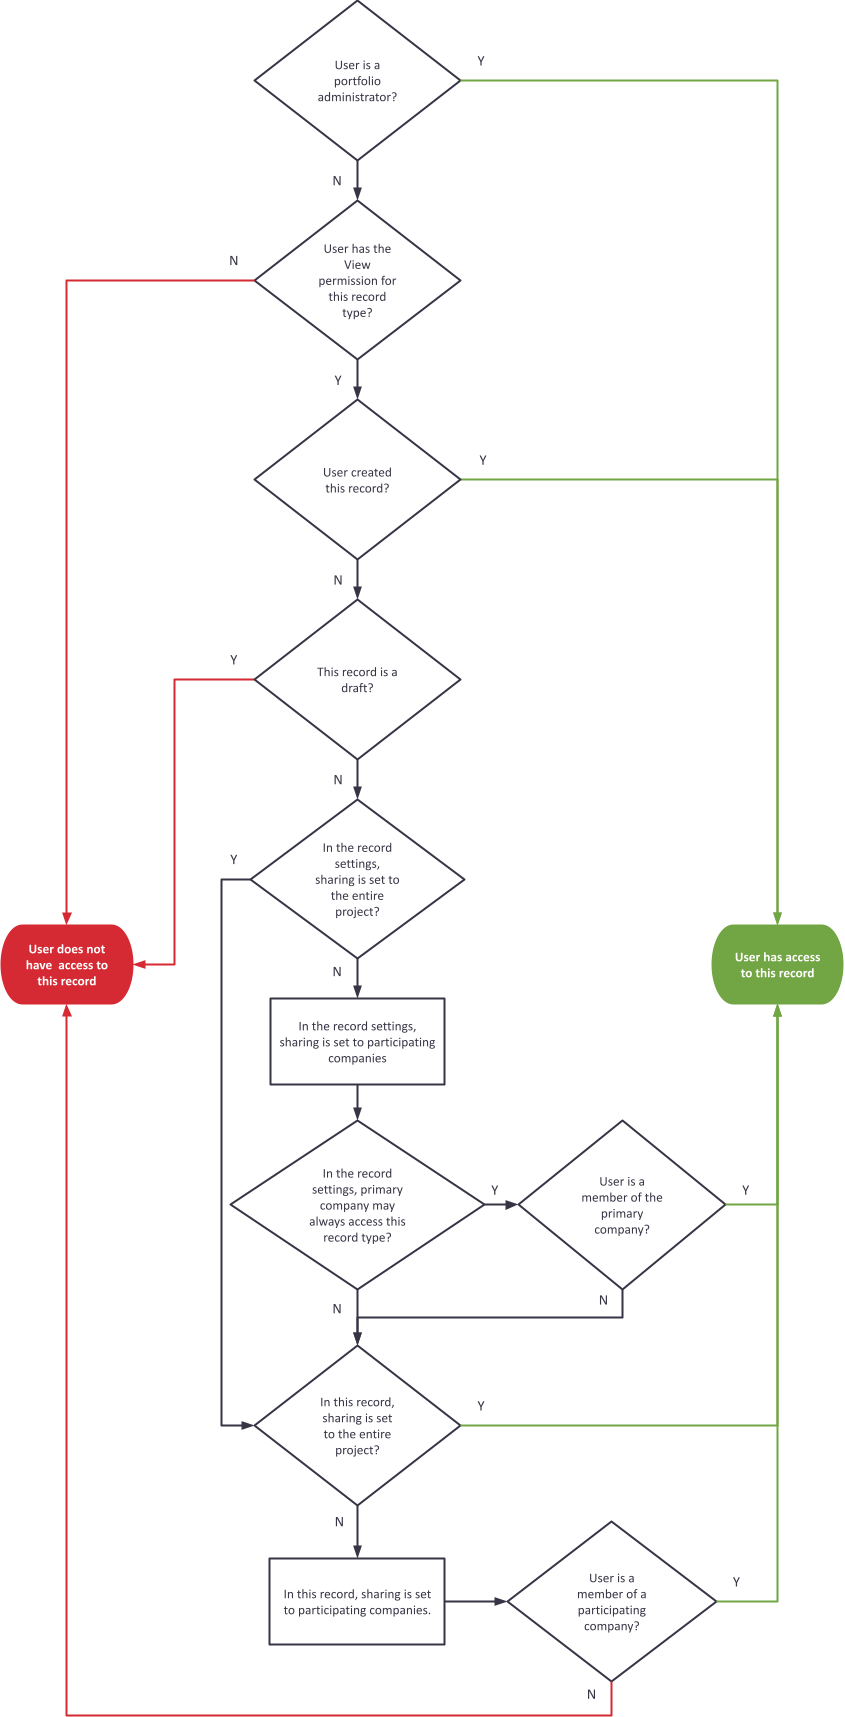
This diagram provides an overview of how record access works.
Permissions and record settings are available in ProjectSight for the web.
You can create a record or copy a record and then edit the details.
- Required fields are marked with an asterisk (*) but aren't enforced for records that use the Draft workflow status.
- For draft records, you can't edit the Number field. For non-draft records, the field is editable, or it's automatically completed after you sync your data.
- Duplicate numbers aren't checked until after synchronization. You can edit the number in the iPad record and then sync your data again.
- Open the record view.
- On the navigation toolbar, click add_circle (Create).
- Enter the record details.
For records that use the Draft status, a draft record is saved immediately in the record view.
For more information, refer to the topic for each record type.
- Open the record view.
- In the tile or list view, on the record, click more_horiz (More) > Copy.
—Or—
Open the record, and then click content_copy (Copy) on the navigation toolbar.
- Changes to the original record are saved automatically when you copy the record.
- Comments, assignments, courtesy copies, and links aren't copied to the new record.
If you edit an out-of-date field, your changes overwrite the previous changes when you save the record. The previous changes are logged on the History tab in ProjectSight for the web.
Your changes are saved automatically if you navigate to the previous or next record.
- To keep the record open, click save (Save).
—Or—
To close the record, click arrow_back Done.
- In the panel, click save (Save).
- Close the panel or select a different panel.
- Select another tile or row in the data view.
- Navigate away from the current data view.
Changes are saved automatically in the panel when you:
If you click aspect_ratio (Expand) before saving the changes, they're displayed in the record but aren't saved yet.
You can only delete local records that haven't been synced to the database yet.
- Open the record type view.
- On the navigation toolbar, click
 (Select Mode).
 - To select more records, click each one.
- Click delete (Remove).
—Or—
To select all the records, click done_all (Select All) on the navigation toolbar.
To delete one record, you can also:
- Click more_horiz (More) > Delete on the record.
- Open the record, and then click delete (Remove) on the navigation toolbar.