Checklists
You create a checklist that uses the scaffold inspection template. As you inspect the scaffold, you ensure that it passes each item in the checklist.
The basic process for working with checklists:
- The checklist template is created in ProjectSight for the web.
- The checklist record is created based on the template.
- A result is recorded for each checklist item.
- The checklist record is approved or rejected.
- On the navigation toolbar, click .
- Click Field Management > Checklists.
—Or—
Open the project home page.
- Click the checklist.
- On the Checklists tab, click chevron_right (Open) on the checklist item row to view its details.
- On the Approvals tab, click chevron_right (Open) on the approver row to view its details.
To navigate to the previous or next item from the open item, you can click ![]() (Previous) or
(Previous) or ![]() (Next).
(Next).
You can create a checklist based on a checklist template or create a revision of the latest record. Old revisions are read-only and can't be used to create new revisions.
- Required fields are marked with an asterisk (*) but aren't enforced for records that use the Draft workflow status.
- For draft records, you can't edit the Number field. For non-draft records, the field is editable, or it's automatically completed after you sync your data.
- Duplicate numbers aren't checked until after synchronization. You can edit the number in the iPad record and then sync your data again.
- In the Checklists view, click add_circle (Create).
- Click the checklist template.
- On the navigation toolbar, click info (Information), and edit the record information.
- To change the workflow status, select an option from the list.
- To add a location, click the Location field, select a parent or child location, and then click Apply.
- To add a courtesy copy, click Add in the Courtesy Copies section, and then select the name.
- To add a comment or an assignment to a checklist item, click chevron_right (Open) on the item row.
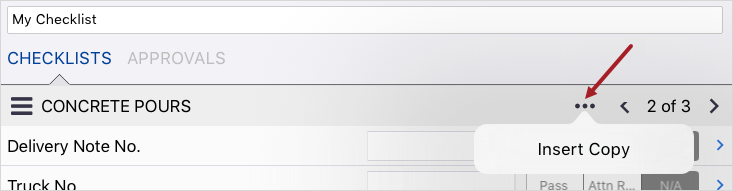
- To copy and insert a copyable section, click more_horiz (More) on the header, and then click Insert Copy.
- To set who has access to the record, click group (Sharing), and then select an option.
- To link an item to the record, click link (Links), click add (Add), and then select the item type.
- To save the changes and keep the record open, click save (Save).
A draft record is added to the view. In the record, the Checklists tab displays the associated checklist items.
Checklists move automatically from the Draft workflow status to the next one if checklist item is updated or an assignment or courtesy copy is added.
To remove the copied section, you can click more_horiz (More) > Delete Copied Section.
—Or—
To save the changes and close the record, click arrow_back Done.
- Ensure that the checklist is synced to the database.
- In the tile or list view, on the checklist, click more_horiz (More) > Copy.
—Or—
Open the checklist, and then click content_copy (Copy) on the navigation toolbar.
The record number is copied to the revision, and the revision number is incremented automatically.
The revision doesn't include any copied sections that were inserted in the original record.
You can record a result for each checklist item and then approve or reject the checklist. Only the latest revision can be updated.
You can also add additional items and approvers to your checklist.
A checklist isn't closed until a closed workflow status is selected for the record.
- On the Checklists tab, record the result on the item row.
- If applicable, enter information or select a value in the field.
- Click the result.
- Update the assignments, or enter a comment.
- To open the item, click the item name or chevron_right(Open).
- Update the information.
- To save the changes to the item, click arrow_back Back.
- Click chevron_right (Next) at the top of the Checklists tab.
- Click , and then select a section.

To open a different section:
- On the checklist record, click add_circle(Add).
- Tap Add checklist item.
- Select the checklist item type.
- Enter a description.
- Clickarrow_back(Add).
To add new items, your security role must have the Create permission for checklist items.
The new item is added to the last section of your checklist record.
- Click the Approvals tab.
- On the row, click your name.
- Add a comment.
- From the Status list, select Approved or Rejected.
- In the Approved Date field, select the date.
- Click the Signature field.
- Sign in the field, and then click Save.
- Click arrow_back Back.
- On the checklist record, click add_circle(Add).
- Tap Add approvers.
- Tap Select from contacts.
- Select the approvers and then tap Add.
To add new approvers, your security role must have the Create permission for checklist approver.
The new approvers are added to the record.
- On the checklist record, click add_circle(Add).
- Tap Add approvers.
- Tap Add new.
- Enter the approver’s first name, last name, and the reason why they are being added as an approver to the checklist.
- Tap Add.
To add new approvers, your security role must have the Create permission for checklist approver.
The new approver is added to the record but will not be added to the project contact list.