Content is not applicable for Go or Free projects.
Notices to Comply
Use this form to notify contractors to comply with instructions. They can be issued for poor workmanship, correction notices, or any unfulfilled contractual obligations.
License: Certain actions, such as adding notice to comply records, require a license as well as security permission. Contact your project administrator if you are unable to perform some actions using the mobile app.
Required fields:
- If auto-numbering is on, numbers are assigned to notice to comply records with non-draft statuses when they're synced to the database.
- Required fields are marked with an asterisk (*) and are enforced for non-draft records. Additionally, required fields in workflow templates are highlighted red if left incomplete upon submission.
Workflows:
- Draft notice to comply records are only visible to the user who created them and the Portfolio Administrator.
- Notice to comply records can't be changed back to the Draft status.
- Notice to comply records with a locked status can't be edited or deleted.
- Status workflows: In status workflows, when an assignment or courtesy copy is added to a draft notice to comply record, the status changes automatically to the next workflow status. This is set at the record settings level by your administrator.
- Template workflows: Status names and workflow steps are configured by your administrator. Generally, the status changes when the person responsible for the next action completes their task, such as:
- A creator publishes a draft
- When a notice to comply is forwarded for review
- When a reviewer selects a response and submits the step
Workflow templates are not applicable for Free or Go projects.
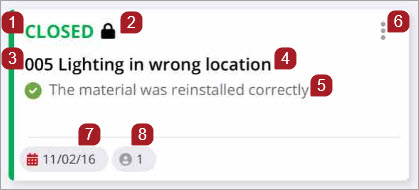
- Record status
- Locked icon indicates closed status
- Record number
- Subject
- Description
- Sub-menu: copy or delete
- Due date
- Assignee information
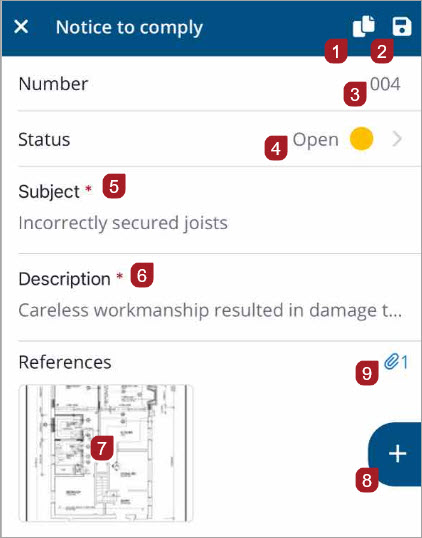
- Copy the record
- Save the record
- Record number
- Record status
- Summary of the notice to comply
- Description of the notice to comply
- Select the thumbnail to view.
- Link (Pin) to drawings, photos, or videos.
- Number of attachments
Viewing
For information on how to search, sort, and filter the Notices to Comply list, see Filter, Sort, and Search.
Creating
- In the Notices to Comply list view, select
 .
. - Enter a subject for the notice to comply.
- Enter a description.
- To add assignments, select Assign.
- Enter additional details and information, then select
 .
.
—Or—
To send courtesy copies, select CC.
Workflow templates are not applicable for Free or Go projects.
If the start step of a template is unrestricted, or you have security permissions for a restricted start step, you can access and create an item with a workflow template from the records list view.
- In the Notice to Comply list view, select .
- If there is only one template available, the New Notice to comply page displays. If there are multiple templates available, the Select Template page displays. Choose a template, then select Add.
- Enter a subject for the notice to comply, then select Done.
- Enter a description, then select Done.
- To send courtesy copies, select CC.
- If you have permissions, you can make Assignments and require a response from assignees by selecting Assign/Assign to.
- Select Due Date to choose a project deadline, then select Done.
- Enter additional details and information.
- To save your updates, select , then select x to return to the records list.
In the list, a star icon indicates the default workflow template that is selected by your administrator.
Once the notice to comply is submitted, a step due date is automatically set based on the step completion days value in the workflow template. However, in the web app, administrators have the flexibility to customize individual step deadlines to better fit each team's specific needs.
A pop-up message displays: Notice to comply updated.
—Or—
If you are a required assignee, template manager, or portfolio administrator, the Submit option displays. To save your notice to comply, move it to the next step, and return to the records list, select Submit.
A pop-up message displays: New Notice to comply created.
If a response is required, when you select Submit, a response required message displays. You must select Response, choose a response, then select Select before you can submit.
If you select submit and there is no assignee assigned for the next step, the Add assignees to next step page displays where you are required to select an assignee, or the template manager, before the record can advance to the next step. See Assignments.
- To start a conversation, select the Comments section, enter your comment, then select Add.
- Select .
—Or—
If replying to a comment, select Comment(s), enter your comment, then select Add.
- To copy a notice to comply, see Copy Record. When you copy a notice to comply item, the following fields copy over: Subject, Type, Importance, Location, and Custom.
Editing
- In the record view, select Status, Type, or Importance.
- To search the list, enter text in the Search field.
- In the record view, select
 .
.
A Status, Type, or Importance page displays with a list.
—Or—
To choose an item from the list, select it, then select Select to return to the record view.
—Or—
To return to the record view without making changes, select <.
- In the Location box, select >.
- Choose a location from the list.
- Select Select.
- Select .
The location hierarchy is set in the web application.
-
To bulk edit your notices to comply, see Batch Edit.
Linking / Annotating
-
To annotate a drawing and link it to this notice to comply, see Drawing Annotations.
-
To link records or drawings to a notice to comply, see Linking Records or Drawings.
-
To attach photos and videos, or how to view and delete attachments, see Photos / Videos