Search tips
- To search in a subset of topics, select
 in the search field and select a filter.
 - To search for a specific word or phrase, add quotation marks around it (example: "budget column") in the search field.
- To remove highlighting on the search terms in a topic, select
 .
. - To search within a topic, select
 , press Ctrl+F, and enter the search term.
In the Photos module, photos are displayed in the following places:
- Photos area: Displays all project photos, including photos that are added to albums and those that are linked to items such as records.
- Albums: Displays photos that are added to albums.
You can view a photo in the Photos module if:
- The photo doesn't belong to any albums.
- The photo belongs to an album that you have access to.
- The photo isn't linked to any items.
- The photo is linked to one or more items, and you have access to at least one linked item. If you don't have access to any linked items, you can view the photo in the corresponding folder in the file management system.
Your album permissions determine whether you can upload, move, edit, and delete photos.
- In the project menu, select Photos.
- If the Search panel is closed, select
(Search) on the navigation toolbar.
- To filter by text associated with the photos, enter the search terms in the Search field.
- The description and file name of the photos when they're are grouped by anything except for record type.
- The number and description or subject of the linked records and the description of the photos when the photos are grouped by record type.
- To filter by linked records, select
in the Records filter, select one or more record types, and then select Apply.
- To filter by location, select
in the Location filter, select one or more locations, and then select Apply.
- To filter by the person who uploaded the photos, select
in the Uploaded by user filter, select one or more names, and then select Apply.
- To filter by the company of the person who uploaded the photos, select
in the Uploaded by company filter, select one or more names, and then select Apply.
- To filter by date, select
in the Date captured filter, and then set the date(s).
- To set a date range, select or enter the start date and then the end date.
- To choose one date, select or enter the date.
- To change the calendar month or year, select the month or year in the calendar header, and then select the desired one.
The search terms are applied to:
The list only includes record types that you have access to.
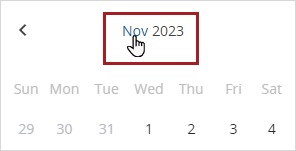
Links to change the calendar month and year
- If you select options from multiple filters, the displayed photos match at least one option in each filter.
- The filters only contain options that are applicable to the available photos.
- To find an option in the Record types, Location, Uploaded by user, or Uploaded by company filter, start typing in the search field.
- When you filter photos in an album, the Record types, Location, Uploaded by user, Uploaded by company, and Date captured filters only apply to the parent album and not to the child albums.
- Filters remain applied when you navigate between the Photos area and the albums. If there are no results, you can clear the filters.
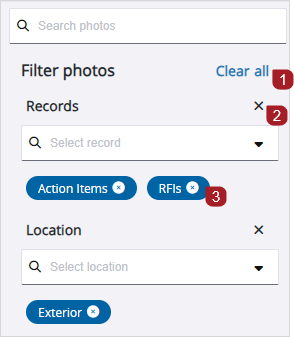
- To remove all the filters, select Clear all.
- To remove the filters in one section, select
(Remove) by the filter name.
- To remove one filter, select
(Remove) on the filter card.
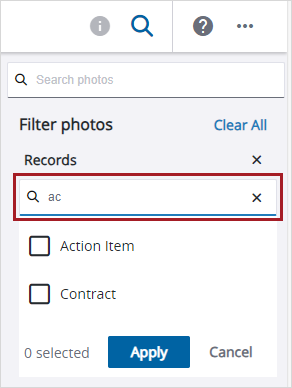
Search field in the Records filter
- From the Group list, select an option.
If you select Week, the photos are grouped from Sunday to Saturday.
- To open the photo in the same tab, select the photo in the album.
- To view the photo in the full screen, select
(Full Screen) in the top-left corner.
- Zoom in or out of the photo.
- To zoom in, hover over the photo, and then move the mouse wheel forwards.
- To zoom out, hover over the photo, and then move the mouse wheel backwards.
- To change the zoom level, select an option from the zoom menu, or select the Zoom in or Zoom out button.
- To zoom in to a specific area of the photo, select Marquee Zoom from the zoom menu, and then select and drag to draw a rectangle on the photo.
- To open the previous or next photo based on the list when the current photo was opened, select
(Previous) or
(Next) on the navigation toolbar.
—Or—
To open the photo in a new tab, hover over the photo and then select (Open).

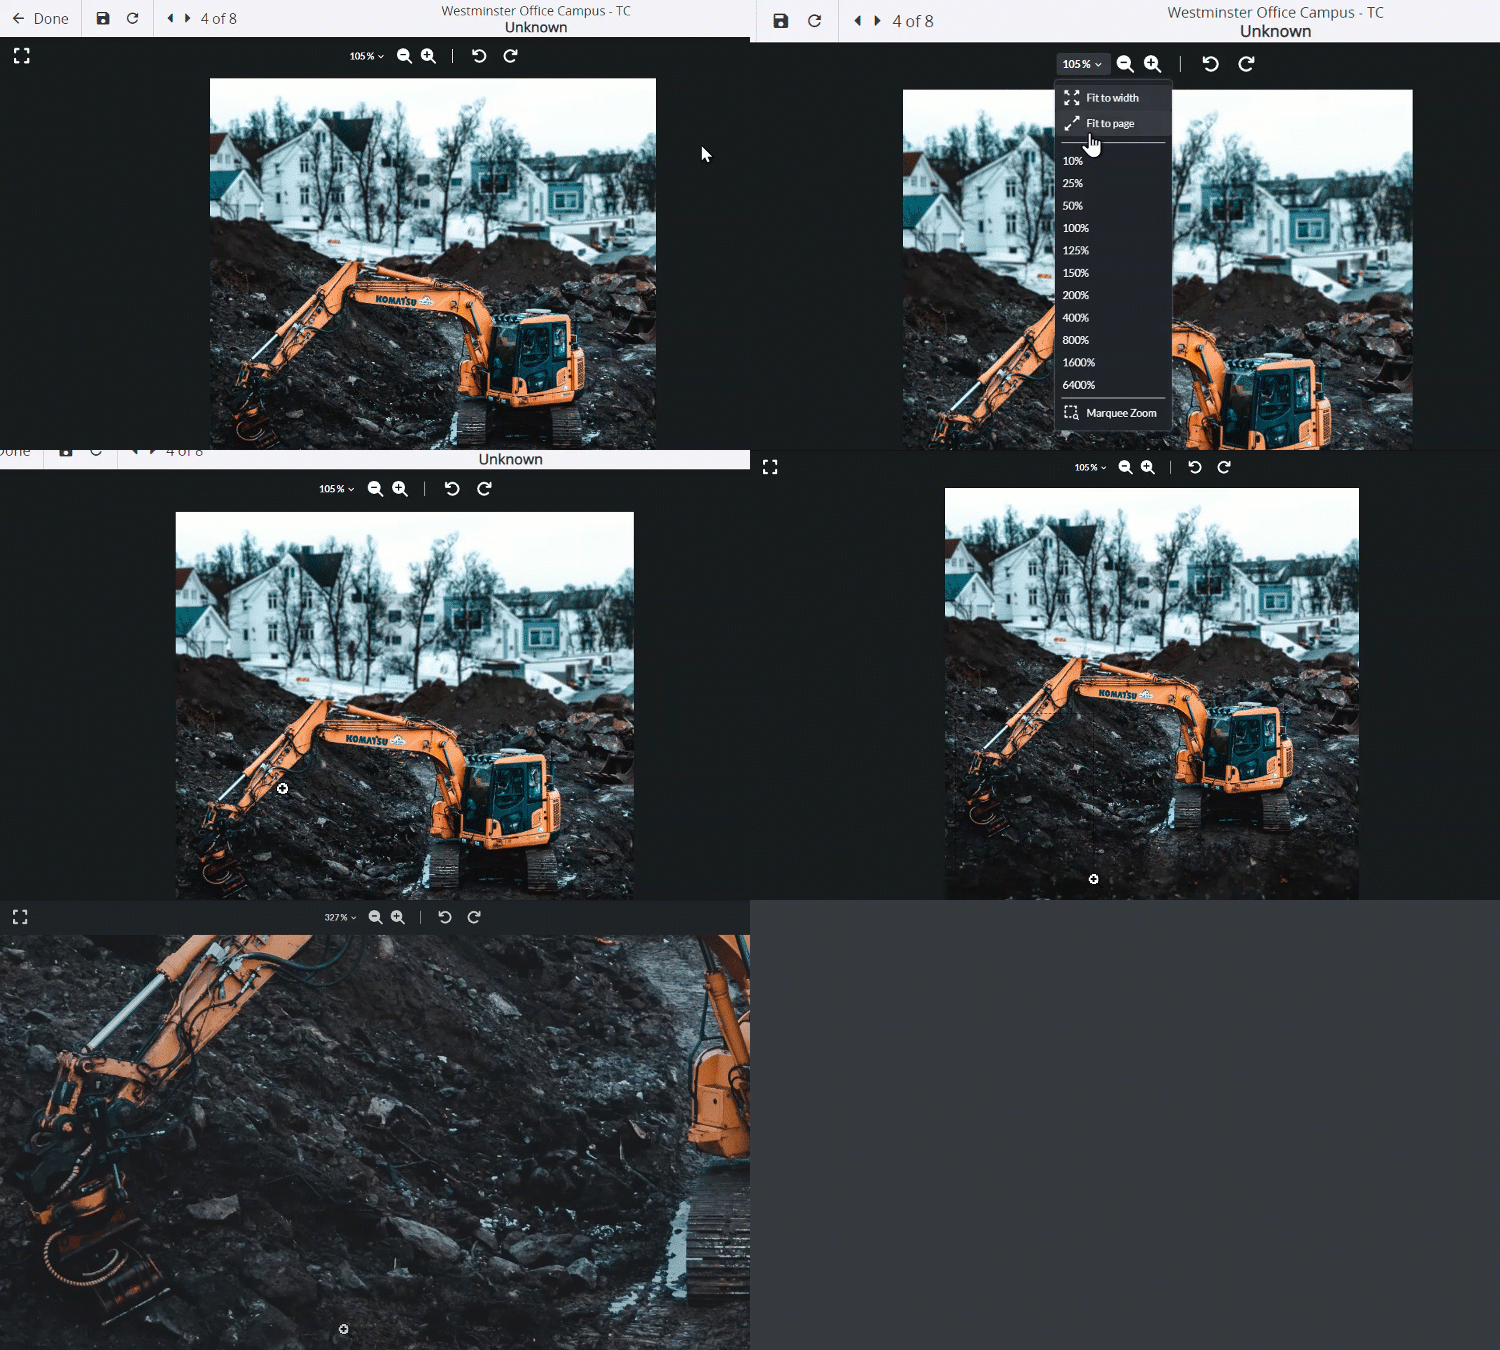
Applying the marquee zoom
(Previous) and
(Next) are not available when you open the photo in a new tab.
- Open the photo in the photo viewer.
- If the Information panel is closed, select
(Information) on the navigation toolbar.
The Albums section displays links to the albums that you have access to.
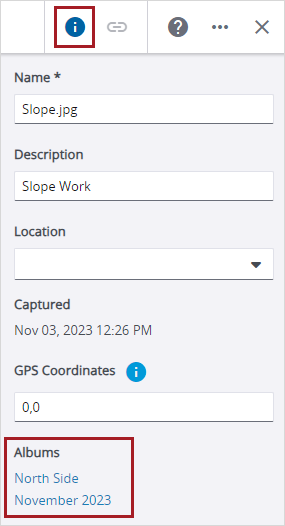
Photo that is in multiple albums
- Open the photo in the photo viewer.
- On the navigation toolbar, select
(Links).
- Select the card to open the item in the same tab.
—Or—
Select (Open) to open the item in a new tab.
The Information panel, which is available in the photo viewer, displays the following photo details:
- Name: The file name, which is also displayed in the album and can be edited in the Information panel.
- Description: The photo description, which can be edited in the Information panel.
- Location: The selected location of the photo.
- Captured: The date and time, based on the time zone that's selected in your user profile, when the photo was taken. If the captured date and time aren't available, the uploaded date and time are displayed.
- GPS coordinates: The longitude and latitude where the photo was taken.
- Uploaded: The date and time, based on the time zone that's selected in your user profile, when the photo was uploaded.
- Uploaded by: The name of the person who uploaded the photo.
- Album: The name of the album. You can select the link to save any changes and return to the album.
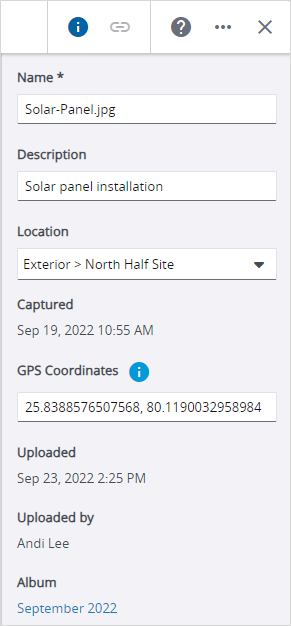
Photo details in the Information panel
You can upload photos in the Photos area or in an album.
- The supported image types are .bmp, .heic, .heif, .jpeg, .jpg, .png, .tif, and .tiff. After you upload .heic or. .heif files, they are converted to .jpeg files.
- The photo name can't contain any of the following characters: \ / : *? " < > |
- From the file management system, you can only select photos that aren't linked to records, drawings, or specifications.
- In the Photos area or in an album, select Upload on the top-right side.
- Drag one or more photos to the dialog.
- To remove a file, select
(Remove).
- To upload more photos, drag them to the bottom area of the dialog, or select Browse or File Library.
- If you select duplicate photos from the file management system, they are not uploaded.
- If you select duplicate photos from your computer or drag them to the Upload dialog, the duplicates are uploaded.
- To edit the file name of a photo, select
(Edit), and then edit the file name.
- To edit the description or location, select the checkbox for one or more photos, then edit the Location or Description field.
- Select Save.
—Or—
Select Browse, and then select one or more photos.
—Or—
Select File Library, and then select one or more photos.
The previous location or description is overwritten when you select the same photo again and edit the field.
For more editing space in the Upload dialog, select (Maximize).
You can add photos from the Photos area to an album or move photos from one album to another.
- To move a photo to an album, you must have the Manager or Contributor permission for the new album.
- The same photo can belong to multiple albums.
- In the Photos area, hover over the photo, and then select the checkbox.
- Select the checkbox for more photos.
- On the navigation toolbar, select
(Add).
- Select the album, and then select Add.
- To add the same photo to another album, repeat steps 1 to 4.
- In the album, hover over the photo, and then select the checkbox.
- Select the checkbox for more photos.
- Select the checkbox for more photos.
- On the navigation toolbar, select
(Move).
- Select the new parent album, and then select Move.
- In the album, hover over the photo, and then select the checkbox.
- Select the checkbox for more photos.
- On the navigation toolbar, select
(Remove).
- In the confirmation dialog, select Remove.
The selected photos that you have permission to edit are removed from the album but are still available in the Photos area.
If you edit a linked photo in the photo viewer, the changes are synced to the photo in the file management system. However, edits to the photo in the file management system aren't synced to the photo in the Photos module.
The photo name can't contain any of the following characters: \ / : *? " < > |
- Open the photo in the photo viewer.
- Edit the file name in the Name field.
- Edit the Description field.
- Edit the Location field.
- In the GPS Coordinates field, enter the latitude and longitude separated by a comma (,) or space ( ).
- Decimal degrees (DD): 41.40338, 2.17403
- Degrees, minutes, and seconds (DMS): 41°24'12.2"N 2°10'26.5"E
- Degrees and decimal minutes (DMM): 41 24.2028, 2 10.4418
- If the GPS Coordinates field contains one value, the value is saved as the latitude.
- The GPS Coordinates field isn't checked for valid formats.
- To save the changes, select Done.
You can use the following formats:
—Or—
Select (Save and Reload).
—Or—
Select (Previous) or
(Next).
—Or—
Select the album link.
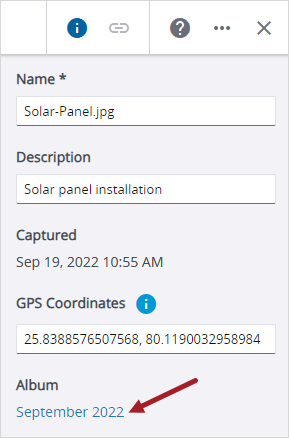
Album link
- In the Photos area or in an album, hover over the photo, and then select the checkbox.
- Select the checkbox for more photos.
- On the navigation toolbar, select
(Edit).
- In the Location field, select the location for the photos.
- In the Description field, enter the description for the photos.
- Select Save.
The changes are applied to photos that you have permission to edit.
- Open the photo in the photo viewer.
- On the toolbar, select
(Rotate Counterclockwise) or
(Rotate Clockwise).
- To save the rotation, select
(Save and Reload) or Done.
You can download photos from the Photos module.
- In the Photos area or in an album, hover over the photo, and then select the checkbox.
- Select the checkbox for more photos.
- On the navigation toolbar, select
(Download).
The photos are downloaded as a zipped file in the Downloads folder of your computer.
After you delete a photo, it's no longer available in the Photos area or in any albums.
You can delete a photo if:
- You uploaded the photo, you have the Contributor or Manager permission for its album, and you have the View permission for the Photos module.
- You didn't upload the photo, you have the Manager permission for its album, and you have the Remove permission for the Photos module.
If the photo is linked to any items such as a record, you must remove the photo from the Links panel of each linked item first before you can delete it.
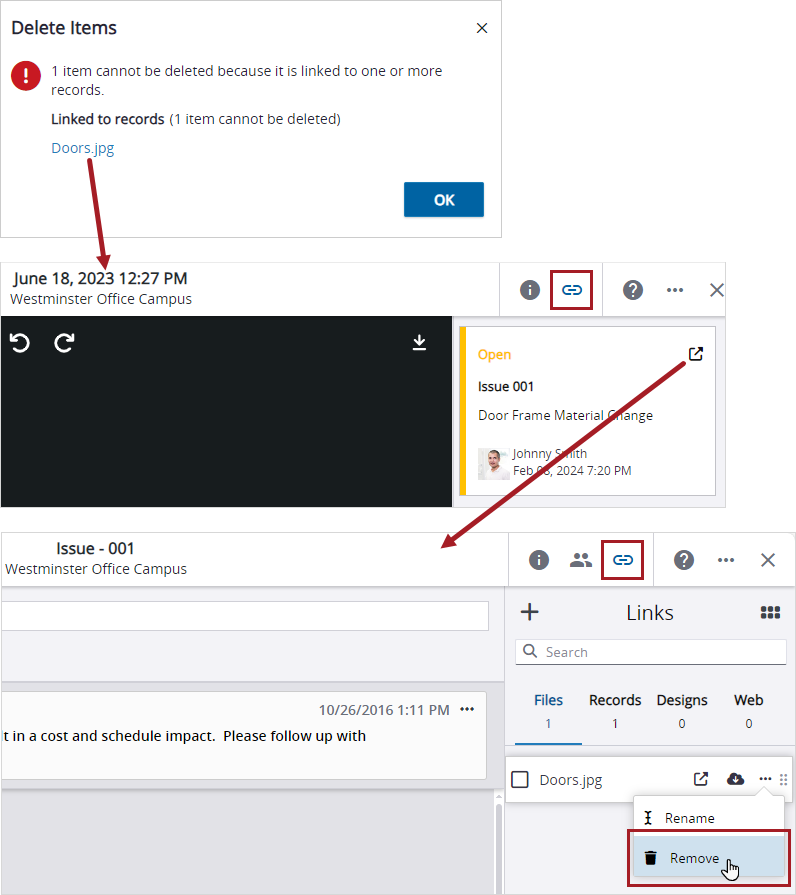
Photo removed from the Links panel of a record
- In the Photos area or in an album, hover over the photo, and then select the checkbox.
- Select the checkbox for more photos.
- On the navigation toolbar, select
(Delete).
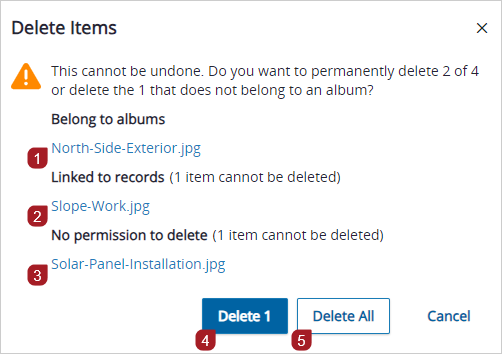
- If all the selected photos aren't linked to any items, and you have permission to delete them, select the delete button in the confirmation dialog.
- A photo that doesn't belong to an album.
- A photo that belongs to an album that you have the Manager permission for.
- A photo that's linked to a record.
- A photo that belongs to an album that you have the Viewer permission for.
- The photo that you can delete because you have the Manager permission for its album.
- The photo that you cannot delete because it's linked to a record.
- The photo that you cannot delete because you have the Viewer permission for its album.
- The option to delete the photo that doesn't belong an album.
- The option to delete all the photos that aren't linked to items (the photo that belongs to the album that you have the Manager permission for and the photo that doesn't belong to an album).
—Or—
If all the selected photos are linked to items, or you don't have permission to delete all of them, select OK.
If you select a combination of photos that are linked to items, photos that belong to albums, and photos that don't belong to albums, you can delete only the photos that don't belong to albums or delete all the photos that aren't linked to items.
You select:
The confirmation dialog displays:
