![]() Search tips
Search tips
- To search in a subset of topics, select
 in the search field and select a filter.
 - To search for a specific word or phrase, add quotation marks around it (example: "team member") in the search field.
- To remove highlighting on the search terms in a topic, select
 .
. - To search within a topic, select
 , press Ctrl+F, and enter the search term.
ProjectSight Mobile
Take ProjectSight's cloud-based construction project management software with you in the field on your phone or tablet.


In the settings, you can change the general settings for drawings, specifications, and record types. The settings are saved automatically.
- Open the record settings.
- Select the record type.
- On the settings menu, select General.
If you make an item type available, anyone with the related permissions can view, create, and edit the items.
To ensure that you can process specification documents in specification sets, turn on the setting for specifications.
- In the General section, select the Enable ItemType checkbox.
You can select which users have access to an item type.
Other factors also affect a user's access to specific records.
- In the Default record sharing access section, select an option:
- Entire project: All project users, regardless of their involvement. In the Sharing panel of new records, the Entire project option is selected by default.
- Companies participating on the record: Only users from participating companies. In the Sharing panel of new records, the Participating companies option is selected by default.
- In the Update existing records dialog, select an option:
- Yes: The selected option is applied to all existing records, including locked records and draft records from other users, and is the default for new records.
- No: The selected option is not applied to existing records but is the default for new records.
- Cancel: No changes are applied, and the sharing setting reverts to the previous selection.
- If the Companies participating on the record option is selected, select the PrimaryCompany may always access all ItemType checkbox.
Users from the primary company, defined in the Project form, have access regardless of their involvement or the sharing setting in the record. However, they must have the View permission.
Users from the project's primary company, Company A, are allowed to access all RFIs. A user from Company B creates a non-draft RFI and limits access to participating companies. Company A users with the View permission for RFIs can view this RFI even though Company A is not a participating company.
When you create a specification set, the default specification group is selected automatically. The specification group is part of the unique key that identifies each specification.
- In the General section, from the Default Group list, select an option.
If you make a record type available for linking to drawing annotations, you can select it from the list for linking records.
- In the General section, ensure that the Enable RecordType checkbox is selected.
- Select the Enable Linking to Drawing Annotations checkbox.
You can set up autonumbering, so the item number is incremented for each new item. The generated number is unique for that item type in the current project. The number is the next available one after the last generated number.
Autonumbering doesn't include letters or formatting.
- In the Numbering section, select the Auto Increment Numbers checkbox.
- In the Number of Characters field, enter the minimum number.
- The first item number is 01.
- The next item number after 99 is 100.
You set the minimum number of characters to 2.
- In the Number of Characters field, enter the minimum number, and then press Enter.
- In the Update Number of Characters dialog, select Yes.
For existing non-draft records, zeroes are added to or removed from the beginning of the record number.
For records that were created when autonumbering was off, the record number isn't updated.
Applies to: Drawing sets, specification sets
When you publish drawings in a drawing set or specifications in a specification set, you can set the default group that will be notified:
- Project Participants: All the project contacts.
- Drawing or Specification Participants: The author, assignees, and courtesy copy recipients.
For drawing sets, notifications are also sent to users who add a comment on the Comments tab.
- In the General section, from the Publish Notification To list, select an option.
When you create a record, the Due Date field is set automatically based on the number of review days after the Created On field. However, you can still edit the dates.
If the review time is set to 0, the Due Date field is empty when a record is created.
- In the General section, in the ItemType Review Time (days) field, enter the number of days.
Applies to: Drawings
You can select how revision numbers are set for uploaded drawings:
- Sequential: If the drawing is the first revision in the drawing series, the revision number is automatically set to the drawing revision default from the field attributes. If the drawing is a subsequent revision, the revision number is incremented automatically based on the drawing marked as Current.
- Extract revision number from title block: The revision number is extracted automatically from the title block of the drawing.
You can also manually edit the revision number for a drawing.
- In the Revision number section, select an option.
If snapping is on while you draw a measurement annotation, the lines are moved automatically to the nearest point or line in the drawing. If you move or resize that annotation, snapping is no longer applied.
Drawing a measurement annotation when snapping is on
- You can temporarily turn off snapping if you press the Shift key while you draw a measurement annotation.
- Snapping isn't supported in raster drawings.
- In the General section, select the Enable Snapping for Measurement Annotations check box.
If you turn the superseded stamp on, published drawings with the Not Current status are overlaid with the stamp in the drawing viewer. The stamp is also included when the drawings are downloaded or included in a report.
- If a drawing is included in an emailed report, then marked as obsolete, and then opened from the report, the drawing is overlaid with the stamp.
- This feature is only supported in the ProjectSight web app.
You can use the default image or upload a custom image. The supported file types are .bmp, .gif, .jpg, and .png.
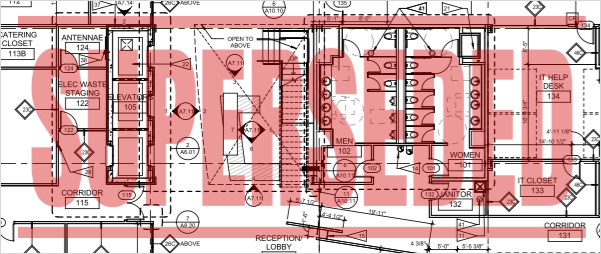
Default superseded stamp on an old revision
- In the Superseded Stamp section, select the Show Superseded Stamp check box.
- Ensure that the Use Default Image toggle is on.
- From the Stamp Position list, select where the stamp will appear on the drawings.
- In the Superseded Stamp section, select the Show Superseded Stamp check box.
- Select Upload.
- Drag the image file from your computer to the Upload Image dialog.
- In the Crop the image dialog, do any of the following:
- To move the image, select and drag the middle of it.
- To resize the image, select and drag a sizing handle.
- Select
 (Crop).
 - From the Stamp Position list, select where the stamp will appear on the drawings.
—Or—
Select Browse, and then select the image file.

The Use Default Image toggle is turned off automatically.
If you switch back to the default image, the custom image remains in the system so that you can use it again.