Search tips
- To search in a subset of topics, select
 in the search field and select a filter.
 - To search for a specific word or phrase, add quotation marks around it (example: "team member") in the search field.
- To remove highlighting on the search terms in a topic, select
 .
. - To search within a topic, select
 , press Ctrl+F, and enter the search term.
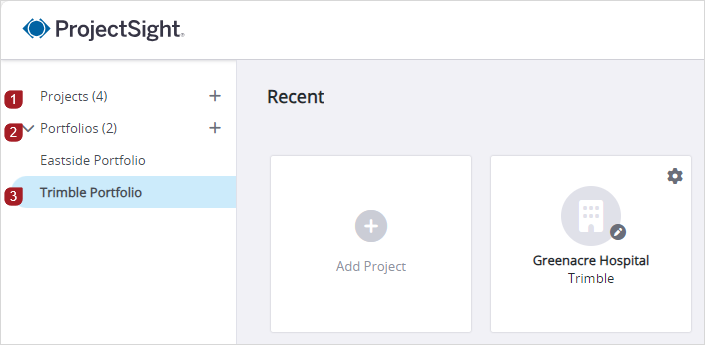
You can open your free and paid projects from the project selection page. This page is organized into the following areas:
- Global projects: All the projects that you have access to.
- Portfolios: All the portfolios that you have access to. This area is visible if you have access to at least one portfolio.
- Portfolio-specific projects: The projects that you have access to in each portfolio.

Areas of the project selection page
After you open a project, the following elements are displayed:
- Project overview: The details in the overview come from the Project form. The project overview is available only on screens that are at least 960 pixels wide.
- Project dashboard: The dashboard contains widgets with project information.
- Filter the list of projects.
- From the filter list at the top, select a filter.
- Owned by anyone: All projects that you have access to.
- Owned by me: Projects that you created.
- Not owned by me: Projects that are created by companies other than your own.
- In the search field at the top right, enter the search terms.
- In the View options panel, modify the options.
- If the panel is closed, select
(View options) on the top-right of the project selection page.
- In the panel, modify the options.
- To reset the panel options to their defaults for the selected view, select Reset.
- To switch to the tile view, select
 (Tile).
 - To add or remove columns in the list view:
- Select
 (Columns).
 - Select the checkboxes of the columns that you want to add to the list view.
- Select Apply.
- To sort the projects in the list view by a column, select the column.
The panel icon displays a dot if you apply any options in the panel.

—Or—
To switch to the list view, select ![]() (List).
(List).
- Select a portfolio name in the menu to see its projects.
- Filter the list of projects.
- From the filter list at the top, select a filter.
- Owned by anyone: All projects that you have access to.
- Owned by me: Projects that you created.
- Not owned by me: Projects that are created by companies other than your own.
- In the search field at the top right, enter the search terms.
- In the View options panel, modify the options.
- If the panel is closed, select
(View options) on the top-right of the project selection page.
- In the panel, modify the options.
- To reset the panel options to their defaults for the selected view, select Reset.
- Select the project tile.
The panel icon displays a dot if you apply any options in the panel.

- On the project selection page, select
(Settings) on the project tile or row.
—Or—
In the project, select (Settings) on the banner.
- On the dashboard, select
(Edit) on the navigation toolbar.
—Or—
In the overview on the project dashboard, select (Edit).
- In the Project form, on the navigation toolbar, select
(Sharing).
- In the Link section, select Copy.
The link is copied to your clipboard and is ready to be shared. For example, you can paste the link in an email.
If ProjectSight doesn't have access to your clipboard, the entire hyperlink text is selected automatically. Then you can use keyboard shortcuts to copy and paste it.
- In the banner, select the project switcher, and then select a project from the list.

The list only shows projects that you have access to in the same portfolio. To switch to a project in a different portfolio, select My Projects at the bottom of the project menu, and then open the project.
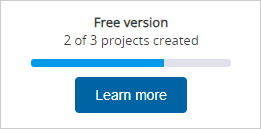
You can create up to 3 free projects that are automatically added to a portfolio called My portfolio (Free Version).
In the project menu, you can see how many free projects that you've created.

Number of free projects created
- Select the Add Project tile.
- Select the checkbox on the ProjectSight free subscription page to agree to the terms and conditions.
- Enter the project name and number, and then select Next.
- Upload your project information.
- To include sample data in your project, select the Include sample data checkbox.
- Select Browse, and select one or more drawings (.pdf or .zip files).
- To upload more drawings, select Browse, or drag the drawings to the upload area.
- Select Next.
- Invite team members to collaborate in your project.
- Enter the email address.
- Select the role.
- Select Invite.
- Select Let's go.
If you have permission to create projects in a portfolio, the terms and conditions aren't displayed.
The sample data includes 2 drawings and an RFI.
—Or—
Drag the drawings to the upload area.
To remove a drawing from the upload list, select next to the drawing.
- Select the Add Project tile.
- From the Portfolio list, select My portfolio (Free Version).
- To set the project number in the Number, enter a unique combination of the prefix, sequence, and suffix.
- Use an existing project as a template.
- From the Project template list, select the project that you want to copy.
- To copy the project-specific settings, turn on the Project settings toggle.
- To add all the team members to your new project, turn on the Team members toggle.
- Upload your project information.
- To include sample data in your project, select the Include sample data checkbox.
- Select Browse, and select one or more drawings (.pdf or .zip files).
- To upload more drawings, select Browse, or drag the drawings to the upload area.
- Select Next.
- Invite team members to collaborate in your project.
- Enter the email address.
- Select the role.
- Select Invite.
- Select Let's go.
The prefix and suffix are optional.
This option is available if you previously created a project.
The sample data includes 2 drawings and an RFI.
—Or—
Drag the drawings to the upload area.
To remove a drawing from the upload list, select next to the drawing.
This step is unavailable if you use a project template and turn on the Team members toggle.
You can edit the project details, including information that's displayed on the project home page. Changes are logged on the History tab.
- Open the Project form.
- Edit the basic project information.
- Edit the project name, which is displayed throughout the project.
- Edit the start date and time, which are used for the Work Progress widget on the project home page.
- Edit the address, building type, construction type, and owner, which are displayed in the summary on the project home page.
- Select
(Save).
You can upload an image that represents the project. The supported file types are .bmp, .gif, .jpg, and .png.
The project image can't be deleted, but you can upload a different image to replace it.
- Select Projects in the left panel.
- On the project selection page, select
 (Tile).
 - On the portfolio tile, select
 (Upload photo).
 - Drag the image file from your computer to the Upload Image dialog.
- In the Crop the image dialog, do any of the following:
- To move the image, select and drag the middle of it.
- To resize the image, select and drag a sizing handle.
- Select
(Crop).
—Or—
Select Browse, and then select the image file.

You can create a report that only includes the records in the current project or a report that also includes records from other projects in the portfolio.
Linked files aren't included in project reports.
- On the navigation toolbar, select
(Print report).
- Select the report template.
- Select the report type.
- Edit the file name.
- If available, select the report format.
- To include records from projects that you have access to, select
(Open) in the Projects list, and then select the projects.
- On the button, select
, and then select an option:
- View
- File Library
- Download
 Email
Email


The available options depend on the type of report.
You can permanently delete a project from ProjectSight.
You cannot restore a deleted project.
- Open the Project form.
- Select
(More) > Delete.
- In the confirmation dialog, type the word DELETE, and then select Delete.
The Delete button is available when you type the word correctly.


