Search tips
- To search in a subset of topics, select
 in the search field and select a filter.
 - To search for a specific word or phrase, add quotation marks around it (example: "budget column") in the search field.
- To remove highlighting on the search terms in a topic, select
 .
. - To search within a topic, select
 , press Ctrl+F, and enter the search term.
You can create and publish checklist templates, which are used for checklist records. Your changes are saved automatically if you navigate to the previous or next checklist template.
The template list displays draft templates and the newest published revision of each template. If you unpublish a template, it remains in the list until you create a new revision for it.
- Open the record settings.
- Select Checklists.
- On the settings menu, select Templates.
- In the checklist template settings, select the template.
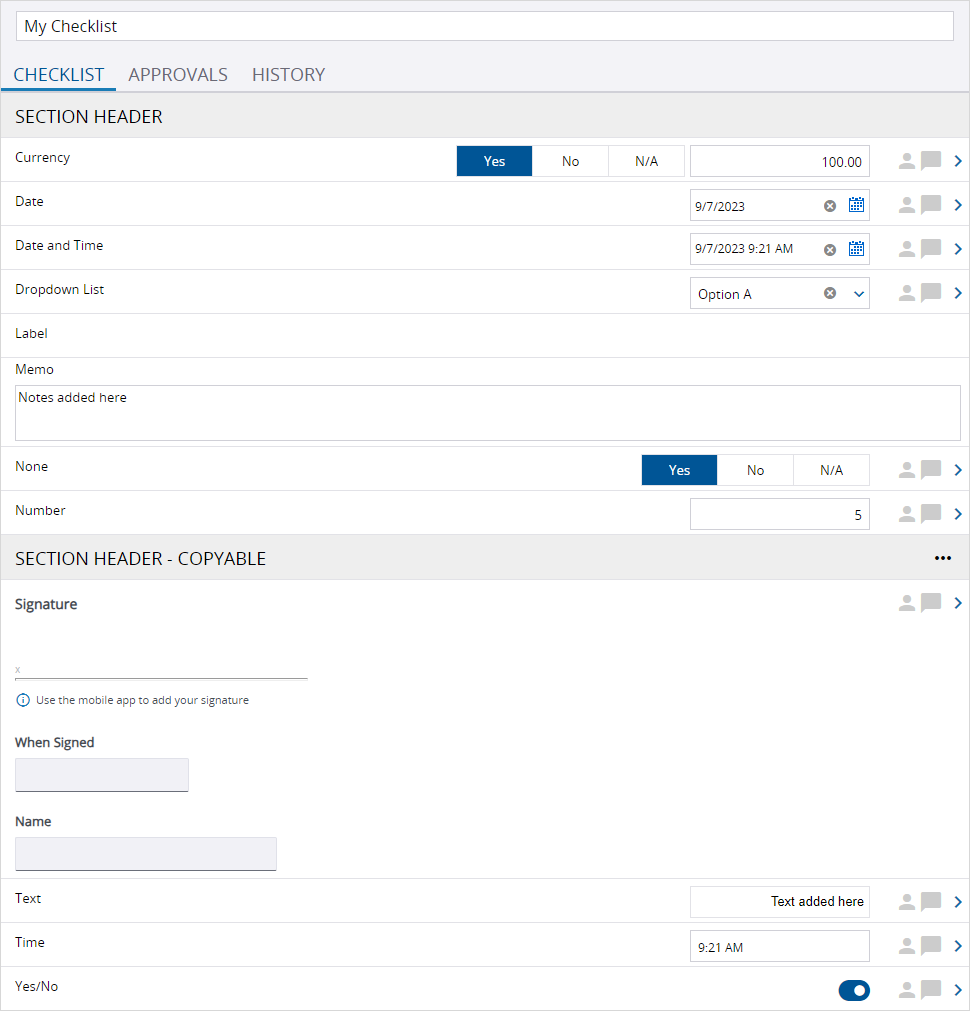
You can add different types of items to a template.
You can include an optional results selector for each item type except for Labels, Memos, Section Headers, and Section Headers - Copyable.

Checklist created in the ProjectSight web app
| Item type | Description |
|---|---|
| Currency | Number field for a monetary value. |
| Date | Field with a date selector. |
| Date and Time | Field with a date and time selector. |
| Dropdown List | List of options that are defined in the template. |
| Label | Text without a field or results selector. |
| Memo | Multi-line field for alphanumeric text without a results selector. |
| None | Label with a results selector but no additional field. |
| Number | Generic number field. |
| Section Header | Header above a group of items. In a checklist record, the items under the section header are grouped together. |
| Section Header - Copyable | Header above a copyable group of items. In a checklist record, the header and its group of items can be copied and inserted as a new section. |
| Signature | Signature section. The fields in the signature section are read-only in the web application but can be completed in the mobile app. |
| Text | Single-line field for alphanumeric text. |
| Time | Time field that's not affected by timezone adjustments. |
| Yes/No | Yes or no toggle. |
A checklist template contains checklist items, which are questions and their acceptable response types. You can add the items in ProjectSight or use the Excel import sheet.
- Required fields are marked with an asterisk (*) but aren't enforced until you publish the template.
- The status is updated automatically based on the publishing status of the template.
- On the navigation toolbar, select Add.
- In the Name field at the top-left, enter the template name.
- In the Information panel, select the module.
- On the Checklist tab, add the checklist items.
- Select Add.
- In the new row, select the item type, and then enter the item description.
- To include the results selector, select the Include Yes/No/NA checkbox for the item.
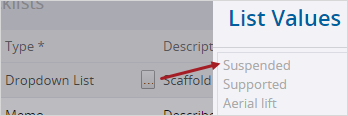
- For dropdown lists, select
 , and then enter each option on a separate line.
 - To reorder the items, select a row, and then select Up or Down.
- To remove an item, select the checkbox for the row, and then select Remove.
- On the Approvers tab, select Add, and then select the workflow roles that can approve the checklist.
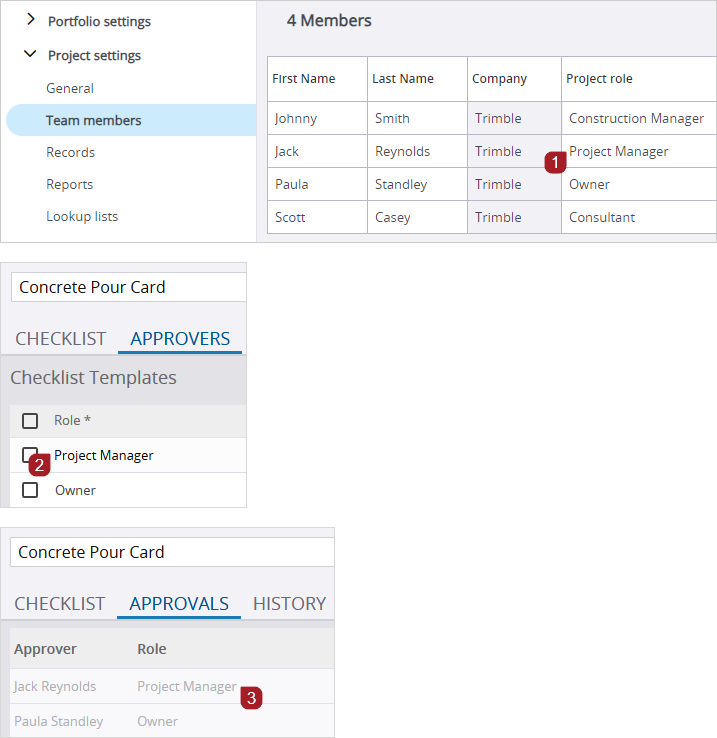
- Team members: Workflow roles are assigned to the contacts.
- Team members: Project roles are assigned to the contacts.
- Checklist template: Roles are selected for the approvers.
- Checklist record: Contacts in the selected roles are approvers.
- To save the changes and keep the template open, select
(Save).
—Or—
To insert a row above the current one, select Insert.
The Include Yes/No/NA checkbox is not applicable for the Label, Memo, Section Header, and Section Header - Copyable types.

When a checklist is created from this template, project contacts in the selected roles are automatically added to the Approvals tab.
In the following images:

—Or—
To save the changes and close the template, select (Save).
- Open the latest revision of a published checklist template.
- On the navigation toolbar, select
(Copy).
- Edit the template name.
- On the Checklist tab, edit the items.
- On the Approvers tab, edit the workflow roles.
- To save the changes and keep the template open, select
(Save).
The revision number is incremented automatically.
—Or—
To save the changes and close the template, select (Save).
When you publish this revision, the previous revision is automatically unpublished.
You can edit checklist items in ProjectSight or use the Excel import sheet. Only unpublished checklist templates can be edited. To edit a published template, create a revision of the published template and publish it.
Record and field permissions are checked when you export checklist templates to an Excel file and when you import the file into ProjectSight.
- Open the checklist template.
- On the Checklist tab, edit the type or description of the items.
- To reorder the items, select a row, and then select Up or Down.
- To remove an item, select the checkbox for the row, and then select Remove.
- On the Approvers tab, edit the workflow roles.
- Create or open a checklist template.
- On the navigation toolbar, select
(Import/Export) > Export to Excel.
- Open the Excel file.
- Add, edit, and delete the checklist items.
- Value Type and Description are required fields.
- For dropdown lists, enter the options in the List Values column, and type a caret (^) between them.
- The Include Yes/No/NA column is not applicable for the Label, Memo, Section Header, and Section Header - Copyable types. If you select Yes for these types, the selection is ignored when you import the Excel file back into ProjectSight.
- Save the Excel file.
- In ProjectSight, open the checklist.
- On the navigation toolbar, select
(Import/Export) > Update from Excel.
- Select the Excel file to import.
The Checklist tab is updated to match the file.
Publish a checklist template to make it available for creating checklists. You can also unpublish a template so it's no longer available.
- In the checklist template, select Publish Template.
- In the checklist template, select Unpublish Template.
The checklist template is now locked and can't be republished. You can create a new revision of the template and then publish it.
You can only delete checklists that have never been published.
- To switch to the Select mode, select the checkbox for a checklist template.
- To choose more checklist templates, select each one.
- Select
(More) > Delete Selected Records.
—Or—
To choose all the checklist templates, select the checkbox on the toolbar.

To delete one item, you can also:
- Select
(More) > Remove on the item.
- Open the item, and then select
(More) > Delete on the navigation toolbar.


