Projects
A project contains the records and files related to your construction project.
Project Home Page
From the project home page, you can access the project menu, the notifications center, project settings, the Quick Add menu, your most used records, and recently viewed or modified drawings. You can also view project details and add team members.
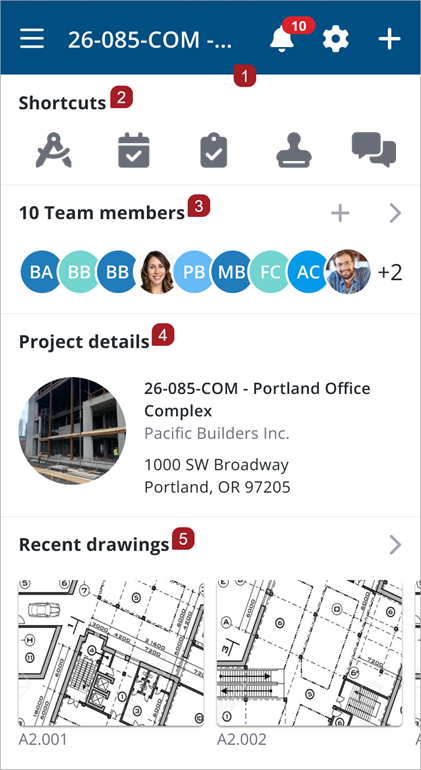
- Navigation bar
- Shortcuts
- Team members
- Project details
- Recent Drawings
From the project home page, you can access the project menu, the notifications center, project settings, the Quick Add menu, your most used records, and recently viewed or modified drawings. You can also view project details and add team members.
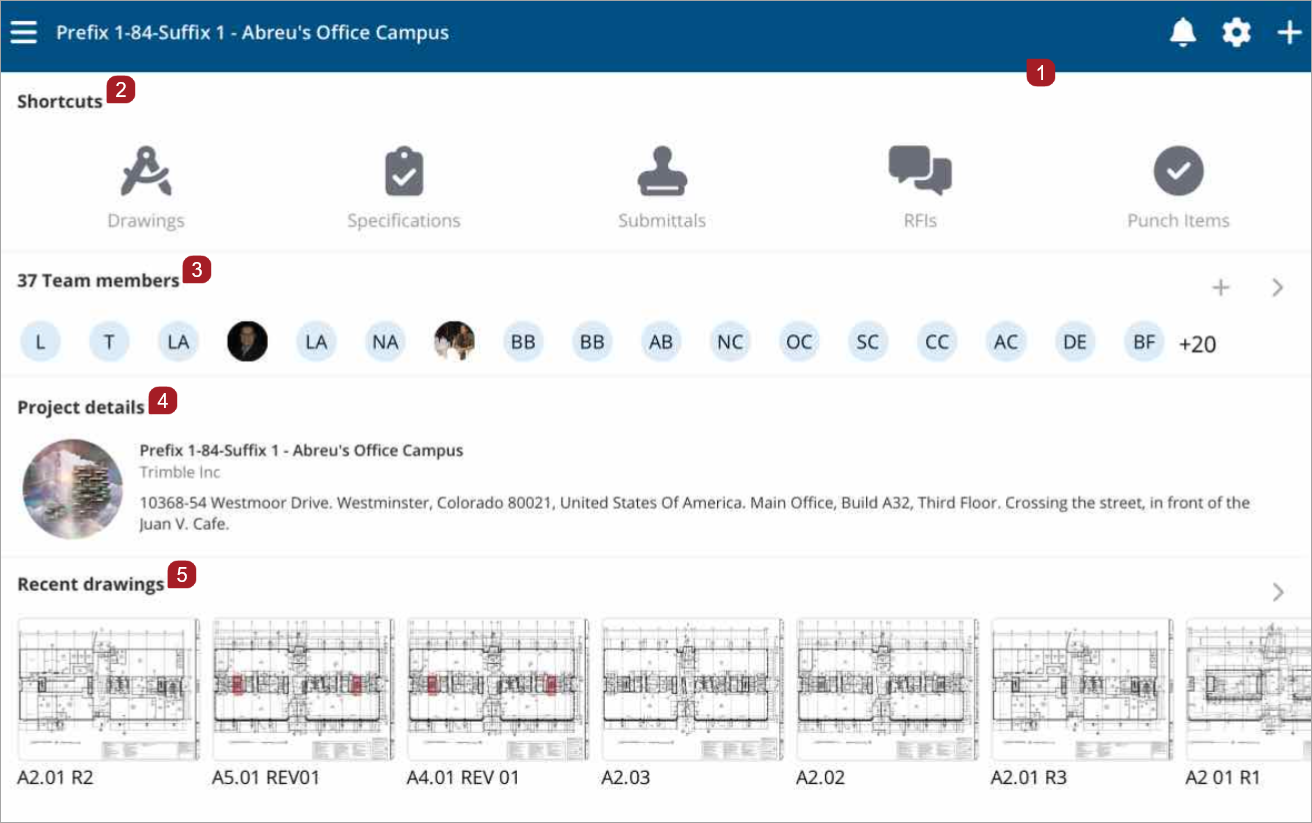
Tablet landscape view
- Navigation bar
- Shortcuts
- Team members
- Project details
- Recent Drawings
From the project home page navigation bar, you can open the project menu, access the notification center and project settings, and open the Quick Add menu.

- Project menu
- Project number and name
- Select the Bell to open the notification center. The red badge on the bell displays the number of unread notifications.
- Project settings
- Quick Add menu
Select the Bell icon on the navigation bar to open the Notifications page. Notifications can be accessed from the Projects home page, Settings, Record lists, or Team members.
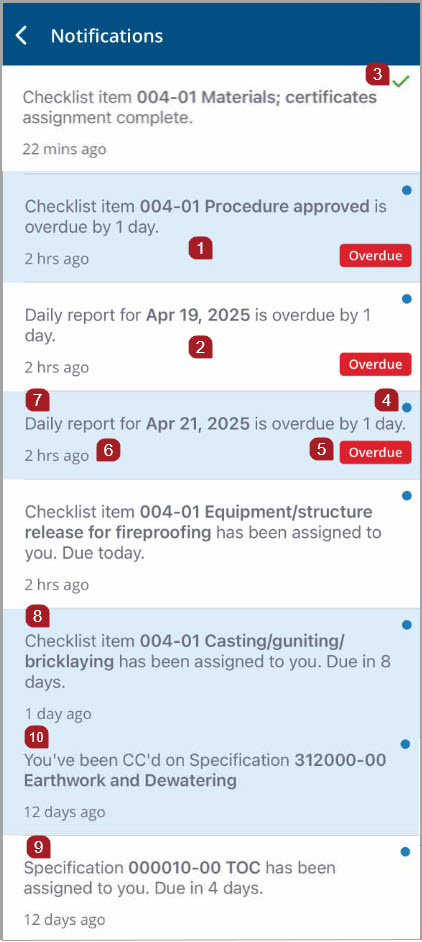
- A blue background displays for unread notifications
- After you tap on a notification card, a white background displays indicating a read notification.
- Status: For status workflows, a green check mark indicates completed items
-
For template workflows, available to ProjectSight Enterprise users, a green check mark does not display. Assignments are closed and drop from the notifications center once the step is complete and submitted.
- Status: A blue dot displays for items that need to be done
- Status: A red overdue badge indicates an overdue item
- A timestamp indicates when you were copied on or assigned to an item. If a reminder notification is sent to you for an incomplete item, the timestamp resets to when you received the reminder notification.
-
Reminder notifications are set in the web application.
- A daily report notification card displays the record name and the date of the record, and the number of days until the assignment is due.
- A checklist item notification card displays the record number, the item or question that requires follow up, and the number of days until the assignment is due.
- This specification notification card displays the section code and revision, the section name, and the number of days until the assignment is due.
- A notifications card can also display items that you have been copied on
Notification cards for other records types display the record type, record number and name, and the number of days until the assignment is due.
If an assignment is due on the day you open the notification center, Due Today displays instead of number of days until the assignment is due.
For workflow statuses records, notifications are removed from the notification center once a record is closed.
Action items, Checklists, Daily Reports, Field Work Directives, and Safety Notices record types are not available for projects with the Go or free version of ProjectSight.
Workflow Templates Notifications
Workflow templates are not applicable for Free or Go projects.
In template workflow, reminders and overdue notifications are based on step due date, not the record due date. Step due dates are set by your administrator in the web app.
Based on the step due date, notification cards display due and overdue messages:
- The Due in [number] days message is figured by subtracting the current date from the step date.
- The Overdue by [number] days message is figured by subtracting the step due date from the current date.
If the step due date is updated, the existing alert in the notifications center is marked as unread.
In-app alerts include assignments and courtesy copies (CCs). CCs can be added to records in any step except the final step as the record is locked. Assignment notifications center:
- If you are a step assignee, you will receive an assignment alert. If a step due date is updated, you will receive an updated alert on current assignments.
- If you are both assigned and CC'd on a record, you will receive only an assignment alert.
- If you are assigned as a CC on a record that is overdue, you will not receive an overdue badge notification because you are not required to take action.
The step due date is included in email notifications.
For an overview of workflow templates and information on email notifications, see Workflow Templates.
The following record types support workflow templates: Action Items, Daily Reports, Field Work Directives, Issues, Notices to Comply, Punch Items, RFIs, and Safety Notices.
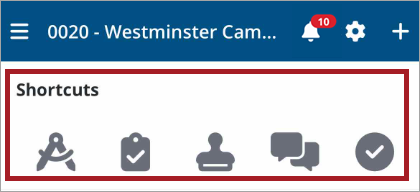
Use Shortcuts to quickly navigate to the records you use most. As you use the records that you have permissions to view, the Shortcuts icons will default to the top five records that you access the most. Select an icon to open the record.
By default, Shortcuts icons display in the following order for new users: Drawings, Specifications, Submittals, RFIs, and Checklists.
Record Icons
From Team members, quickly view and add team members.
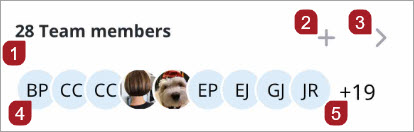
- Number of team members
- Select + to open the Invite team member form.
- Select > to view the team members contact list.
- Select a member avatar to view the member card where you can call, text, or email them.
- The number of additional team members not visible on the project home page.
Project details set in the web app display on the project home page.
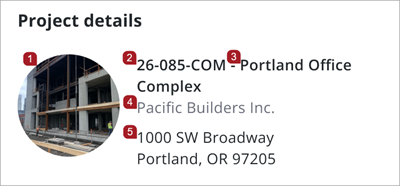
Project details with a project number that includes a prefix and suffix.
- Project avatar
- Project number
- Project name
- Company name
- Project address
For Go and Enterprise users, if project properties set in the web app include a prefix and suffix, this project number format displays: [Prefix] - [Sequence] - [Suffix].
From Recent drawings, if you have view permissions, you can easily access drawings that you have recently modified or viewed.
If you do not have view permissions for drawings, Recent drawings will not display on your project home page.

Recent drawings empty carousel. No drawings have been viewed or modified yet.
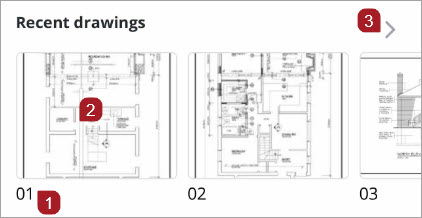
Recent drawings carousel, which displays the last 25 drawings you have viewed.
For the free version of ProjectSight, if you included sample data when you created your project, two sample drawings will display in the drawings carousel.
- Drawing number
- Select a drawing to open it.
- Select > to open the drawings list.
Watch a video: ProjectSight Mobile - Project Home Page Navigation
Project Menu
To open the project menu, select ![]() on the navigation bar from anywhere in the application.
on the navigation bar from anywhere in the application.
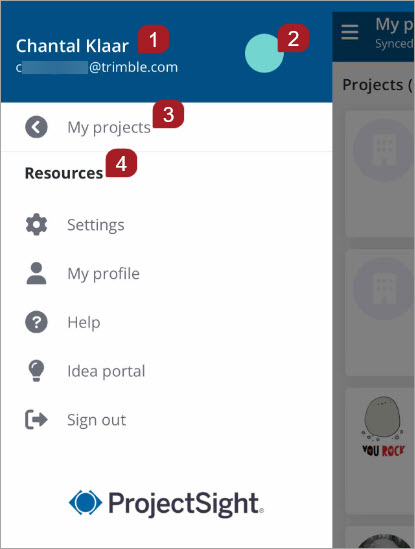
Project menu before a project has been opened
- User name and email
- User avatar, or user initials if an avatar has not been uploaded
- Select My projects to view the projects list
- Resources: Access settings, view your profile information, open Help topics, contribute to the Idea portal, or sign out
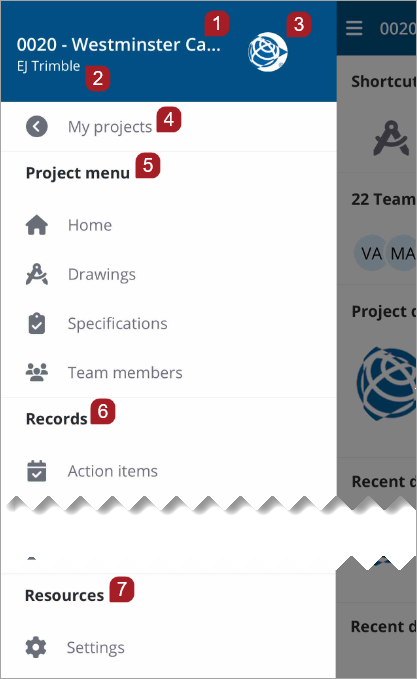
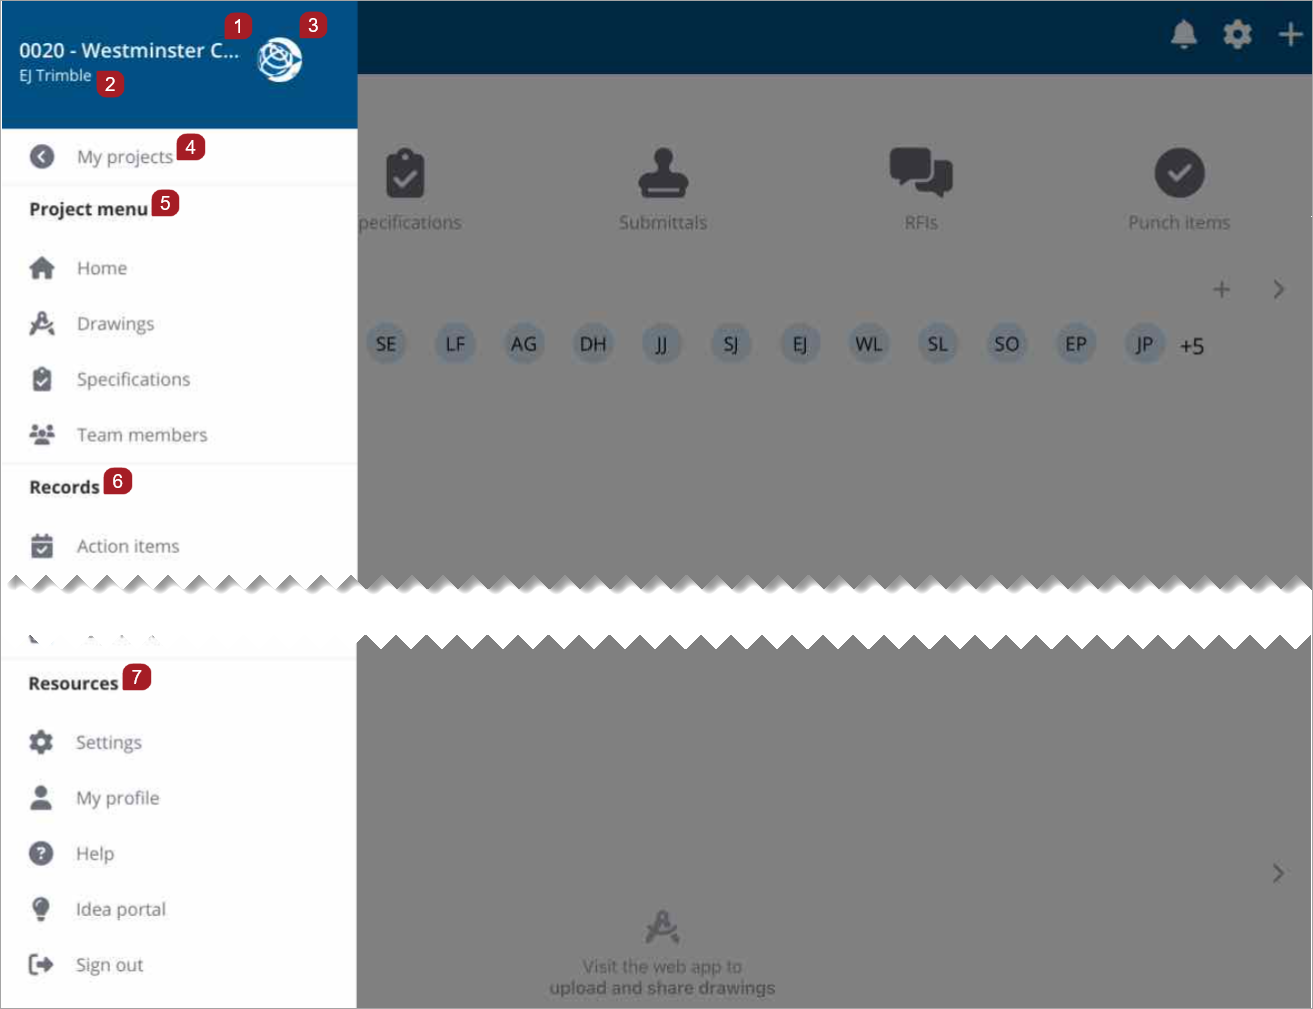
Project menu after a project has been opened
- Project number and name
- Portfolio name
- Project avatar
- Select My projects to view the projects list
- Project menu: Select Home to open the Project home page, or a record type to open it
- Records: Displays the records that you have permissions to view or edit. Select a record to open it.
- Resources: Access settings, view your profile information, open Help topics, contribute to the Idea portal, or sign out
The company name displays for free projects.

For Trimble Connect users, Trimble connect displays in the Resources section.
To open the project menu, select ![]() on the navigation bar from anywhere in the application.
on the navigation bar from anywhere in the application.
Menu view before opening a project
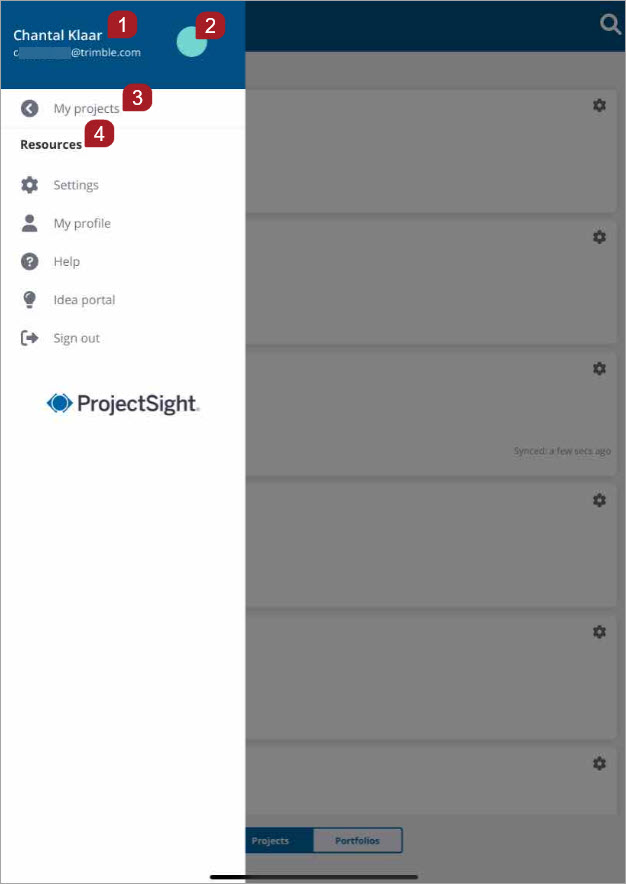
Portrait view
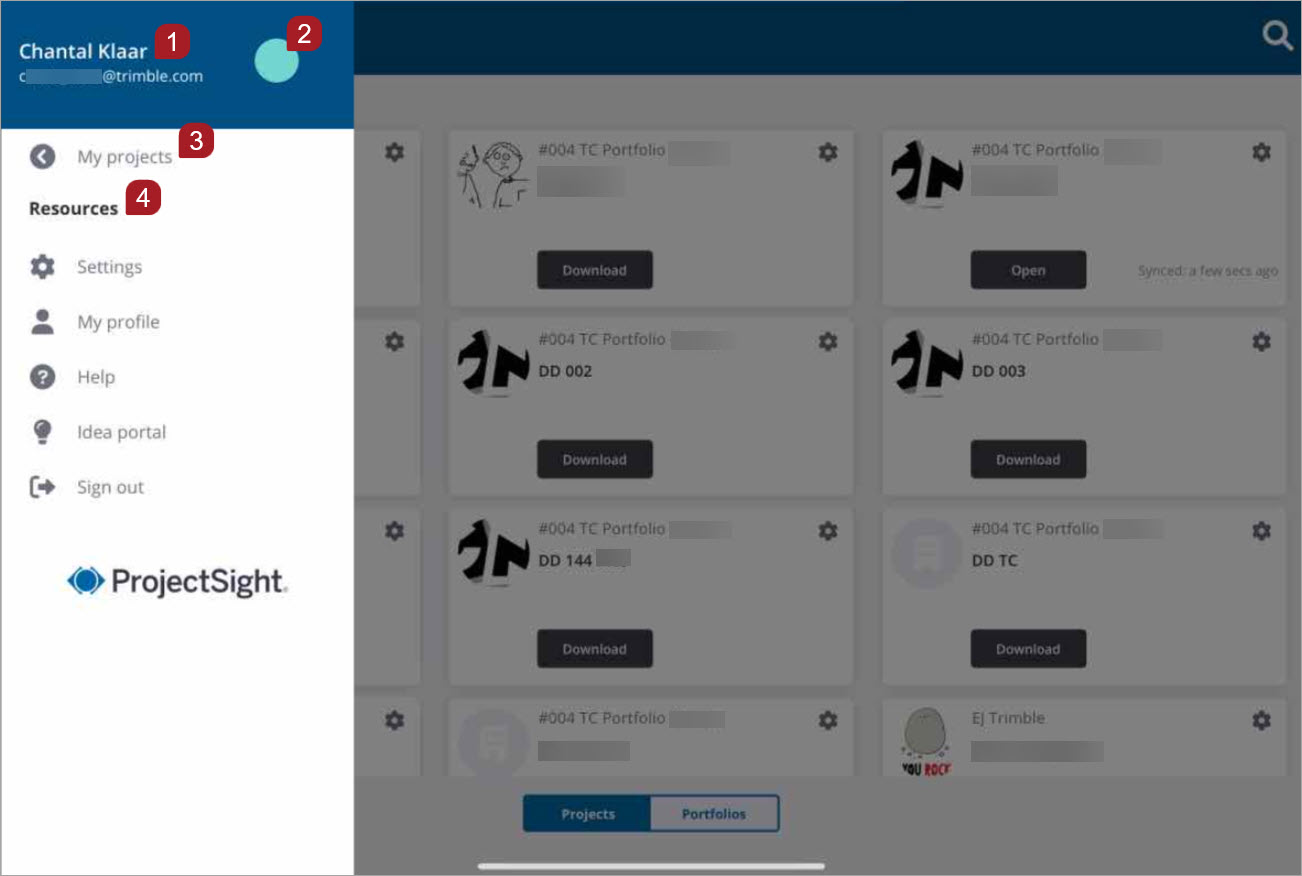
Landscape view
- User name and email
- User avatar, or user initials if an avatar has not been uploaded
- Select My projects to view the projects list
- Resources: Access settings, view your profile information, open Help topics, contribute to the Idea portal, or sign out
Menu view after opening a project
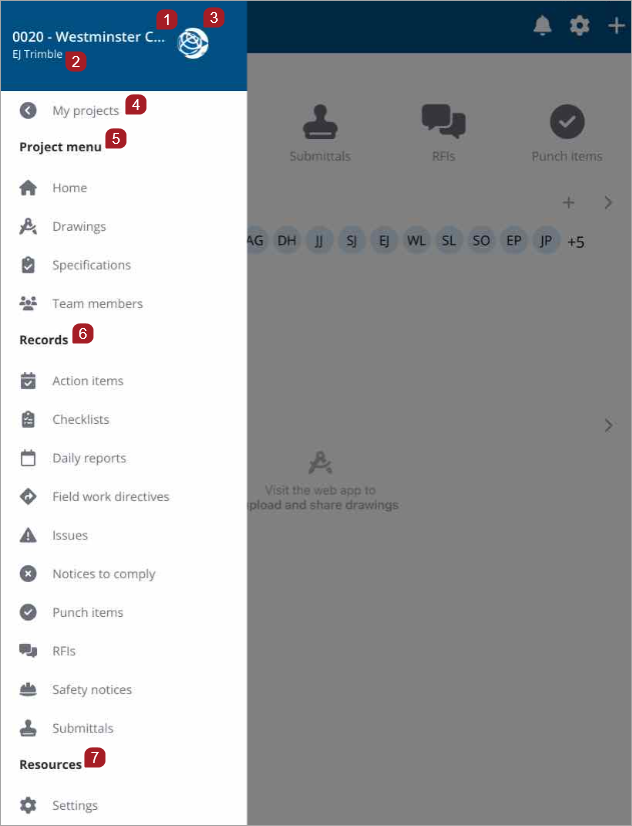
Portrait view
Landscape view
- Project number and name
- Portfolio name
- Project avatar
- Select My projects to view the projects list
- Project menu: Select Home to open the Project home page, or a record type to open it
- Records: Displays the records that you have permissions to view or edit. Select a record to open it.
- Resources: Access settings, view your profile information, open Help topics, contribute to the Idea portal, or sign out
The company name displays for free projects.
For Trimble Connect users, Trimble connect displays in the Resources section.
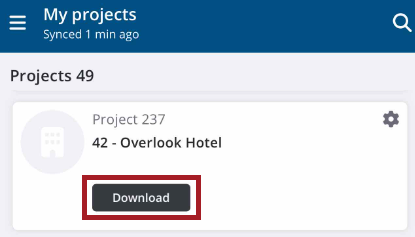
DOWNLOADING
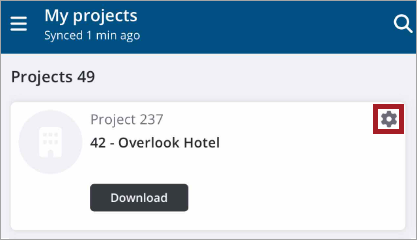
- On the My Projects page, for the project you wish to download, select Download.
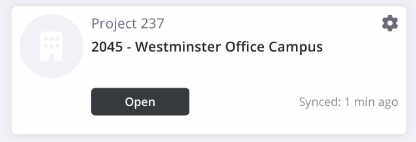
- Select Open to view the project home page.
- Queue multiple projects to download. They will be downloaded one at a time.
-
Files will continue to download behind the scenes while you work. If you encounter one that has not been downloaded, select it to download on demand.
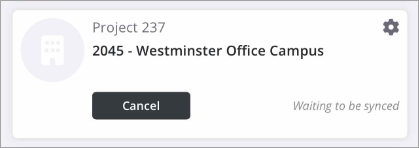
A blue bar indicates the progress of your download. Select Cancel if you would like to stop the download.
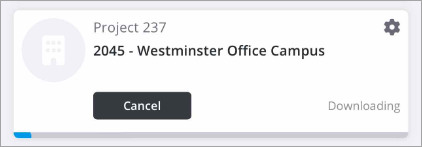
The synced time stamp indicates when the project was last downloaded.
- On the My Projects page, for the project you wish to download, select Customize
 .
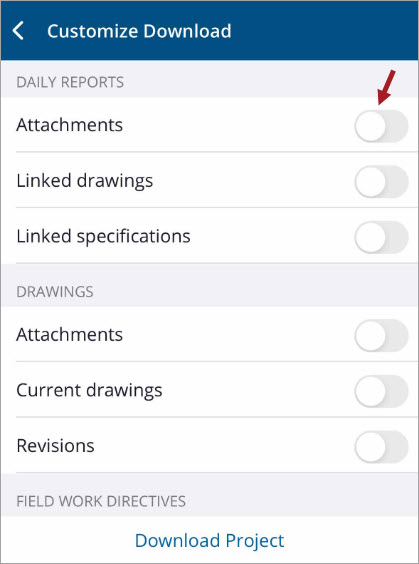
. - On the Customize Download page, toggle on the drawings or record attachments to include in the initial download.
- Select Download Project.
- After the project has downloaded, select Open to enter the project.
- Queue multiple projects to download. They will be downloaded one at a time.
- Files will continue to download behind the scenes while you work. If you encounter one that has not been downloaded, select it to download on demand.
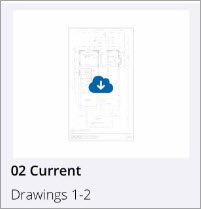
Drawings or attachments that were not part of the initial download can be manually downloaded.
The blue bar indicates the progress of your download. Select Cancel if you would like to stop the download.
The synced time stamp indicates when the project was last downloaded.
INVITING
If you have permissions, you can add team members to your project from the project menu.
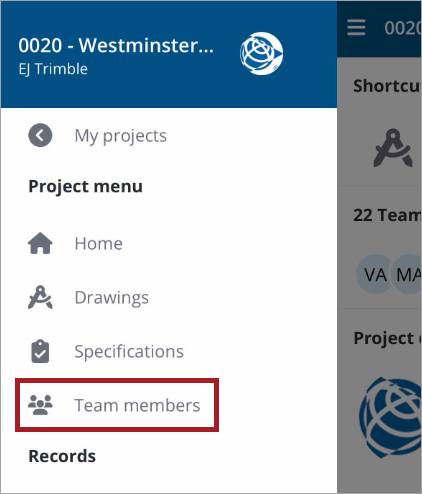
- On the Project menu, select Team members.
- On the Team members page, select Add +.
- Select the Email field to enter an email.
- Select the Security role field to view and choose a role from the Security role list.
- Contributor - (default role) Users with this role have access to edit records in the project they have been invited to. Record type permissions still apply.
- Viewer - Users with this role have access to view records in the projects they have been invited to. Record type permissions still apply.
- Project Administrator - Project Administrators have access to create, edit, and delete records, as well as manage Project Settings.
- Manager - Users with this role have access to create and edit, and remove records in the projects they have been invited to. Record type permissions still apply.
- Select Done.
- Select the First name and Last name fields to enter a name.
- If you have permissions to add companies, select the Company field to enter a company.
- Enter a phone number in the Cellphone field.
- Once all of the required fields are completed, select Invite to send your invitation and return to the Team members list.
An Invite team member form displays.
Contributors may not upload designs or create public annotations.
Managers may upload designs or create public annotations.
Your administrator sets the permissions that control what security roles you see. Users who have paid ProjectSight projects may see different roles depending on their permissions, such as None (contact only), Portfolio Administrator, Standard User, Collaborator, and Power User.
—Or—
Select ![]() to select a company.
to select a company.
If you only have permission to invite users to your own company, the Company field displays as read-only and defaults to your company name.
A confirmation pop-up message displays even if you have navigated to another page.
—Or—
Select Add + to invite the team member.
The form clears and your invitation is sent. A confirmation pop-up message displays: Invite request was sent successfully.
Invite additional team members.
—Or—
To exit the form, select X.
If you have permissions, you can add team members to your project.
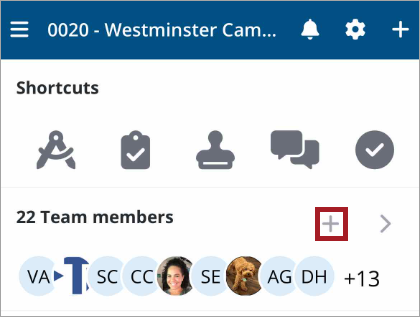
- On the Project home page, select Add +.
- Select the Email field to enter an email.
- Select the Security role field to view and choose a role from the Security role list.
- Contributor - (default role) Users with this role have access to edit records in the project they have been invited to. Record type permissions still apply.
- Viewer - Users with this role have access to view records in the projects they have been invited to. Record type permissions still apply.
- Project Administrator - Project Administrators have access to create, edit, and delete records, as well as manage Project Settings.
- Manager - Users with this role have access to create and edit, and remove records in the projects they have been invited to. Record type permissions still apply.
- Select Done.
- Select the First name and Last name fields to enter a name.
- If you have permissions to add companies, select the Company field to enter a company.
- Enter a phone number in the Cellphone field.
- Once all of the required fields are completed, select Invite to send your invitation and return to the Team members list.
An Invite team member form displays.
Contributors may not upload designs or create public annotations.
Managers may upload designs or create public annotations.
Your administrator sets the permissions that control what security roles you see. Users who have paid ProjectSight projects may see different roles depending on their permissions, such as None (contact only), Portfolio Administrator, Standard User, Collaborator, and Power User.
—Or—
Select ![]() to select a company.
to select a company.
If you only have permission to invite users to your own company, the Company field displays as read-only and defaults to your company name.
A confirmation pop-up message displays even if you have navigated to another page.
—Or—
Select Add + to invite the team member.
The form clears and your invitation is sent. A confirmation pop-up message displays: Invite request was sent successfully.
Invite additional team members.
—Or—
To exit the form, select X.
If you have permissions, you can invite team members to your project with the Quick Add menu.
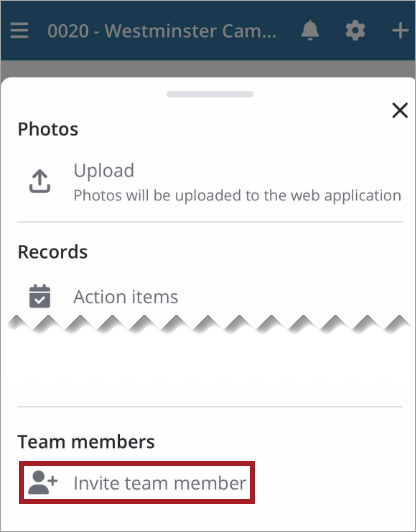
The Quick Add menu.
- On the Project home page, select + on the navigation bar to open the Quick Add menu.
- Select Invite team member.
- Select the Email field to enter an email.
- Select the Security role field to view and choose a role from the Security role list.
- Contributor - (default role) Users with this role have access to edit records in the project they have been invited to. Record type permissions still apply.
- Viewer - Users with this role have access to view records in the projects they have been invited to. Record type permissions still apply.
- Project Administrator - Project Administrators have access to create, edit, and delete records, as well as manage Project Settings.
- Manager - Users with this role have access to create and edit, and remove records in the projects they have been invited to. Record type permissions still apply.
- Select Done.
- Select the First name and Last name fields to enter a name.
- If you have permissions to add companies, select the Company field to enter a company.
- Enter a phone number in the Cellphone field.
- Once all of the required fields are completed, select Invite to send your invitation and return to the Team members list.
An Invite team member form displays.
Contributors may not upload designs or create public annotations.
Managers may upload designs or create public annotations.
Your administrator sets the permissions that control what security roles you see. Users who have paid ProjectSight projects may see different roles depending on their permissions, such as None (contact only), Portfolio Administrator, Standard User, Collaborator, and Power User.
—Or—
Select ![]() to select a company.
to select a company.
If you only have permission to invite users to your own company, the Company field displays as read-only and defaults to your company name.
A confirmation pop-up message displays even if you have navigated to another page.
—Or—
Select Add + to invite the team member.
The form clears and your invitation is sent. A confirmation pop-up message displays: Invite request was sent successfully.
Invite additional team members.
—Or—
To exit the form, select X.
REMOVING
Removing files frees up space in your device. Once removed from your device, they are still available for download.
- Open the project.
- Select
 > Settings > Usage & Sync.
 - Select the item type.
- Disable Auto Upload.
- In the File Size row, select Remove.
The files from the selected record type are removed from the device.
- Open the project.
- Select > Settings.
- Select Remove Project.
The project and its files are removed from the device.
Visit the web application to remove free projects.
VIEWING
At the bottom of the My Projects page, a Projects/Portfolios toggle displays.
The Projects/Portfolios toggle does not display for users with only free projects.
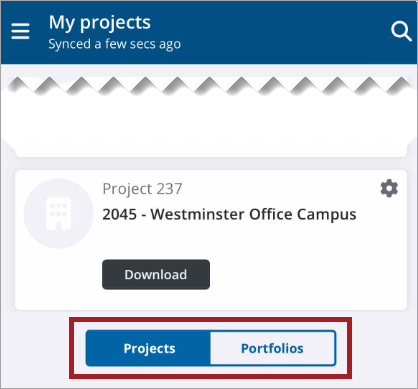
- Select Portfolios to display a list of portfolios you have permissions to view.
- Select a portfolio to view its projects.
—Or—
To return to the My Projects page, select Projects on the toggle.
- To view a data center region list and choose a different data center region select Switch, or to remain in the default data region select x.
-
To change your data region and return to the My projects page, select a different region, then select Confirm.
—Or—
To return to the My projects page without changing the region, select <.
On the My projects page, when you initially sign in to the ProjectSight app, a data center selector pop-up displays with your default Data center region. To view a project in a different region, you must switch to a different data center region.
Your Data center region defaults to the country you selected for your Trimble ID.
To open a project in a different region, you can also change the data center region in Settings. If the data center region you select is offline, a pop-up message displays.

- To view a project in a different region than the default region, select the Data center region field.
-
To change your data region and return to the My projects page, select a different region, then select Confirm.
—Or—
To return to the My projects page without changing the region, select <.
- Enter a company name in the Company field.
- Select the Company Type field to view a list and select a company type.
- Select Select.
- Select Save.
When you select Save, you are accepting and agreeing to the terms of service.
The Add Project page displays.
If you are a new user, or have an incomplete profile, when you sign in to the ProjectSight app, the Complete your profile page displays with your default data center region.
Your Data center region defaults to the country you selected for your Trimble ID.
A data center region list displays.
To open a project in a different region once you have completed your profile, you can change the data center region in Settings, or when you initially sign in to the ProjectSight app with the data center region selector. If the data center region you select is offline, a pop-up message displays.
- Select the project.
To open a project in a different region, first change the region in the settings and then select the project.
- Open the project.
- On the home page Team members widget, select >.
- Select Sort to change the sort order.
- Select a project contact to view their contact details.
- If set up on your device, you can select one of the contact methods to email, phone, or text the project contact.
—Or—
Select ![]() to open the project menu, then select Team members.
to open the project menu, then select Team members.
All project contacts are listed in alphabetical order.
- From the Project home page, Settings page, Team members, or Record list page, select the Bell icon on the navigation bar to open the Notifications page.
- To open the record associated with the notification card, select it.
- To complete an assignment, select Assigned to Assignee, then select the blue check mark.
- To return to the record view, select <.
- Make any other desired edits, then to save your marked assignment and edits, select
 .
. - If you marked an assignment as done and want to return to the Notifications page to see the updated status, or would like to view other notifications, select the Bell icon.
A red badge on the bell icon indicates the number of unread notifications.
A green check mark displays to indicate a completed assignment.
You will be returned to the Record list view for the record type you opened.
Workflow templates are not applicable for Free or Go projects.
- From the Project home page, Settings page, Team members, or Record list page, select the Bell icon on the navigation bar to open the Notifications page.
- To open the record associated with the notification card, select it.
- If you are a required assignee, template manager, or administrator, you can submit the step. On the edit record page, make any desired edits, then select Submit to return to the records list view.
- If you want to return to the Notifications page to see the updated status, or would like to view other notifications, select the Bell icon.
A red badge on the bell icon indicates the number of unread notifications.
A pop-up message displays: New [Record type] created.
If there is a response required for an assignee other than yourself, Submit does not display. The assignee with a required response must respond and submit the step to close it.
—Or—
To make updates based on your permissions and save them without submitting, select ![]() , then select x to return to the records list.
, then select x to return to the records list.
A pop-up message displays: [Record type] updated.
- To open the Project menu, select
 on the navigation bar.
 - To scroll the menu, swipe up or down.
- To close the menu, swipe left or select outside of the menu.
From the Recent drawings carousel, if you have view permissions, you can easily access drawings that you have recently modified or viewed. The carousel displays the last 25 drawings you have viewed.
For the free version of ProjectSight, if you included sample data when you created your project, two sample drawings will display in the drawings carousel.
- Open the project.
- On the Recent drawings widget carousel swipe right or left to move through the photo carousel.
- To open a drawing, select it.
- If you have edit permissions, make your desired edits.
- To close the drawing, select x.
- To open the project menu, select .
- To return to the Project home page, select Home.
If you have view permissions, you can access drawings from the Recent Drawings widget.
- Open the project.
- On the Recent drawings widget of the Project home page, select >.
- To download a drawing, select
 .
. - To open the drawing, select it.
- If you have edit permissions, make your desired edits.
- To close the drawing, select x.
- To open the project menu, select .
- To return to the Project home page, select Home.
By default, Shortcuts icons display in the following order for new users: Drawings, Specifications, Submittals, RFIs, and Checklists. As you use the records that you have permissions to view, the Shortcuts icons will default to the top five records that you access the most.
- Open the project.
- On the Shortcuts widget of the project home page, select a record icon.
- Make your desired edits.
- Select to open the project menu.
- Select Home to return to the project home page.