Onboarding Wizard
Complete your profile, add a project, and invite team members with the onboarding wizard for the free version of ProjectSight.
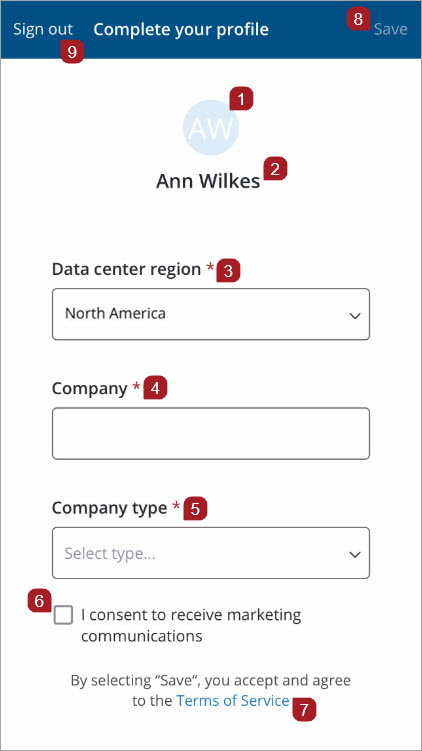
- User avatar
- User name
- To view and choose a project data center region from a list, select the Data center region field.
- Enter a company name in the Company field.
- To view and choose a type from a list, select the Company type field.
- To consent to receiving ProjectSight marketing communications, select the box to check it.
- To view terms, select Terms of Service.
- To accept and agree to the Terms of Service, select Save.
- To exit the Complete your profile page, select Sign out.
Your Data region center defaults to the country you selected for your Trimble ID.
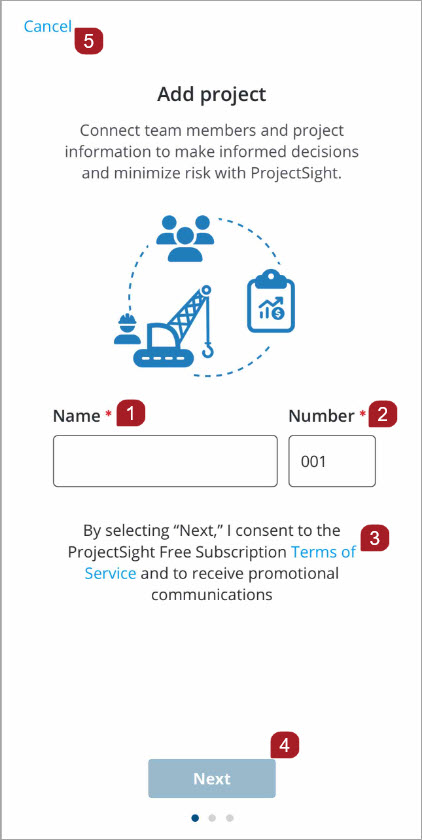
- Enter your project name in the Name field.
- Enter your project number in the Number field
- Select the link to view the Terms of Service
- To access the Invite team members page and to consent to the Terms of Service and receiving promotional communications, select Next.
- To exit the Add project page, select Cancel.
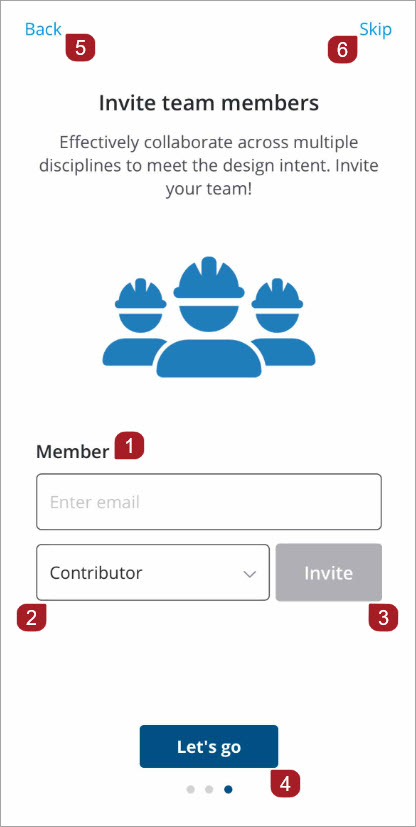
- Enter an email for the contact you want to invite in the Member field.
- To view and choose a security role, select the security role field.
- To send your invitation, select Invite.
- To display your Project home page, select Let's go!
- To return to the Add project page, select Back.
- If you want to add team members later, select Skip.
After you create your Trimble ID, you can complete your profile.
- On the Complete your profile page, accept the defaulted Data center region.
- Enter a company name in the Company field.
- Select the Company Type field to view a list and select a company type.
- Select Select.
- Select the checkbox to consent to receiving ProjectSight marketing communications.
- To view terms, select the Terms of Service link.
- Select Save.
When you select Save, you are accepting and agreeing to the terms of service.
The Add Project page displays.
Your Data region center defaults to the country you selected for your Trimble ID.
—Or—To change the region, select the Data center region field, select a different region from the list, and then select Confirm.
If the data center region you select is offline, a pop-up message displays.

After you complete your profile, you can add a project.
- On the My projects page, select + Add project.
- On the Add project page, enter your project name in the Name field.
- In the Number field, enter your project number.
- If you would like to review the terms of service, select the Terms of Service link.
- Select Next.
- On the Include project information page, select Next to include sample data for your first project and move to the next page.
On the ProjectSight Free subscription page, select the checkbox to agree to terms and conditions, or select Cancel to return to the Add project page.
When you select Next, you are accepting and agreeing to the terms of service and to receive promotional communications.
—Or—
Select Cancel to exit the page.
When you select Next, the Include project information page displays.
—Or—
To move to the next page without sample data, deselect the checkbox.
The Invite team members page displays.
- On the Invite team members page, in the Member field, enter an email for the contact you want invite.
- Select the Security Role field to view a list of roles.
- On the security role list, select a role to choose it.
- Contributor - (default role) Users with this role have access to edit records in the project they have been invited to. Record type permissions still apply.
- Viewer - Users with this role have access to view records in the projects they have been invited to. Record type permissions still apply.
- Project Administrator - Project Administrators have access to create, edit, and delete records, as well as manage Project Settings.
- Manager - Users with this role have access to create and edit, and remove records in the projects they have been invited to. Record type permissions still apply.
- Select Done.
- Select Invite to send your invitation.
- Invite additional team members.
Contributors may not upload designs or create public annotations.
Managers may upload designs or create public annotations.
A pop-up message displays: Yay! You've invited a team member. Add more.
—Or—
Select Let's go! to start collaborating with your team.
Processing may take a few minutes. When your information has uploaded, your Project home page will display.