Drawing Measurements
Add measurement annotations to your drawings to estimate actual sizes. You can add annotations to measure distances, perimeters, and areas.
Measurements in ProjectSight are approximations only.The Measurements tool is located on the Drawings annotation toolbar, and includes the Calibration, Distance, Perimeter, and Area annotation tools.
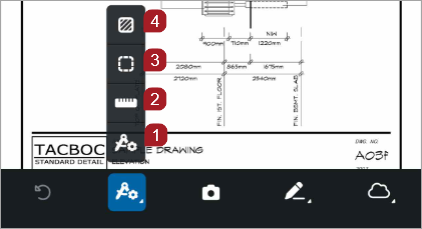
- Calibration tool
- Distance tool
- Perimeter tool
- Area tool
A calibration must be added before the Distance, Perimeter, or Area tools are activated.
Before you add your first measurement annotation, you must calibrate the drawing to set the default scale. The calibration is personal to each user and unique to each drawing revision.
When you calibrate or recalibrate a drawing, existing annotations and previous revisions aren't affected by the new default scale. You can change the scale of an annotation in the drawing, and that doesn't change the calibration of the drawing.
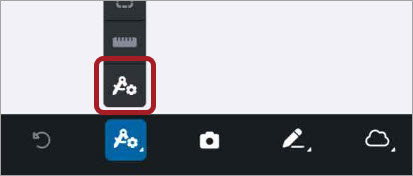
If your calibration is already set, the measurement tools are available in the annotation toolbar. You can recalibrate the drawings at any time.
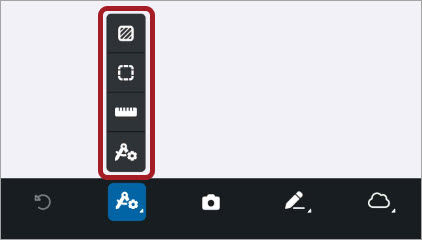
Calibration is set and measuring tools are available
Toggle snapping on to enhance your control over annotation placement and precision. If snapping is on when you draw a measurement annotation your lines are moved automatically to the nearest point or line in the drawing.
Once you turn on snapping, it will apply to any modifications you make to your annotation, as well as for the next measurement annotation you create.
The snapping default setting is on. You can toggle snapping off when you open a drawing.
iOS Device
To toggle snapping on or off for an iOS device, select a measurement annotation, select Edit, select Style, and then in the Snapping section, select the toggle to turn it on or off.
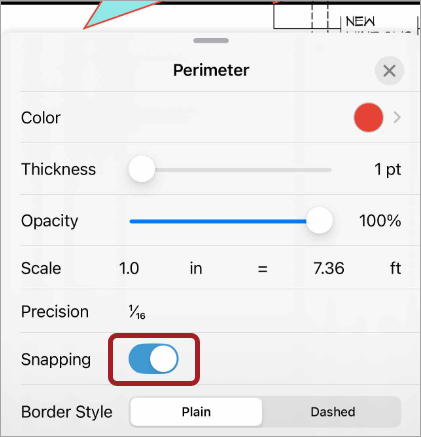
Snapping toggled on in the style drawer
Android Device
To toggle snapping on or off for an Android device, select a measurement annotation, select Edit, select Style![]() , and then in the Snap to points section, select the toggle to turn it on or off.
, and then in the Snap to points section, select the toggle to turn it on or off.
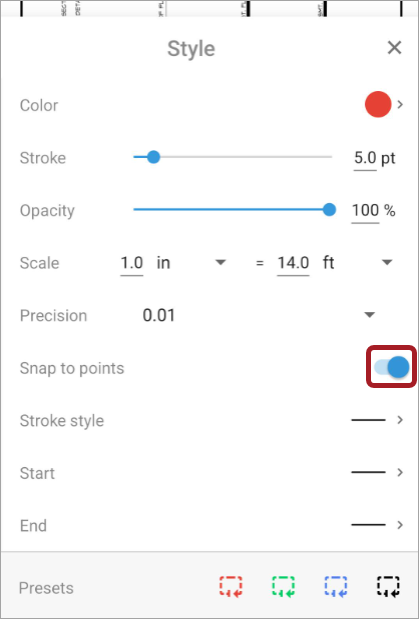
Snapping toggled on in the style drawer
iOS
The measurements tool style menu allows you to adjust annotation style, view annotation information, and link, copy, or delete your annotation.
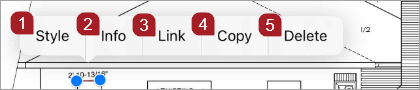
iOS quick style menu
- Select Style to adjust stroke or fill color, thickness, opacity, scale, precision, or border style, or to turn snapping on or off
- Select Info to view the distance, area, angle, perimeter, or axis
- Select Link/Unlink to either attach the annotated drawing to a record or remove the attachment from a record
- Select Copy to copy your annotation
- Select Delete to delete your annotation
In the style drawers you can adjust the appearance of your measurement tool annotations and view distance, angle, and axis information.
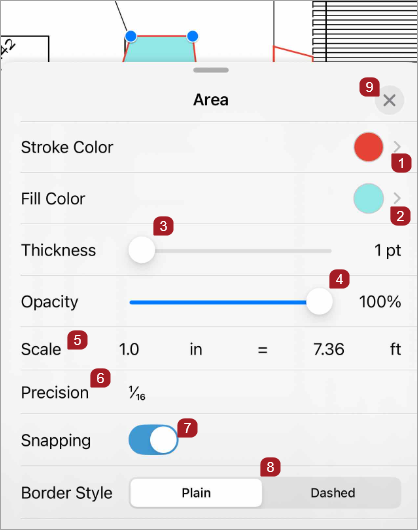
- Select Stroke Color to choose a line color
- Select Fill color to choose a color
- Move the slider right to increase stroke thickness or left to decrease it
- Move the slider right to increase stroke opacity or left to decrease it
- Select Scale, then choose a unit of measure
- Select Precision, then choose an accuracy of measurement
- Turn snapping on and off by selecting the toggle
-
The snapping default setting is on. You can toggle snapping off when you open a drawing.
- Select Plain or Dashed to adjust the border style
- To close the drawer, select anywhere on the drawing or x
Area tool style drawer with snapping toggled on
Fill color is only available for the Area tool
Android
The measurements tool style menu allows you to adjust annotation style, view annotation information, and link, copy, or delete your annotation.
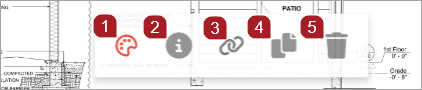
Android quick style menu
- Select Style
 to adjust stroke color, style, and opacity, line weight, scale, precision, or to turn snapping on or off
 - Select Info
 to view the distance, area, angle, perimeter, or axis
 - Select Link/Unlink
 to either attach the annotated drawing to a record or remove the attachment from a record
 - Select Copy
 to copy your annotation
 - Select Delete
 to delete your annotation
In the style drawers you can adjust the appearance of your measurement tool annotations and view distance, angle, and axis information.
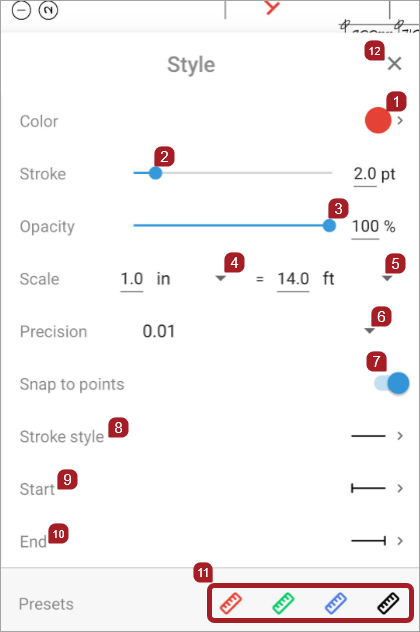
- Select to choose a stroke color
- Move the slider right to increase line weight or left to decrease it
- Move the slider right to increase stroke opacity or left to decrease it
- Select to choose a scale unit of measure in the drawing
- Select to choose scale unit of measure in the real world
- Select to set precision and choose an accuracy of measurement
- Turn snapping on or off by selecting the toggle
-
The snapping default setting is on. You can toggle snapping off when you open a drawing.
- Select Stroke Style to choose a plain or dashed line
- Select Start to choose a style for the beginning of your line
- Select End to choose a style for the end of your line
- Select one of the four icons to choose a present color for your annotation
- To close the drawer, select anywhere on the drawing or x
Distance tool style drawer with snapping toggled on
Calibrate
Before you add your first measurement annotation, you must calibrate the drawing to set the default scale. The calibration is personal to each user and unique to each drawing revision.
When you calibrate or recalibrate the drawing, existing annotations and previous revisions aren't affected by the new default scale. You can change the scale of an annotation in the drawing, and that doesn't change the calibration of the drawing.
- On the annotations toolbar, select the Measurement tool
 , then the Calibration tool
  .
. - Select the drawing and draw a line.
- In the calibration pop-up, enter a value and select a unit of measurement.
- Select a decimal or fraction for precision.
- Select Set.
Calibration tool
A calibration pop-up displays.
The value must be greater than zero.
If you select feet or inches as the unit of measurement, you can toggle on fractional units, which allows you to create a measurement annotation that uses fractions rather than decimals. Fractions may display differently in web. For example, a distance measurement in mobile displays as 3' 1-11/16", while in web it displays as 3 1/8 ft.
The calibration is set and the calibration line is removed.
Snap
Once you turn on snapping, it will apply to any modifications you make to your annotation, as well as for the next measurement annotation you create.
The snapping default setting is on. You can toggle snapping off when you open a drawing.
- In a drawing, select a distance, perimeter, or area annotation.
- Select Edit.
- Select Style.
- For an iOS device, in the Snapping section, select the toggle to turn snapping on or off.
- To close the drawer, select anywhere on the drawing or select x.
A quick style menu displays.
A style drawer displays.
—Or—
For an Android device, in the Snap to points section, select the toggle to turn snapping on or off.
iOS
Create
- Open the Drawings record.
- Select
 to download a drawing.
 - Select the drawing to open it.
- On the annotations toolbar, select the Measurement tool .
- If your calibration isn't set yet, calibrate the drawing.
- To make a distance tool annotation, select the Distance tool
 .
. -
Select the drawing and draw the line.
A style quick menu displays.
-
To edit your annotation, select Style to adjust color, thickness, opacity, scale, precision, or border style, or to toggle snapping on or off.
Once you turn on snapping, it will apply to any modifications you make to your annotation, as well as for the next measurement annotation you create.
—Or—
- To close the Style or Info drawer, select anywhere on the drawing or select x.
If your calibration is already set, the measurement tools are available in the annotation toolbar. You can recalibrate the drawings at any time.
The Distance tool is highlighted in blue.
You can access the style quick menu at any time by selecting your annotation, then selecting Edit.
Select Info to view the distance, angle, x-axis, or y-axis.
—Or—
Select Link to attach the annotated drawing to a record.
—Or—
Select Copy to duplicate your annotation.
—Or—
Select Delete to remove an annotation.
- Open the Drawings record.
- Select to download a drawing.
- Select the drawing to open it.
- On the annotations toolbar, select the Measurement tool .
- If your calibration isn't set yet, calibrate the drawing.
- To make a perimeter tool annotation, select the Perimeter tool
 .
. - Use your finger to draw the first line, then add connected lines.
- To draw additional lines, select the endpoint of your first line and draw the next line. For each connected line, select for the endpoint.
- To save the annotation, select the highlighted Perimeter tool on the annotation toolbar.
-
To edit your annotation, select Style to adjust color, thickness, opacity, scale, precision, or border style, or to toggle snapping on or off.
Once you turn on snapping, it will apply to any modifications you make to your annotation, as well as for the next measurement annotation you create.
—Or—
- To close the Style or Info drawer, select anywhere on the drawing or select x.
If your calibration is already set, the measurement tools are available in the annotation toolbar. You can recalibrate the drawings at any time.
The selected Perimeter tool is highlighted in blue.
A style quick menu displays for your annotation and the perimeter tool is no longer highlighted on the toolbar.
You can access the style quick menu at any time by selecting your annotation, then selecting Edit.
Select Info to view the perimeter measurement and angle.
—Or—
Select Link to attach the annotated drawing to a record.
—Or—
Select Copy to duplicate your annotation.
—Or—
Select Delete to remove an annotation.
- Open the Drawings record.
- Select to download a drawing.
- Select the drawing to open it.
- On the annotations toolbar, select the Measurement tool .
- If your calibration isn't set yet, calibrate the drawing.
- To make an area tool annotation, select the Area tool
 .
. - Use your finger to draw the first line, then add connected lines.
- To draw the second line, select the endpoint of your first line and draw the line. For each additional connected line select the endpoint for the previous line.
- To save the annotation, select the highlighted Area tool on the annotation toolbar.
-
To edit your annotation, select Style to adjust stroke or fill color, thickness, opacity, scale, precision, or border style, or to turn snapping on or off.
Once you turn on snapping, it will apply to any modifications you make to your annotation, as well as for the next measurement annotation you create.
—Or—
- To close the Style or Info drawer, select anywhere on the drawing or select x.
If your calibration is already set, the measurement tools are available in the annotation toolbar. You can recalibrate the drawings at any time.
The selected Area tool is highlighted in blue.
A style quick menu displays.
You can access the style quick menu at any time by selecting your annotation, then selecting Edit.
Select Info to view the area and angle.
—Or—
Select Link to attach the annotated drawing to a record.
—Or—
Select Copy to duplicate your annotation.
—Or—
Select Delete to remove an annotation.
Edit
- Open a drawing.
- Select a distance annotation.
- Select Edit.
- To move the distance annotation, select the line, then drag it where you would like it placed.
- To save your changes, select anywhere on the drawing.
A quick menu displays and blue endpoints display on the line.
—Or—
To adjust the length of your annotation, select a line endpoint, then drag it to lengthen or shorten it.
—Or—
To change the angle of the line, select an endpoint, then drag it to increase or decrease the angle.
- Open a drawing.
- Select a perimeter or area annotation.
- Select Edit.
- Select inside the annotation and then drag it where you would like it placed.
- To save your changes, select anywhere on the drawing.
A quick menu displays and blue endpoints display on the annotation.
- Open a drawing.
- Select a perimeter or area annotation.
- Select Edit.
- To adjust the shape of your annotation, select an endpoint, and drag it.
- To save your changes, select anywhere on the drawing.
A quick menu displays and blue endpoints display on the annotation.
- Open a drawing.
- Select a distance, perimeter, or area annotation.
- Select Edit.
-
To edit your annotation, select Style to adjust stroke color, thickness, or opacity, scale, precision, or border style, or to turn snapping on or off. For an area annotation you can also select a fill color.
Once you turn on snapping, it will apply to any modifications you make to your annotation, as well as for the next measurement annotation you create.
—Or—
- To close the Style or Info drawer, select anywhere on the drawing or select x.
- To return to the Drawings list, select x.
A style quick menu displays.
Select Info to view the area and angle for an area annotation, perimeter and angle for a perimeter annotation, or distance, angle, x-axis, and y-axis for a distance annotation.
—Or—
Select Link/Unlink to either attach the annotated drawing to a record or remove the attachment from a record.
—Or—
Select Copy to duplicate your annotation.
—Or—
Select Delete to remove an annotation.
Android
Create
- Open the Drawings record.
- Select to download a drawing.
- Select the drawing to open it.
- On the annotations toolbar, select the Measurement tool .
- If your calibration isn't set yet, calibrate the drawing.
- To make a distance tool annotation, select the Distance tool .
-
Select the drawing and draw the line.
A style quick menu displays.
-
To edit your annotation, select Style to adjust stroke color, opacity, or style, line weight, scale, or precision, or to toggle snapping on or off.
Once you turn on snapping, it will apply to any modifications you make to your annotation, as well as for the next measurement annotation you create.
—Or—
- To close the Style or Info drawer, select anywhere on the drawing or select x.
If your calibration is already set, the measurement tools are available in the annotation toolbar. You can recalibrate the drawings at any time.
The Distance tool is highlighted in blue.
You can access the style quick menu at any time by selecting your annotation, then selecting Edit.
Select Info to view the distance, angle, x-axis, or y-axis.
—Or—
Select Link to attach the annotated drawing to a record.
—Or—
Select Copy to duplicate your annotation.
—Or—
Select Delete to remove an annotation.
- Open the Drawings record.
- Select to download a drawing.
- Select the drawing to open it.
- On the annotations toolbar, select the Measurement tool .
- If your calibration isn't set yet, calibrate the drawing.
- To make a perimeter tool annotation, select the Perimeter tool .
- Use your finger to draw the first line, then add connected lines.
- To draw additional lines, select the endpoint of your first line and draw the next line. For each connected line, select for the endpoint.
- To save the annotation, select the highlighted Perimeter tool on the annotation toolbar.
-
To edit your annotation, select Style to adjust stroke color, opacity, or style, line weight, scale, or precision, or to toggle snapping on or off.
Once you turn on snapping, it will apply to any modifications you make to your annotation, as well as for the next measurement annotation you create.
—Or—
- To close the Style or Info drawer, select anywhere on the drawing or select x.
If your calibration is already set, the measurement tools are available in the annotation toolbar. You can recalibrate the drawings at any time.
The selected Perimeter tool is highlighted in blue.
A style quick menu displays for your annotation, your perimeter annotation is surrounded by a blue box, and the perimeter tool is no longer highlighted on the annotations toolbar.
You can access the style quick menu at any time by selecting your annotation, then selecting Edit.
Select Info to view the perimeter measurement and angle.
—Or—
Select Link to attach the annotated drawing to a record.
—Or—
Select Copy to duplicate your annotation.
—Or—
Select Delete to remove an annotation.
- Open the Drawings record.
- Select to download a drawing.
- Select the drawing to open it.
- On the annotations toolbar, select the Measurement tool .
- If your calibration isn't set yet, calibrate the drawing.
- To make an area tool annotation, select the Area tool .
- Use your finger to draw the first line, then add connected lines.
- To draw the second line, select the endpoint of your first line and draw the line. For each additional connected line select the endpoint for the previous line.
- To save the annotation, select the highlighted Area tool on the annotation toolbar.
-
To edit your annotation, select Style to adjust stroke color, opacity, or style, line weight, scale, or precision, or to turn snapping on or off.
Once you turn on snapping, it will apply to any modifications you make to your annotation, as well as for the next measurement annotation you create.
—Or—
- To close the Style or Info drawer, select anywhere on the drawing or select x.
If your calibration is already set, the measurement tools are available in the annotation toolbar. You can recalibrate the drawings at any time.
The selected Area tool is highlighted in blue.
A style quick menu displays for your annotation, your perimeter annotation is surrounded by a blue box, and the perimeter tool is no longer highlighted on the annotations toolbar.
You can access the style quick menu at any time by selecting your annotation, then selecting Edit.
Select Info to view the area and angle.
—Or—
Select Link to attach the annotated drawing to a record.
—Or—
Select Copy to duplicate your annotation.
—Or—
Select Delete to remove an annotation.
Edit
- Open a drawing.
- Select a distance annotation.
- Select Edit.
- To move the distance annotation, select the line, then drag it where you would like it placed.
- To save your changes, select anywhere on the drawing.
A quick menu displays.
—Or—
To adjust the length of your annotation, select a line endpoint, then drag it.
—Or—
To change the angle of the line, select an endpoint, then drag it to increase or decrease the angle.
- Open a drawing.
- Select a perimeter or area annotation.
- Select Edit.
- Select inside the annotation and then drag it where you would like it placed.
- To save your changes, select anywhere on the drawing.
A quick menu displays and the annotation is surrounded by a blue box.
- Open a drawing.
- Select a perimeter or area annotation.
- Select Edit.
- To adjust the shape of your annotation, select an endpoint, and then drag it.
- To save your changes, select anywhere on the drawing.
A quick menu displays and the annotation is surrounded by a blue box.
- Open a drawing.
- Select a distance, perimeter, or area annotation.
- Select Edit.
-
To edit your annotation, select Style to adjust stroke color, opacity, or style, line weight, scale, or precision, to turn snapping on or off, or to choose a preset stroke color.
Once you turn on snapping, it will apply to any modifications you make to your annotation, as well as for the next measurement annotation you create.
—Or—
- To close the Style or Info drawer, select anywhere on the drawing or select x.
- To return to the Drawings list, select x.
A style quick menu displays.
Select Info to view the area and angle for an area annotation, perimeter and angle for a perimeter annotation, or distance, angle, x-axis, and y-axis for a distance annotation.
—Or—
Select Link/Unlink to either attach the annotated drawing to a record or remove the attachment from a record.
—Or—
Select Copy to duplicate your annotation.
—Or—
Select Delete to remove an annotation.