ProjectSight Mobile
Take ProjectSight's cloud-based construction project management software with you in the field on your phone or tablet.


In Crystal Reports, you can create or edit a report file (.rpt) that can be uploaded into ProjectSight as a custom report template. Download the .xsd files and then create a report file, or edit an existing report file.
For detailed information on using Crystal Reports, refer to their documentation.
- On the project selection page, select
 (Settings) on the project tile or row.
 - In the Portfolio settings section of the menu, select Reports.
- Select the item type.
- On the settings menu, select Reports.
—Or—
In the project, select ![]() (Settings) on the banner.
(Settings) on the banner.
- In the ProjectSight report settings on the navigation toolbar, select
 (Download).
All the .xsd files for the record type are downloaded in a ZIP folder.
If you rename the .xsd files, the file upload will fail for the custom report in ProjectSight.
- In the ProjectSight report settings, select a report.
- In the panel, select Download Report File.
After you download the .xsd files for a record type, use them to create a new .rpt file in Crystal Reports. You can use the general .xsd file in the report file, and then insert subreports that use specific .xsd files.
Custom fields are included in the general .xsd file with the prefix udf_.
| Record type | File name |
|---|---|
| Action items | HotList.xsd |
| Applications for payment | ApplicationForPay.xsd |
| Budgets | Budget.xsd |
| Change order requests | ChangeOrderRequests.xsd |
| Checklists | Checklists.xsd |
| Contract invoices | ContractInvoices.xsd |
| Contracts | Contracts.xsd |
| Cost forecasts | Forecast.xsd |
| Daily reports | DailyReports.xsd |
| Drawings | Drawings.xsd |
| Drawing sets | DrawingSets.xsd |
| Field work directives | FieldWorkOrders.xsd |
| General invoices | GeneralInvoices.xsd |
| Issues | Issues.xsd |
| Meeting minutes | Meetings.xsd |
| Notices to comply | Notices.xsd |
| Potential change orders | PotentialCO.xsd |
| Prime contract change orders | PrimeContractCO.xsd |
| Punch items | PunchList.xsd |
| Purchase orders | PurchaseOrders.xsd |
| Requests for information | RFI.xsd |
| Safety notices | Safety.xsd |
| Specification sets | SpecSet.xsd |
| Specifications | Specification.xsd |
| Subcontract change orders | SubcontractCO.xsd |
| Submittal packages | SubmittalPackages.xsd |
| Submittals | SumittalRegister.xsd |
| Transmittals | Transmittals.xsd |
- On the toolbar, select File > New > Blank Report.
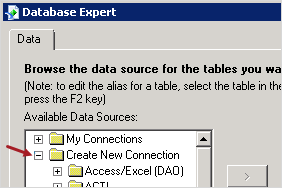
- In the Database Expert dialog, in the Available Data Sources section, expand the Create New Connection group.
- To the left of the ADO.NET (XML) group, select +.
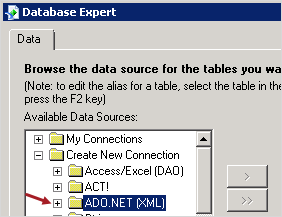
- In the ADO.NET (XML) dialog, to the right of the File Path field, select
 .
. - Select an .xsd file, such as the general file for the record type, and then select Finish.
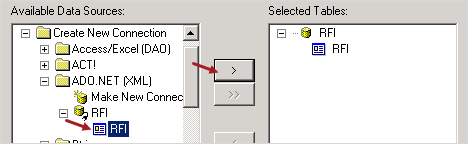
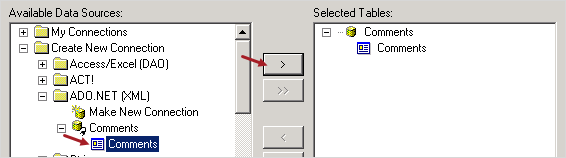
- In the Available Data Sources section, select the table, and then add it to the Selected Tables section.
- Select Finish.
If the ADO.NET (XML) dialog doesn't open, double-click Make New Connection in that group.
You can add the fields from the Field Explorer to the report file.
In the report file, you can create subreports that can be inserted in the main report file.
- On the toolbar, select Insert > Subreport.
- Select Create a subreport with the Report Wizard.
- Enter the report name, and then select Report Wizard.
 Create a new connection for the data source.
- Select OK.
—Or—
In the My Connections group, select a table, and then add it to the Selected Tables section.
You can add the fields from the Field Explorer to the subreport.
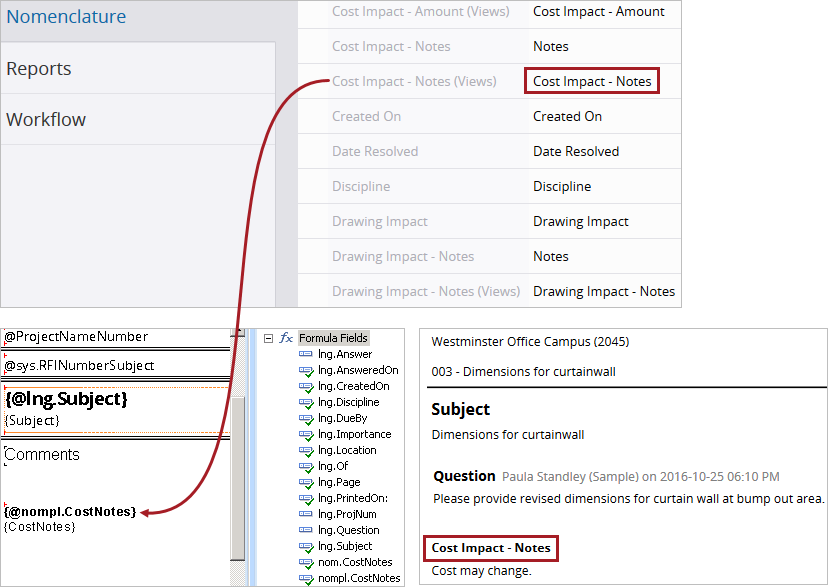
You can create formula fields that use the field and picklist nomenclature from ProjectSight. Picklist nomenclature, identified by the word (Views) in the system name, is used for differentiating between two fields with the same label and for fields with ambiguous labels.
When you create a formula field in the report file, use a prefix for the formula name:
- nom. - For field nomenclature.
- nompl. - For picklist nomenclature.
You want to include the cost impact notes field in an RFI report. Because RFIs have multiple fields for notes, you create a formula field using Cost Impact - Notes (Views) instead of Cost Impact - Notes.
You can upload an .rpt file to add a custom report template.
The data group in the file must match the record type.
- Create or edit a report file in Crystal Reports.
- In ProjectSight report settings, on the navigation toolbar, select
 (Create).
 - Enter the title, subtitle, and description.
- Select Upload Report File, and then select the .rpt file.
- To grant access to the report template, select Modify Permissions, and then select the roles.
- Select Create.
The title and subtitle combination must be unique for the record type.