User interface
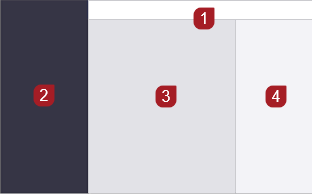
The ProjectSight user interface consists of the following areas:
- Navigation toolbar: Displays the navigation elements, page titles, and buttons related to the selected area or module.
- Navigation menu: Displays the major areas (Portfolio and Project) and modules that you can open.
- Content area: Displays the content associated with the selected area, module, or view. You can customize the view in the content area.
- Right-side panel: Displays information or actions related to the content area. For more information, see Panels.
Your permissions affect what's available and what you can do in the different areas.
You can open various applications from ProjectSight. On the topbar, the app switcher may contain the following links, which depend on your account type and permissions:
- External links
- MEP solution links
- Trimble Connect
- Viewpoint Spectrum module links
- Viewpoint Vista module links
Viewpoint Spectrum or Viewpoint Vista module links are available if the portfolio is part of an account with the associated ERP link type, which is set by ProjectSight Support.
- Open a portfolio that is part of an account with the Viewpoint Spectrum or Viewpoint Vista ERP link type.
- Set up the security roles.
- In the portfolio settings, click Security Roles.
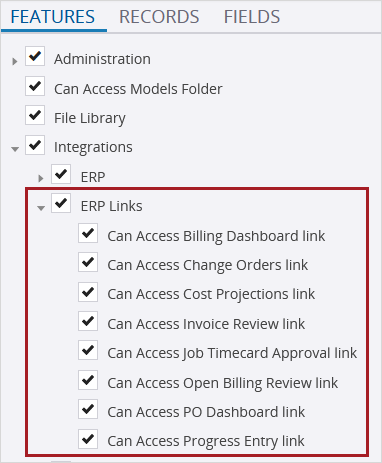
- In the security role that will set up the links, select the following feature permissions:
- Integrations > ERP > Link Companies
- Integrations > ERP > Link Projects
- In the security roles that will have access to the links, select the applicable feature permissions in the Integrations > ERP Links section.
- Select the ERP company.
- In the portfolio settings, click Companies.
- On the navigation toolbar, click swap_vertical_circle (Import/Export) > Link to ERP.
- In the ERP Company field, select a company.
- Click Link > Confirm.
- On the General tab of the project settings, select the Link this Project to ERP check box, and then select a project.
Feature permissions for Viewpoint Vista module links

ERP Company field
- On the topbar, click apps (App switcher), and then click a link.
Contact cards represent people who are associated with the project, record, or file. These cards are displayed in places such as the Information panel or Contact Info tab of records.

- On the contact card, click the profile picture or
 (Profile).
The contact information comes from the company record in ProjectSight for the web.
- On the contact card, click the profile picture or (Profile).
- In the contact popover, click the email address.
The email address is copied into a new message from your default email program.
- On the contact card, click more_horiz (More).
The available actions depend on where the contact card appears.
In the content area, you can set up the data view according to your preferences. Your customized view is retained in ProjectSight for iPad but isn't synced to ProjectSight for the web.
- At the top-right of the view, click apps (Tile) or list (List).
- At the top-right of the view, click the Group list, and select an option.
Within each group, the items are sorted by the number in ascending order.
- At the top-right of the view, click the Sort list, and select an option.
- To sort the items in descending order, click the sorting option again.
The items are sorted alphanumerically in ascending order by the selected option and then by the number.